RON HAZELTON:
I'm heading to Florida's largest inland city. Now every year, 52 million tourists travel here to meet Mickey, Donald and Goofy and to enjoy Sea World and Universal Resort. Yep, I'm on my way to Orlando where I'm meeting up with Ro and Ashley Jones.
So what were you thinking about?
RO JONES:
Well, we like to grill, we like to spend a lot of times outdoors, and then part of that is, is eating outdoors and really enjoying it. So ah, we just, we need some help, need a lot of help.
ASHLEY JONES:
A little atmosphere.
RO JONES:
Exactly.
RON HAZELTON:
So we're sort of talking about creating an outdoor eating area back here.
RO JONES:
Yes.
ASHLEY JONES:
Yes.
RON HAZELTON:
Okay. So I'm thinking about maybe building a table -
RO JONES:
Okay.
RON HAZELTON:
-- together out of wood.
RO JONES:
Okay, all right.
ASHLEY JONES:
Okay.
RON HAZELTON:
-- come up with our own design. And then maybe, I don't know, a couple of planters, ah, to sort of define this a little bit more.
RO JONES:
That would be nice.
ASHLEY JONES:
Yeah, I'd like that.
RO JONES:
That would be nice.
RON HAZELTON:
We move inside where I've created the components of the table on my laptop computer.
So we'll start out with some legs.
RO JONES:
Right.
RON HAZELTON:
And we'll make these, I think, out of some four by four. It is, you know, make these a little bit --
[BOTH SPEAK AT ONCE]
RO JONES:
And they're notched at the top right there?
RON HAZELTON:
Notched at the top.
The notches or tenons will support a frame which will serve as the foundation for the table top. After printing the designs, we move to a work station I've set up outside.
RO JONES:
Now what are, what are the grooves there, Ron?
RON HAZELTON:
I'm gonna leave some spaces between the two by fours. Part of that is aesthetics. I think it will look nice. Part of it is because the table is outside and it's gonna expand and contract.
ASHLEY JONES:
Smart.
RON HAZELTON:
So I want to, I don't want to push the table apart if the wood were to swell, so we'll leave those spaces in there.
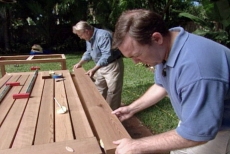
The table will be built entirely from cedar. So after making a cut list, Ashley and Ro use my power miter saw to cut all the lumber to size at one time. Our next step is to notch out the tenons at the top of each leg.
And then what's gonna happen is, when we put the table together, that tenon is gonna go up inside here and the rails will have attached to it. All right.
ASHLEY JONES:
Oh, nice.
RON HAZELTON:
Prior to cutting, we have to lay out cut lines on the leg. Using a combination square as a gauge, I first determine the thickness of the rail, then transfer that measurement to the leg.
And we'll draw a line here.
ASHLEY JONES:
Wow.
RON HAZELTON:
All right, okay.
ASHLEY JONES:
Mm-hmm [AFFIRMATIVE].
RON HAZELTON:
Now we're gonna keep this,
ASHLEY JONES:
Okay.
RON HAZELTON:
So this is gonna go away and this is gonna go away and that's gonna go away. Now what I want to do is set the combination square to the width of the board. Tighten this up and then we'll kind of use this as a gauge. Then we'll just slide it along like this.
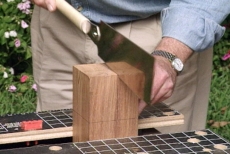
Ashley takes over and continues the line around the other three sides. Finally we extend the lines we drew on the top of the leg to those we drew on the sides, and now we're ready to cut out the tenons with my Japanese handsaw.
Well, a conventional western saw cuts as you push it. This saw cuts as you pull it. So you can almost think of, of sort of just a slicing action like you were, you were just slicing off some bread or a roast beef or in this case, a four by four piece of cedar.
[ASHLEY LAUGHS]
I'm just gonna get this started for you here.
Ashley takes over cutting along each of the vertical lines. Then we reposition the piece and she makes the necessary cross cuts to form the shoulder of the tenon.
ASHLEY JONES:
Whoa.
RON HAZELTON:
Beautiful, beautiful.
ASHLEY JONES:
All right.
RON HAZELTON:
Well, there's your first joint, right there.
ASHLEY JONES:
Great.
RON HAZELTON:
The five pieces that make up the frame are all two by fours, which we'll attach together with screws. First, we lay out the two end rails and Ashley drills a pair of holes through the ends.
ASHLEY JONES:
Beautiful.
RON HAZELTON:
Now I call these, ah, shank holes or clearance holes because they're large enough to allow the shank or the shaft of the screw to drop all the way through.
ASHLEY JONES:
Oh, okay.
RON HAZELTON:
And we only want the thread of the screw to bite into the second piece of wood that this is going to be attached to. Not into the first one, right.
In order to conceal the screw heads, Ro uses a countersink bit to create a shallow hole slightly larger than the screw head. Next, we bore similar holes and countersinks in the middle of the side rails. This is where our cross brace will go.
Assembly time. Okay, you got the holes all drilled, the countersink's done. Now we're gonna put some glue on this.
ASHLEY JONES:
Okay.
RON HAZELTON:
So Ashley, why don't you take this end.
ASHLEY JONES:
Okay.
RON HAZELTON:
Paint some on here, down to the line and then paint some on the end of this side rail.
ASHLEY JONES:
Okay.
RON HAZELTON:
Ro, you can do the same over here.
RO JONES:
Oh great.
RON HAZELTON:
After brushing glue onto the ends of both rails, we join them together, make sure they're flush on the ends, then drive in screws. We repeat the process on the opposite side, then move on to the cross brace. Okay.
RO JONES:
That's for those really big meals, right?
RON HAZELTON:
Yeah, yeah, for the for the holiday feast. You don't want this table sagging in the middle.
RO JONES:
That's right.
RON HAZELTON:
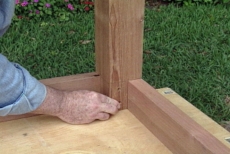
With our frame assembled, Ro bores shank holes through the tenons one each leg. While Ashley looks after Kai, Ro and I are left alone to attach the legs and maybe do a little male bonding.
Number two.
RO JONES:
Yes. You want me to put in your last screw or you up to that.
RON HAZELTON:
Let's go independently here, all right?
RO JONES:
Oh, independent? Trying to get a real head start on me. [LAUGHS]
RON HAZELTON:
Still working on it, huh? We ready?
RO JONES:
That's good.
RON HAZELTON:
Let's just take it up instead of down.
RO JONES:
Okay.
RON HAZELTON:
Sort of an important moment, you know, it's like it's standing on its own two legs.
RO JONES:
Will it stand? [LAUGHS] Wow, this is very sturdy. Okay.
RON HAZELTON:
Okay, there's the base.
RO JONES:
Very nice.
RON HAZELTON:
Say, could you stand right here? Just check --this joint looks like it might be a little bit high.
RO JONES:
Whoa -- [LAUGHS] I, I knew where that was going. [LAUGHS]
[LAUGHTER]
[MUSIC]
So we're ready for the,ah, the top now and we're gonna make that up out of two by fours right here. And then on the ends and the sides, we're going to put on two by sixes that will sort of frame all of this. And the way that we're going to attach everything together is with this system right here. These are called biscuit joinery.
ASHLEY JONES:
Okay.
RON HAZELTON:
And, ah, what we'll do is we'll be cutting some slots like this in the edge of the wood.
AHHLEY JONES:
Mm-hmm [AFFIRMATIVE].
RON HAZELTON:
Dropping in these biscuits which are compressed pieces of wood, we'll put some glue in there first.
And then we'll assemble the joint like this and the glue actually will cause that wood to swell and so the joint will be held together by the swollen biscuit, if you will, and the glue.
ASHLEY JONES:
Wow.
RON HAZELTON:
And we'll do that every place one of these two by fours meets this end piece right here, okay.
ASHLEY JONES:
Mm-hmm [AFFIRMATIVE].
RON HAZELTON:
So step one is to cut the slots and we're gonna do that with this tool right here. This is called a plate joiner.
RO JONES:
Okay.
RON HAZELTON:
And its only purpose in life is to cut the slots into which those biscuits go. There's a blade, you can see it right there.
ASHLEY JONES:
Mm-hmm [AFFIRMATIVE].
RON HAZELTON:
It sticks out. I'll turn this on for you. You see it spinning?
RO JONES:
Mm-hmm [AFFIRMATIVE].
ASHLEY JONES:
Wow. Look at that.
RON HAZELTON:
There it goes. So we're gonna put this in position, we're gonna turn it on, we're gonna push this into the edge of the wood and it will cut that slot for us automatically.
ASHLEY JONES:
Wow.
RON HAZELTON:
All right. Now you see, guys, we've got a center mark drawn on each one of these. All we have to do is set this in place, and there's a red line there on the top of the plate joiner. Just line it up with the mark in the center of the wood, turn it on.
Push it all the way in until it stops.
ASHLEY JONES:
Okay.
RON HAZELTON:
Then pull it back out again, move onto the next one. Line up the two marks -- okay.
Ashley and Ro complete the first set of slots, then I adjust the blade, lowering it from the base. This allows us to make the second set of slots about half an inch below the first. We repeat the process on the two by six end frames.
All right you guys, you ready for some biscuits and glue?
RO JONES:
Sounds, ah, sounds great.
RON HAZELTON:
We brush exterior grade glue into the slots of the end frames, then do the same with the slots in the ends of our two by fours. This glue has a short work life. On a day like this, it could lose its bonding ability in as little as 10 minutes.
RO JONES:
So what you're saying is, hurry up, guys.
ASHLEY JONES:
Work fast.
[LAUGHTER]
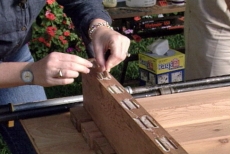
RON HAZELTON:
Now we're just gonna drop the biscuits --
ASHLEY JONES:
Okay.
RON HAZELTON:
-- into this end piece. You guys, just go right down the line there.
ASHLEY JONES:
Great.
RON HAZELTON:
Push them all the way down.
ASHLEY JONES:
Go fast.
RON HAZELTON:
Go fast.
ASHLEY JONES:
We'll have a race.
[MUSIC]
RO JONES:
Finished.
RON HAZELTON:
Let's take this now. Okay. And Ro, you can do the same thing.
RO JONES:
Okay.
RON HAZELTON:
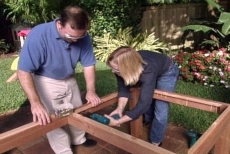
We slide the end frames into place, then secure them with pipe clamps as the glue begins to set and the biscuits expand. Our next step is to install wood cleats along the inside of the table frame. These will enable us to attach the table top later on. After Ro bores the clearance holes, we apply glue, then secure the cleats with screws.
All right, that takes care of that, guys. Now I want to deal with these screw holes right here. We're gonna actually make those disappear.
There are a couple of ways to fill countersunk screw holes like this. One is to purchase these buttons. You'll find these at most home improvement centers or woodworking supply shops.
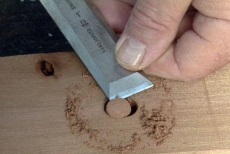
They just sit right in here. You give these a tap with a hammer, of course you put a little glue in first to hold them in place. Now this is gonna actually not hide the holes so much, but make it decorative. You want to make this hole disappear completely. I'll show you how to do that. Take a piece of scrap wood that closely matches the wood that the hole is in, and this is called a plug cutter. It's just in my drill here. And I've put the drill into a portable drill press.
We're just gonna drill down into this block of wood right here. There you go, there's our plug. Gonna pop it out like that. Okay. Take a little glue, put it on the base of the plug. Okay, put the plug in position. Now the plug has a grain, so we want to align the grain with the grain of the wood. In this case, it's running horizontally.
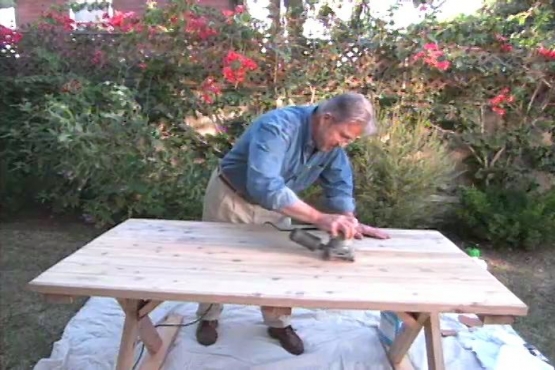
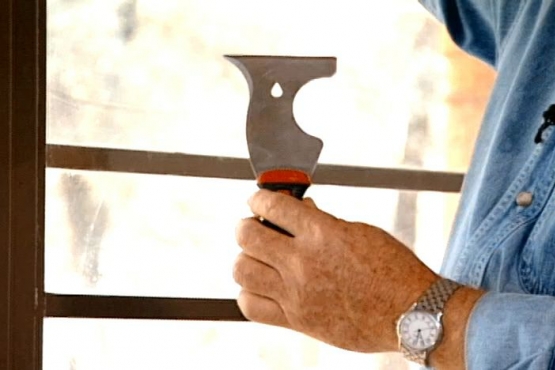
Tap it in place with a hammer. We let that dry for a few minutes and then take the chisel and trim off the excess. Finally, sand the surface flush. So there you go. Buy a plug or make your own.
With the end frames in place, we use the same biscuit joining techniques to attach the side frames. After the glue has dried, we set the completed tabletop onto the base and attach it by driving screws through the cleats we installed earlier. Finally it's time to seal the wood.
Ashley and Ro have to choose between a clear sealer or a tinted one.
RO JONES:
Ah,I like the subtle. I mean I like the, the natural -- the look of it. Let it all just kind of happen naturally.
ASHLEY JONES:
Right. Especially because cedar's so nice. I mean it really is nice.
[BOTH SPEAK AT ONCE]
RO JONES:
We've, we've made a big decision here.
RON HAZELTON:
All right guys, now here's what I'm gonna suggest. Let's take the brush. Gotta go sideways first, go down in here and get the edges of the wood.
ASHLEY JONES:
Okay.
RON HAZELTON:
That's really important because that will get wet down there. This sealer has -- will protect not only from water but it will also protect from mildew and give some ultraviolet protection. Ultraviolet rays do break down wood cells. Though the clear sealer goes on somewhat dark, it will lighten as it dries.
After applying the sealer, our table is complete, and now we're ready to shift our focus to the planters.
These are some of the plants that I'd like to put in it. These were selected by the way, because they grow particularly well right in this area.
RO JONES:
Okay.
RON HAZELTON:
But before we put these in, we've gotta build the planters. So come over here, let me show you my idea. It's essentially a box but we've added some detail with these heavy legs and with this lip up here on the top.
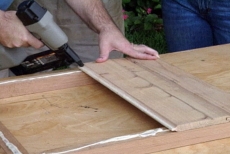
We begin by assembling two by twos to form the frames for each side panel. After running a bead of construction adhesive over the face of the frame, we attach tongue and groove cedar strips. On the first strip, we shoot one nail through the face, then angle a second one through the tongue.
Right, now see, this is the groove right here. There's the tongue.
ASHLEY JONES:
Yes.
RON HAZELTON:
So we'll just lay this on, push it up tight, press it down into the adhesive. Okay, Ro, then you're gonna put your angled nail in, and see, you won't have any more visible nails now until we get way over to the end.
ASHLEY JONES:
Okay.
RON HAZELTON:
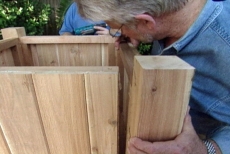
Once all four sides are assembled, we use construction adhesive and screws to attach them to the legs.
Now we're going to attach these four together and we'll end up with a box which, for the time being, won't have a bottom in it, but it will eventually.
Next, with the planter lying on its side, we attach the top lip by driving in screws from inside the planter.
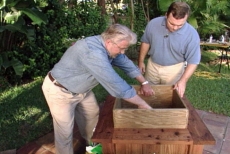
Now we've got the main part of the planter all done. What I want to do now is build an inner box or an inner liner out of this pressure-treated plywood. This is the part of the planter that the soil is actually gonna come into contact with.
RO JONES:
Okay.
RON HAZELTON:
We assemble the liner box, drill a number of drainage holes through the bottom, then attach handles so that the liner can be removed and replaced if necessary. We set the liner inside the planter and cover the drainage holes with a piece of landscape fabric.
On container plants like this, it's really important to use a very good quality potting soil.
While Ashley takes a break, Ro and I turn from carpentry to landscape design and soon, we're down to our final step.
Well, no outdoor eating area would be complete without a cooking device, right?
RO JONES:
Wow, it's gorgeous.
RON HAZELTON:
Beautiful new Weber gas grill there.
RO JONES:
It looks great.
ASHLEY JONES:
Looks great, probably tastes better. [LAUGHS]
RO JONES:
Join us at our brand new table. It's just --
RON HAZELTON:
Don't mind if I do.
RO JONES:
-- oh, it's so nice, Ron.
RON HAZELTON:
Yeah. How was it, how was the building of it?
ASHLEY JONES:
It was a lot easier than I thought.
RON HAZELTON:
Yeah.
ASHLEY JONES:
It turned out to be great.
RON HAZELTON:
Yeah?
ASHLEY JONES:
Yeah.
RON HAZELTON:
How about the saw, you get enough saw time?
ASHLEY JONES:
I did, I did, all the different types of saws. The Japanese saw, the power saw -- I loved it, and drilling too.
RON HAZELTON:
While outdoor furniture is easily purchased, I have to believe that every time Ro and Ashley entertain out here, they'll enjoy a special feeling. Their table and planters not only exhibit true craftsmanship, but they should be the source of many a good story at every outdoor party thrown here.