Well, it’s time to hit the road again. Today, I’m headed west … way, way west to Danville, California.
This is the home of Bill and Susan Drummond. They're long time friends of mine and I'm looking forward to seeing them again. Their daughter Jenny wants to create some better storage in her closet for her clothes, toys and games. And her brother Billy has agreed to help her.
Good organization begins with a good plan. And Jenny has a very clear idea of what she wants.
Well Jenny, this is a great drawing. You did this yourself, right?
JENNY:
[Affirmative].
RON HAZELTON:
Based on Jenny's drawing, I draw my own sketch, which I go over with the kids, just to make sure that I've gotten things straight. Jenny's closet organizer will consist of three sections. The ends of each section will have wooden legs connected together with lengths of copper pipe.
Those ends will then be attached to each other with more copper pipe, to form a freestanding frame. Finally, adjustable shelves will be added. Now that we're all agreed on the plan, we get ready to cut some uprights or legs that will form the ends.
Okay, so Billy, you got the tape measure. What we're going to do now is measure seven feet starting from this end right here down the length of this board. Pull it out and there's one foot. Perfect. That's it -- good. You got those saws that I sent you for your birthday?
JENNY:
[Affirmative].
RON HAZELTON:
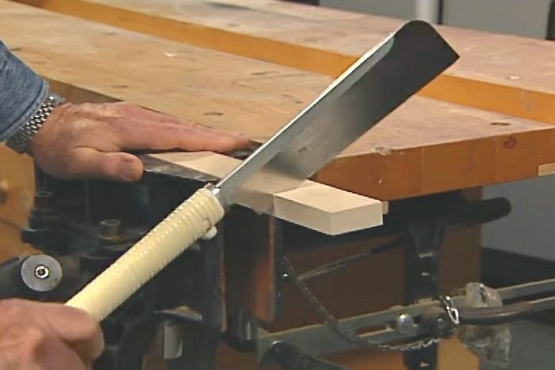
Can you get those? Think it's time to do some cutting. So what you have to do here is you have to sort of tip the saw up and sort of like -- like this and go down that line.
This is the first time Jenny is using the Japanese handsaw I gave her for her birthday. In minutes, she's got the hang of it. Look at that huh, what a nice first cut with that new saw.
Brother Billy wants to try too. So his sister gives him a quick lesson and shortly, he's on his own. Yay. Bill arrives home just in time for he and Susan to help the kids with the next step. Marking the locations for the holes into which we'll insert the copper pipe. For accuracy, we clamp the four uprights together and draw a single line across all of them at once.
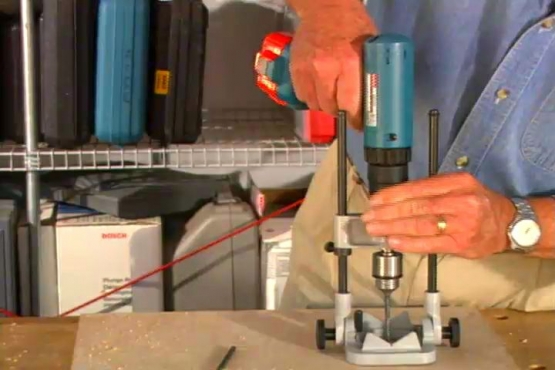
Now we're ready to drill the holes for our half inch copper pipes. It's important these holes be straight and perpendicular to the surface of the wood. To help us get the accuracy we need, we'll use this portable drill press, which attaches to any hand drill and helps us keep everything in alignment.
We'll only drill part of the way through the wood. This will keep the ends of the pipe from showing and prevent them from sliding out. After drilling our first set of holes, we rotate the uprights and get ready to bore a second set.
These holes are for the stretchers that will connect the ends together. Since this copper pipe will be larger, we use a larger drill bit. With the wooden uprights ready to go, we turn our attention to the copper pipe that will connect them together.
This is a pipe cutter right here. This is how we're going to cut the pipe. See this little wheel right here? Little sharp wheel. That's going to go right on the mark that I just made and then we're going to turn this knob down here and that's going to tighten this up.
Now what I'm going to do is, I'm going to -I'm going to rotate this around like that and every time I go around once, I'm going to tighten this a little bit. There we go. Now for the fun part. We're going to start actually putting this together kind of like, ah, I don't know, a giant Lego set.
We start by squeezing polyester glue into the holes for the cross pieces.
[SOT]
We're done, all right. Our first ladder. Let's high five this, guys. Yay.
After assembling the end sections, it's time to connect them together to form free standing frames. To do this, we once again apply glue to the holes, insert the stretchers into one end section and then set the other end section on top.
Everybody line up their pipe.
Now we repeat the process three more times.
Okay, give a little spin like this, twist them around. How we doing?
Well we did it. Three frames here. And you know, what I like about these is they're so light. You know, they really are light. Now though, I want to get the shelves made to go in here. Now this is called medium density fiberboard, some people call it MDF. The reason I'm using it is because the edges, when you cut them like this, are very, they're free of voids or holes. They're very clean and solid, okay.
The only problem is that this, like most shelves, would have a tendency to kind of bend or deflect over time. So we're going to have to add to the front edge here, what I call a stiffener or a cleat. It's going to go right on the front edge.
And then on the end of this, we're going to put a little hook. The hook will fit over the copper pipe on the ends. This hook will actually be a half hole that we'll make by clamping two boards together and drilling right where they meet.
Now see what we have here now are, two little hooks. And these little hooks are going to go right over that piece of pipe like that.
Now we glue the ledgers or stiffeners onto the shelf, flip the shelf over, drill a small pilot hole and nail the cleat in place. The nails will hold the stiffener until the glue dries. One section of our organizer calls for a hanging bar.
We'll make the brackets for the bar by first drilling an inch and five eighths hole in the center of a piece of one by three. The hanging rod itself is made from one and a half inch copper pipe which which we cut to length, using a hacksaw.
The pipe is inserted into the holes in the bracket and the bracket is screwed to the frame. Okay, it's time for installation. Bill and I move the frames into the closet and connect them together with screws.
And then bring it back to me a little bit more. Jenny helps me position the adjustable shelves. And there's your bookshelf. Huh? Let's go get Pokemon. So what do you think? Is that what you had in mind?
JENNY:
Kind of. I was -- I was just thinking that I play with my dinosaurs more than the stuff down here. So I was wondering if we could move this stuff up there and my dinosaurs down here.
RON HAZELTON:
Ai yi yi.
You know, one of the beauties of this organizer is its flexibility. Regardless of how much Jenny's preferences may change as she grows older, this system will easily adapt to her needs. After all, it's inevitable that dinosaurs will some day give way to designer clothing.