RON HAZELTON:
Anthony Dinello lives out in the country about an hour north of me. He loves spending time outdoors. But his deck has suffered from the weather and become a bit of an eyesore. It's well, sort of depressing. Together we're going to see if there isn't some beauty lurking beneath its dingy surface.
ANTHONY:
Yeah, so this is the deck. You know it's, it might be all of 5 years old.
RON HAZELTON:
That's all.
ANTHONY:
Yeah. It looks a lot worse than it is.
RON HAZELTON:
Have you ever put, since it was new, have you ever put another sealer on here?
ANTHONY:
Yes, the first year that I bought it, I sealed it and tried to take care of it. And -
RON HAZELTON:
Then it went downhill from there?
ANTHONY:
Since that point yeah.
RON HAZELTON:
You got some algae over here.
ANTHONY:
Right.
RON HAZELTON:
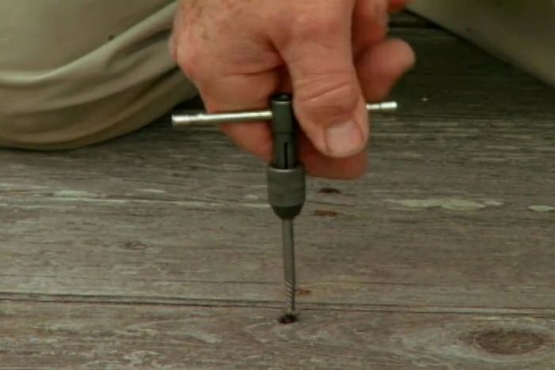
We'll want to take care of that. You notice the nails down here? Most of them are well set below the surface. But right down here, you know, you got a couple that are popping up. And I imagine there are a few more like this.
RON HAZELTON:
This punch like tool called a drip pin is my choice for resetting deck nails. The large blunt end drives nails below the wood surface without damaging the rust proof coating on their heads.
RON HAZELTON:
Now what's been going on over the last 4 years since there was a sealer put on here is the sealer kind of breaks down over time. And that allows the sunlight, ultra violet rays to sort of attack the surface of the wood if you will and discolor it.
But the other thing that's happening here is there's simply dirt that's fallen out of the air and collected on the surface of the deck. So what I want to do first of all, is give this a good cleaning with a deck wash, all right.
So - go ahead and pour this in.
RON HAZELTON:
The fastest way to get a cleaner like this on a deck is to apply it using a pump sprayer.
RON HAZELTON:
And the, the general idea is you don't want to apply any more of this than we can work in about 10 or 15 minutes.
RON HAZELTON:
A light brushing helps loosen the dirt and begins revealing the wood grain underneath.
RON HAZELTON:
All the stuff it's picking up.
ANTHONY:
It's a little like seeing an old friend come back.
RON HAZELTON:
It's really remarkable how much cleaning alone can improve the appearance of outdoor wood. I'm going to rinse off the deck using a power weather. A garden hose brings in household water at a pressure of around 60 to 80 pounds per square inch.
This pump then boosts that to over a thousand pounds. And pushes the water out through a hose and into an applicator wand. The high pressure water does an impressive job of rinsing and cleaning. It's so effective in fact that I need to be careful not to get the nozzle too close to the surface where it could actually etch away the wood.
It's also important to keep the wand moving and avoid leaving it trained on one spot
RON HAZELTON:
See, we're getting back to the natural color of the wood here. But there's still these dark areas, dark spots here - there's some over here.
So in order to get this looking more like it did when it was put down originally, we're gonna have to go to a brightener.
MAN:
Ron Hazelton's HouseCalls is being brought to you by The Home Depot.
[SOUND CUT]
RON HAZELTON:
My friend Anthony Dinello has been down in the dumps over his dingy deck. So I've dropped by to lend a hand. So far, we've reset the protruding nails and given the wood a good old fashioned cleaning and power washing. But the deck still has some stubborn spots.
And overall, is darker than I'd like it. I can solve that problem by applying a brightener, again using a pump sprayer. Anthony's at work today, so I'll be on my own. First, I wet the deck to slow down evaporation and keep the surface from drying out too quickly.
Next I spray on the brightener, wait a few minutes, then agitate the solution using a long handled brush. I work a fairly small area about ten boards wide. Finally I use the power washer and rinse the surface thoroughly. A couple of days later I'm back for the final step.
RON HAZELTON:
The water-proofer that I'm about to put down here is gonna do several things. It's gonna seal the deck against water penetration, add some color without obscuring the grain. Protect from the sun's ultraviolet rays and impede the growth of mildew.
That's quite a bit, isn't it?
Now I'm applying the water proofer to the railing with a brush, a 3-inch is working really well on these wide areas here. I'll probably change to something narrow for the balusters. And you notice I'm starting up here at the top.
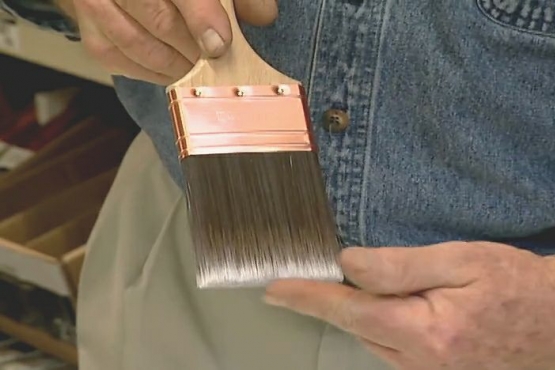
That way if they have any drips, I'll catch them as I work my way down. Now for the deck itself, I'm gonna use a different applicator. This is a painting pad. It's got a slightly rough surface right here. And that's gonna help me work this material into the pores or surface of the wood.
I'm applying the sealer with even strokes along the length of the boards, moving with the grain. One thin coat is enough. I'll make sure not to leave any puddles or pools. Applying the sealer to the sides of the deck boards is best done with a thin brush.
RON HAZELTON:
Look okay to you?
ANTHONY:
Looks great. It really does. It's like night and day.
RON HAZELTON:
You know it's just amazing what the cleaning and the brightening and then the sealer and stain will do. I mean it's surprising what's underneath there.
ANTHONY:
Yeah it was a mess. I thought actually I might at one point have to replace the deck.
RON HAZELTON:
I'd like you to do a little cleaning on this. Maybe you know take some soap and water and a scrub brush and just kind of wash it and rinse it off. That will, that will really prolong the life on this. And this should last you for maybe a couple years or more.
This finish that I put on here.
ANTHONY:
All right.
RON HAZELTON:
And then don't let it go quite so long next time. Because if you catch it just as - you know this, this finish is starting to wear out, you can just reapply the stain part of it. You don't have to go through all the brightening and stuff.
ANTHONY:
Okay.
RON HAZELTON:
Can you see yourself having a little cookout on here.
ANTHONY:
I certainly can. A nice Italian feast out here. We sure can you know. No problem at all with that.
RON HAZELTON:
Well listen, enjoy it.
ANTHONY:
Thank you, thank you very much.