How to Put in a Laminate Kitchen Countertop
Give Your Kitchen a Fast Face-life with a Pre-fabricated Countertop in an Updated Color with a New Sink
Take a day for a DIY project to update your kitchen with a new countertop and sink. This custom-ordered countertop comes from the factory pre-fabricated and laminated in the specified color and providing a partial cut-out for a designated sink size and configuration. Just remove the old sink and countertop and follow a few easy steps to install the new components.
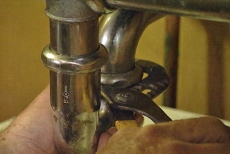
Disconnect the Water Supply Lines and Drain Pipes
Shut off both water valves under the kitchen countertop directly beneath the sink. Put a tray under the piping to catch residual water and then disconnect hot and cold water lines and the drain's P-trap.
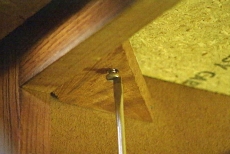
Loosen Fasteners and Remove the Countertop and Sink Unit
Remove screws and blocks that secure the old countertop. Use a utility knife to cut caulking at the backsplash and a pry bar and putty knife to loosen the countertop. Remove the countertop and sink as a unit.

Confirm the Size and Shape for the Pre-made Sink Cutout
Bring in the new pre-fabricated kitchen countertop and confirm that the sink cutout is the right size and shape for the new sink. Cut the cardboard sink template from the sink packing box and compare it to the countertop cutout.

Support the Cutout and Finish Cutting It with a Jigsaw
Use a jigsaw to finish sawing out the cutout. Screw some scrap lath strips into the top of the cutout--not into the countertop--to support the cutout while finishing the cut.

Position the New Laminated Kitchen Countertop
Set the kitchen countertop in place on the base cabinets. Helpers make the unwieldy countertop easier to handle. Secure the countertop to the cabinet base with wood screws and blocks in the same way that the original unit was attached.
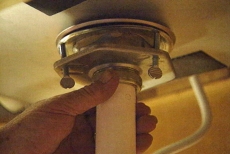
Apply Plumber's Putty and Install Sink Fixtures
Apply plumber’s putty to drain cutouts, working from the upper side of the sink. Insert and tighten each sink basket against the putty to make waterproof seals. Repeat the process to install the tap and faucet fixture. Clear excess putty.

Apply Waterproof Sealant and Position the Sink in the Countertop
Apply a bead of silicon sealant around the sink’s lip to ensure a watertight bond. Position the sink over the countertop cutout and drop it into place. Clean off excess sealant to make a neat seal.
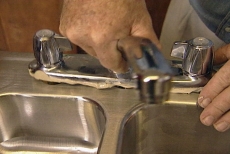
Attach the New Sink, Water Lines and Drain Components
Secure the sink to the counter. Attach both waterlines beneath the new sink. Apply pipe thread compound to the connecting threads on the drain components and tighten the compression nuts. Restart the hot- and cold-water supplies.
Blog Articles

Maximize Your Yield with DIY Netting for Strawberry Beds
Keep your strawberries safe from pests with our DIY strawberry cage netting solution. Learn how to create sturdy frames and find the best netting for your strawberry plants.

Change It Up: Swapping Out Your Light Switch Plates
Tired of boring light switch covers? Upgrade your home decor with this simple guide on replacing light switch plates and make a statement in every room.

Revamp Your Outdoor Space: How To Stencil A Concrete Patio
Learn how to create a stunning patterned concrete patio with our easy-to-follow instructions for stenciling. Upgrade your outdoor space in no time.


