RON HAZELTON:
You know, I really love arched arbors. I was fortunate enough to inherit this one when I got the house. As a matter of fact, I like them so much that I'm gonna put up another one.
Now there's really nothing wrong with this gate. It certainly works fine, but couldn't you just imagine this with an arch over the top, lattice panels on the side and maybe some day, some roses vining up the sides and over the top? Well, that's what I have in mind.
Now, when it comes to outdoor decorative structures like this, I have to admit, I have a preference for wood. But this wooden piece right here has given me some problems. I've got some dry rot here and down here. So for this project, I've chosen a material that has the beauty of wood but none of the disadvantages.
Well, here's the arbor. It's from Walpole Woodworkers. Now, even though this may look like wood, actually it's not. It's cellular PVC, a product called AZEK. Now cellular PVC works in machines pretty much like wood, but it has one great advantage and that is, it won't rot. Before I can begin putting my arbor in, I need to take out the existing gate. I'll also need to remove the fence sections on either side. To get this section out, I'll have to first cut the post near the bottom. Then I can pull the fence rails out of the opposite side.
One way to loosen the posts from their holes is to use a pickax or maddock like this one, to lever the posts up out of the ground. If ever there was a project where layout is important, well, this is it. The arbor is a four-sided structure and each corner post has to be in just the right spot.
I'm using this large square to make certain the sides are perpendicular to each other. The crossed strings indicate the exact center of each hole. I use a hole template and spray paint to mark the outlines, then remove the stakes and string.
Using a post spade, I cut through the turf and remove them. Then I switch to a post hole digger. This one by Fiskars has offset handles that will allow me to dig deeper and eliminate one of the most uncomfortable consequences of using this tool, banging my knuckles together.
Well, I've got the post holes dug. Now this job's probably gonna take me two or three days. So as you can see, I've had to take down the fence and the gate. So to make the pool child-safe, I put up my mesh fence back here. Now these things are really great.
They're portable, they go up in about 10 or 15 minutes and it will keep the pool safe for the kids while I'm doing my work out here. Now these are all the components for the arbor. I'm gonna be starting with the post. These are very interesting.
They actually have an extruded aluminum core right here and then the cellular PVC or the AZEK is actually wrapped around them. These are four separate boards with interlocking miters here. So I'm gonna begin by setting these.
I like to put a couple of inches of rock in the bottom of the hole for drainage, but more importantly today, to give me a moveable base that will allow the post to be readjusted downward with a simple twisting action. Once I have the post at roughly the correct height, I fill the hole about one third full, with more rock.
At this point, the post will support itself. So I remove the protective plastic wrap and reach for a post level. I love this tool because it's held in place with an elastic band, leaving both my hands free. Even better, it shows plumb or vertical in both directions, at the same time.
Next, I set the other front post the same way. Once I'm satisfied everything is plumb, I compact the rock, using the blunt end of a six foot steel pry bar.
[MUSIC]
My front two posts are in and they're partially set. Most importantly, they're plumb, perfectly vertical. Now, I'm gonna start installing these lattice panels. Now, because I want to have these exactly the same distance from the top of each post and because I'm working by myself today, rather than measure and mark each one of these posts, I've made up a gauge, it's a strip of plywood here, a stop on the top and I'm gonna clamp this on the post, like so.
And then, down here at the bottom, I'm gonna clamp on this block of wood. Now I just set the bottom of the panel on the top of the block. That will carry the weight, leaving my hands pretty much free to clamp the panel to the post.
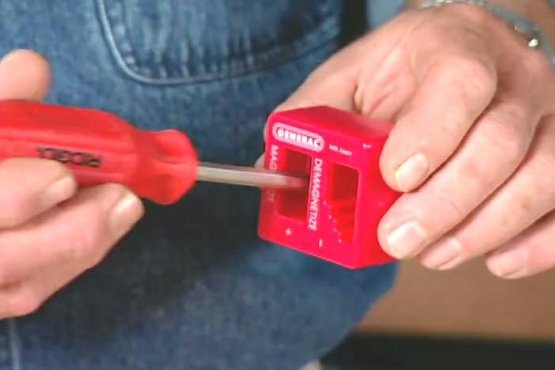
Now because these posts have this extruded aluminum core, I'm going to have to use a special fastener, and here it is right here. You look at the tip, you'll see that there's actually like a drill bit, machined into the end. This is a self tapping fastener. It will actually bore and tap itself right into the aluminum and it has a very small head, called a finish head.
First, I drill a clearance hole, large enough to accommodate the screw shaft. Then insert the self tapping screw and drive the drill point through the aluminum core, countersinking the head. In addition to being self tapping, these screws also have a rust-resistant finish. Eventually, I'll cover the recessed heads with spackle.
Next, I move to the other front post and repeat the process. First clamping the panel -- then screwing it in place. [SOUND OF DRILL] With the lattice panel secured to the front post, I get ready to install the rear ones.
This spacer will insure that the width between the panels is exactly the same, front and rear. Notice how the holes near the end, give me an easy place to put the clamps. Once the spacer is in place, I drop the rear posts into the holes, clamp them to the lattice panel --and attach them with the same rust-resistant self tapping screws.
It's about time to set on the arch. But before I do, I slip these decorative collars over the tops of the posts. Because this top is fully assembled, it's pretty heavy. Too heavy for me to handle alone, so I've asked my younger and stronger friend, Kevin, to give me a hand.
The arch has an extension that fits snugly into a recess on the top of the posts. I cut a spacer block that will center the collar over the joint between the bottom and the arch. Then screw the collars in place.
With everything set, I do a final check for plumb, fill the hole through the top and compact the rock with the pry bar. Well the canopy's in and I gotta say, it looks pretty good. Now it's time to put up the gate. Down here, I've installed sort of a temporary base and leveled it up. Good.
So that I can have a stable support on which I set the gate while I install it, I also insert a couple of spacers on the hinge side, then clamp the gate in place. Now everything will stay positioned where I want it and I'll have both hands free to install the hinges.
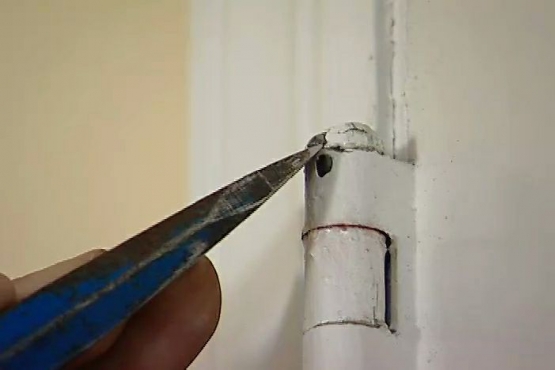
These are sturdy reproduction strap hinges that will go with the traditional look of the gate. Once again, I let my clamps do the holding work. First, I drill screw shaft clearance holes followed by pilot holes into the aluminum channel, then drive in the screws.
The post side of the hinge is in two parts, a bottom and a top. All I have left to do is install the gate latch and replace the fence sections.
This manufacturer has done a terrific job of translating a traditional design into a material that's probably gonna last longer than I will. Now remember, I have a couple of small children, so I put a self closing mechanism over here on this side of the gate and right here, my child safe latch, well up out of their reach.
As for those roses, well, it's gonna take a while for them to establish themselves and trail over the top. But you know, I have heard there are trailing roses out there that will grow five to six feet a year. I'll be checking that out.