How to Make a Concrete Counter Top in Place
Use an existing vanity or base cabinet to create your own concrete counter top
If you are looking for a unique way to update or upgrade your countertops, consider the benefits of using concrete. Because it's always custom mixed, an endless array of colors make this solution an easy way to ensure that your kitchen or bathroom will be one of a kind. Follow these basic steps to become the first in your neighborhood to bring the everyday functionality of concrete, indoors. It's durable, looks good, and is easy to clean.

Build the Form
The form, or the mold, is what holds the concrete into place while it sets and dries. You will want to use a particle board product called melamine to build this. The melamine has a plastic coating on it, which will allow you to pull it away from the concrete after it dries without any chipping. Any bare wooden surfaces that may be exposed to concrete should be covered with electrician's tape to make sure that they pull away from the concrete easily as well.
Creating the Opening for the Sink
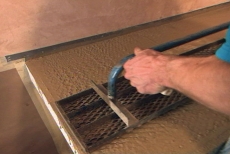
Use a piece of Styrofoam as a placeholder for the sink opening. The sink itself can serve as a template, and you can cut the foam to the exact size of the opening that you will need. Caulk the bottom side of the foam board to create a tight seal and then screw it into place. Once that is secure, set a small system of wire mesh into place to reinforce the concrete that you are about to pour.
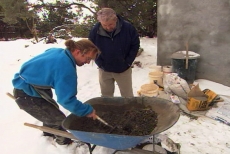
Mix the Base Layer of Concrete
Using a quick drying concrete mix, prepare the concrete in a wheelbarrow. Add water slowly as you hand mix it, making sure that you don't get the mixture too wet. Once it is ready to go, you can roll the wheelbarrow right inside to where you are building the countertop. This will save a lot of trips in and out with buckets of heavy, wet, concrete. Shovel the mixture into the form, and use a wooden float to compact it into a level, base layer of concrete.
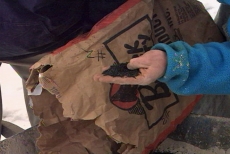
Prepare the Top Coat of Concrete
This is the batch of concrete that will determine your counter top's color and features. Begin with a base of the same quick drying cement mix that you used for the base layer. For this project, we also added marble sand, white portland cement, mineral pigments, and black slag. Each of these products creates an additional layer to the beauty and final appearance of the top coat.
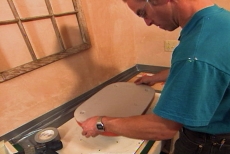
Create the Finished Edges
Using water, thin some of the top coat concrete even further and use it to finish the exposed edges. These are the areas around the perimeter of the top, as well as around the sink cut out. The thinned product will be easier to work with to create smooth edges, and will be easier to float the slag into a smooth surface. Use a hammer to lightly strike the edges of the form during this step. The blows will force any air bubbles around the edge to the surface. A tool called a jitterbug can also be used to bring the cream to the top. This will make the process of creating a smooth top much easier.
Finish the Concrete Counter Top as it Dries
About an hour after using the jitterbug, check the concrete to see how it is drying. If you poke a finger onto the surface and it leaves a peak, then it is not ready yet. If, however, it just leaves a fingerprint, then you can begin working with a trowel to smooth the surface even further. This process should be repeated several times over the next few hours as the concrete dries.
Related Tips

Blog Articles

Maximize Your Yield with DIY Netting for Strawberry Beds
Keep your strawberries safe from pests with our DIY strawberry cage netting solution. Learn how to create sturdy frames and find the best netting for your strawberry plants.

Change It Up: Swapping Out Your Light Switch Plates
Tired of boring light switch covers? Upgrade your home decor with this simple guide on replacing light switch plates and make a statement in every room.

Revamp Your Outdoor Space: How To Stencil A Concrete Patio
Learn how to create a stunning patterned concrete patio with our easy-to-follow instructions for stenciling. Upgrade your outdoor space in no time.


