Ron:
You know storage is one of those things we never seem to have a enough of. That was certainly the case for my pals Jack and Carol Hoag. They had simply run out of closet space and were desperate for more. So I loaded up my van and head North along the seacoast to the Boston suburb of Wayland, Massachusetts
RON –
THERE ARE FEW THINGS I ENJOY MORE THAN FINDING A COUNTRY ROAD IN NEW ENGLAND…AND DRIVING. AND WHEN OLD FRIENDS ARE ON THE OTHER END OF THAT ROAD…WELL, THAT’S ABOUT AS GOOD AS IT GETS. TODAY’S JOURNEY BRINGS ME JUST WEST OF BOSTON TO THE TOWN OF WAYLAND, MASSACHUSETTS AND THE HOME OF JACK AND CAROLE HOAG AND THEIR SON, BROOKE. YEARS AGO, I WORKED FOR JACK AS A MARKETING EXECUTIVE BEFORE I TRADED SUITS AND TIES FOR KHAKIS AND DENIMS.
Ron:
Hey guys
Carol:
Ron
Ron:
How are you?
Jack:
How are ya
Ron:
Hey Sable--
Carol:
Oh it's so good to see you.
Jack:
How you doing Ron
RON:
TODAY, I’M GOING TO HELP MY OLD FRIENDS CREATE SOME STORAGE SPACE IN THEIR GUEST ROOM BY CONSTRUCTING A COUPLE OF CLOSETS THAT SHOULD BE AS ATTRACTIVE AS THEY ARE PRACTICAL.
Ron:
So Carol, this is where you want to put the closets, so tell me what you were thinking about.
Carol:
Well first I thought I needed something all the way across, we need so much storage, but then there was no place to put the bureau. So Ron, what do you think about doing a closet on each side of the bureau.
Ron:
This bureau
Carol:
Yeah, yeah. That needs a face-lift too
Ron:
We could do that, or we could build you three closets and make the center one with a bunch of drawers in it.
Carol:
But then I won't have the depth going, you know, looking through, I don’t want the room to be
Ron:
Back to this wall, okay
Carol:
Yeah, right, okay
Ron:
All right, that makes sense to me
Ron:
Carol, here’s what I’m thinking.
Carol:
Yeah.
Ron:
Two matched closets, with raised panel doors.
Carol:
Great.
Ron:
And we’ll leave enough space in the center here for that chest of drawers that you’ve already got. Trim these off on the top with some cove molding, or cornice molding up here.
Carol:
That’ll look nice. Yeah.
Ron:
And then on the inside, on this closet over here, the left one, adjustable shelves, pretty much top to bottom. And then on the right one, two hanging rods.
Carol:
Terrific.
Ron:
Look all right?
Carol:
I love it.
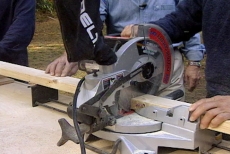
RON:
USING A COMPOUND MITER SAW, CAROLE AND BROOK TEAM UP TO CUT SEVERAL TWO BY FOURS THAT WE’LL USE TO FRAME OUR CLOSETS.FIRST WE’LL ASSEMBLE AND INSTALL A RECTANGULAR FRAME AGAINST THE CEILING. THEN, WE’LL ADD FOUR VERTICAL POSTS. IT’S ONTO THIS FRAMEWORK THAT WE WILL ATTACH OUR WALLS AND DOORS
Ron:
This is a nasty little cut right here for you.
Jack:
Okay. Ten.
Ron:
You’ve got ten. We’ll count them afterward. Okay. Now, hang on a second. Hang on. Put your left hand right here.
Jack:
Yeah.
Ron:
Hold that.
Jack:
Is this my left?
Ron:
This is your left hand. Oh, we’re in trouble. Okay. This is the on/off switch. Just squeeze it once.
RON:
NOW MY FRIEND JACK IS A MARKETING GENIUS, WHO HAS MANAGED TO GET THROUGH MOST OF HIS LIFE WITHOUT EVER USING A TOOL…UNTIL TODAY.
Ron:
Jack! I’m so proud! They’re all there!
Carol:
Good, Jack!
RON:
WITH OUR FRAME SECTIONS CUT, WE MOVE BACK INSIDE. THE FRAMES HAVE TO BE MOUNTED ONTO WALL STUDS, SO CAROLE AND BROOK USE ELECTRONIC STUD FINDERS TO LOCATE AND MARK EACH ONE
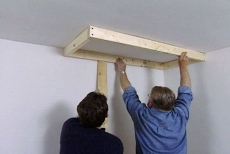
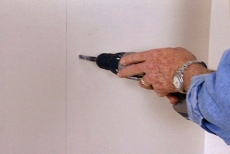
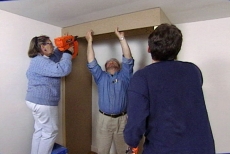
NOW WE’LL BUILD OUR FRAMEWORK FROM THE TOP DOWN, BUT IT’S MUCH SIMPLER TO ASSEMBLE THE PIECES OF THE TOP SECTION FIRST AND THEN INSTALL IT AS ONE PIECE. BROOK AND CAROLE DRILL CLEARANCE HOLES THROUGH THE ENDS OF TWO BOARDS, THEN DRIVE SCREWS THROUGH THEM TO ASSEMBLE EACH SIDE OF THE FRAME. USING A TWO BY FOUR FOR TEMPORARY SUPPORT, WE ATTACH THE FRAMES DIRECTLY TO THE WALL STUDS, BUT CAROLE’S HAVING SOME SLIPPAGE PROBLEMS -- IN MORE WAYS THAN ONE
Ron:
Now you know why you're getting a slipping on this?
Carol:
Am I bringing the uh--
Ron:
The drill is dropping down a little bit--
Carol:
So are my glasses, right.
Ron:
Got to get you a better pair.
RON:
A NEW PAIR OF GLASSES AND A BIT MORE PRESSURE ON THE BACK OF THE DRILL SOLVES BOTH SLIPPAGE PROBLEMS
Ron:
Hey Jack, come here.
Carol:
Yeah.
Jack:
You're really gonna have me do a…
Ron:
No, listen, not yet. You can let go of that, Brook.
Brook:
Okay.
Ron:
It'll stay up there, okay.
Brook:
Well after he gets through with it I'm not sure.
Jack:
I’ve literally never done this before.
Ron:
Push, there you go. (APPLAUSE) His first drill. Okay!
RON:
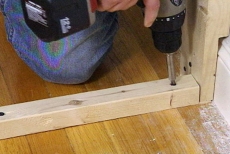
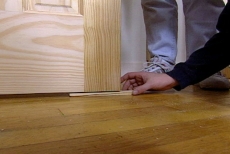
WE’VE CUT OUR POST SECTIONS WITH A SMALL NOTCH AT THE BOTTOM SO THEY WILL SLIP RIGHT OVER THE BASEBOARD.
Ron:
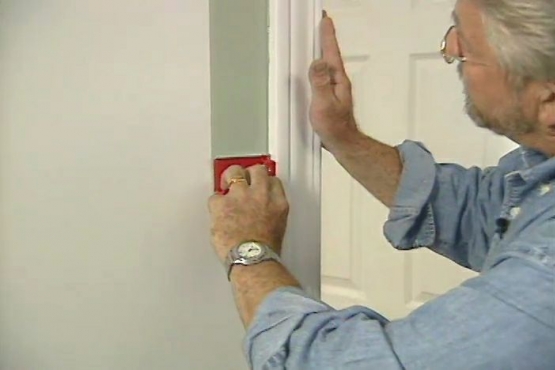
Now I'll be able to uh, attach this at the top and the bottom with screws. But there is no way to drill into the wall and attach it with screws here in the middle because there's no wall stud here. So for that we're gonna have to use a toggle bolt. I’m gonna go through this existing hole right here, just make a marker hole in the wall. Okay, we'll take this away. Now I'm going to enlarge that to a half-inch. I’m gonna pass this bolt through the two by four and screw the toggle on the other end, just a few turns here. That’s good. I’m gonna squeeze the wings of the toggle together, put ‘em through that hole, push the bolt in. Now you can see how those wings have flipped out inside the wall and they’re holding the two by four, now we just have to tighten it up. The trick here is to kind of pull back on the two by four as we tighten this up. That’ll keep the wings from spinning inside the wall. And you watch, it’ll pull the two by four right into contact, there it goes, yup. Okay, good. Now we’re going to attach this top and bottom.
Carol:
Yay!
Ron:
It is perfect, hunh?
Carol:
I did it!
Ron:
Not a single slip.
RON:
WE ATTACH A SHORT PIECE OF FRAMING TO THE FLOOR, INSTALL OUR FINAL VERTICAL PIECE AND OUR CLOSET FRAMES ARE COMPLETE.
Ron:
Okay Brook. Why don’t you put that in? These are the sides of our closet, this is ¾ inch thick MDF. Medium Density Fiberboard. Carol, can you hold this in place for one second? I’m going to step over here. Yeah, push this up against the back wall, there you go, just like that, make sure it’s in tight at the bottom. Okay, and we’re going to attach this with the nail gun.
RON:
BROOK AND CAROLE USE NAIL GUNS TO ATTACH THE MDF DIRECTLY TO THE FRAMES. WE NAIL FACIA BOARDS ACROSS THE FRONT OF THE FRAMES, THEN GIVE OUR DO-IT-YOURSELF GURU JACK A SHOT ON THE OTHER CLOSET.
Ron:
Now start from there. Go ahead.
Brook:
You’re going to have him shoot the gun?
Ron:
Go ahead.
Jack:
Now I pull the trigger?
Ron:
Pull the trigger.
Jack:
Ahh!
RON:
JACK PROVES ANOTHER POINT…THESE CORDLESS NAIL GUNS ARE NOT ONLY EASY TO USE, BUT ARE VERY SAFE.
Carol:
Good.
Ron:
So here’s your new door.
Carol:
I like it. It’s great.
Ron:
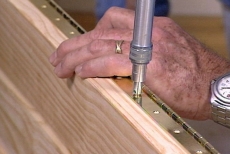
It’s very nice. Brook, if you can just kind of hold that. And we’re going to hang these using a piano hinge. This is a long strip of continuous hinge here, and I’m going to put it on at an angle so we get it in the right position. Now, I’m going to start by drilling a little pilot hole using this bit. This is a self-centering drill bit, see it’s in a cower or sleeve that slides back.
Carol:
Oh.
RON:
THE SELF-CENTERING BIT ALLOWS ME TO BORE THROUGH THE EXACT CENTER OF EACH HINGE MOUNTING HOLE. CAROL AND BROOK FOLLOW BEHIND DRIVING IN SCREWS.
Ron:
Beautiful
RON:
TO INSTALL THE DOOR, WE REST IT ON SHIMS TO PROVIDE THE NECESSARY FLOOR CLEARANCE. ONCE AGAIN, WE USE A SELF-CENTERING BIT AND SCREWS TO ATTACH THE DOOR TO THE FRAME. WITH THE EXTERIOR OF OUR CLOSETS COMPLETE, IT’S TIME TO CUSTOMIZE THE INSIDE
Ron:
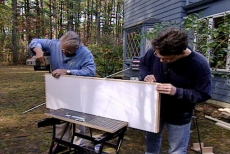
So these are stock shelves that I picked up. They’ve got a vinyl coating on here. But to make them a little bit stiffer, and able to take a little more of a load, I’m going to put this strip on the front here, which is why I’m having you put that glue on there.
RON:
THESE WOOD STRIPS NOT ONLY STRENGTHEN THE SHELVES, BUT ALSO GIVE THEM A MORE SUBSTANTIAL FINISHED LOOK.
Ron:
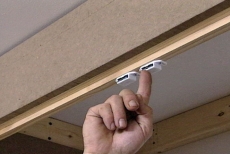
Now, while Brook’s been downstairs making up those shelves, I’ve done a couple of things up here. Added a wooden strip right here to act as a doorstop, and a couple of magnetic catches. So, the stop will keep the door from swinging too far inward, and the catch will keep it closed. Also, over here on the side, we’ve installed a couple of shelving standards. These have little metal clips like this that can be placed in any of these slots. Carol wanted some total adjustability on this, and I think she’s now got it. Here’s Brook. Hey, how are you, Brook?
Brook:
Hi, Ron. How are you doing?
Ron:
Okay. Let’s try this one and see if it fits. Drop this end in first. That side. Okay. It’s looking good. Why don’t you bring the rest of those up?
Brook:
Okay.
Ron:
Over here, Carol has been putting up the clothes rod rack. Have you got them both up on the top?
Carol:
I’ve got the top one ready to go.
Ron:
Okay. So that goes in there.
Carol:
That goes in there.
Ron:
See if that slips down in there.
Carol:
Perfect.
Ron:
Okay. That’s very nice
RON:
OUR NEXT STEP IS TO INSTALL WHAT I LIKE TO CALL THE CROWNING GLORY. A FEW STRIPS OF CROWN MOLDING CAN ADD A BEAUTIFUL ACCENT TO AN OTHERWISE ORDINARY WALL. FINALLY, A COAT OF PRIMER THEN PAINT, AND OUR CLOSETS ARE COMPLETE.
Carol:
I think it’s incredible! We worked hard, but look at this payoff. Yeah. This is great.
Ron:
Brook?
Brook:
You know Ron, these closets look like a huge project, but each step was really very easy.
Ron:
When you break it down, yeah, it was simple, wasn’t it? And you know what I loved about this? We didn’t use any drywall, any joint compound, no tape, this is all just wood and MDF. And, oh…
Jack:
Time to pay the check, right?
Ron:
Look who finally showed up. Congratulations.
Jack:
You did a great job. I played a major role
Ron:
Consultants always come in at the end, you know.
Carol:
Yes, and get the credit.
RON-VO:
WELL, IT SEEMS WE ALL FEEL THE NEED FOR MORE CLOSET SPACE AT ONE TIME OR ANOTHER, BUT RARELY THINK ABOUT THE POSSIBLITY OF CREATING A CLOSET. AND WHILE OUR DAY BEGAN WITH A WHITE DRESSER SITTING AGAINST AN EMPTY WALL, IT HAS ENDED WITH A TRANSFORMATION THAT IS EVERY BIT AS ATTRACTIVE AS IT IS PRACTICAL.