Ron:
You know, I can never have enough counter space, or cabinet space, how ‘bout you? Well, one way to get some more without a lot of trouble or expense, is to build a lazy susan. And that, is what we’re going to do right now.
Very simple. We’re going to start with a couple of wooden squares like this. This is ¾ inch birch plywood. On top of that, we’re going to put one of these bearings. We’ll mount this on top of the base, put the turntable on top. Of course, these will be cut into circles, first. Simple project, great results, so let’s start.
Now we’ll be using a jigsaw to cut those squares into circles. We could do this by hand by sort of following a line around, but you know what, I can never get a really clean circle that way. So what I want to do is make up a circle-cutting jig for the jig saw. Very, very simple to do. I’m going to make it out of this material right here. This is ¼ inch tempered hardboard. We’ll start by clamping this to the workbench. Then I’m going to take a square and draw myself a line just like that. Now we’ll take the jigsaw and cut right down the line to that mark.
Now what I want to do is attach this circle-cutting template to the bottom of our jigsaw temporarily. While we cut the circle. And the best way to do that, I believe is going to be to use some of this double-stick carpet tape. Now. We’ll take the jigsaw, place it in this groove we cut earlier, and stick it right on to our template.
RON – VO:
NEXT, I SET THE ASSEMBLY ON THE WOODEN BLANK WITH THE JIGSAW BLADE TOUCHING THE EDGE, THEN DRIVE IN A SMALL NAIL AS A PIVOT POINT AND GET READY TO CUT.
Ron:
All I’ve got to do now is move the saw in a circle, and we should have a pretty accurate disk here.
RON – VO:
THE CUTTING PLATFORM I’M USING HERE IS THREE PIECES OF PLYWOOD BOUND TOGETHER, AND TO MY WORKBENCH, WITH DOUBLE-STICK TAPE.
Ron:
So anyway, there you go. Perfect circle.
RON – VO:
NEXT, I REPEAT THE PROCESS TO CUT A SMALLER CIRCLE FOR THE BASE OF THE LAZY SUSAN.
Ron:
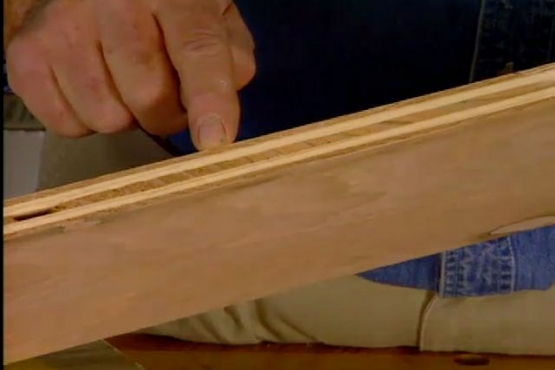
Now, we are going to turn plywood into something that looks like solid wood by using a material called wood edge banding. This is it right here. It actually is strip of solid wood, very, very thin, with a hot melt adhesive on the back of it. And it couldn’t be simpler to use. In fact, all you need is the edge banding, and a regular iron.
Lay this in position, gotta make sure it’s centered over the edge. The iron is on hot. Now as we apply heat to the base of the tape, we’re softening up that hot melt glue on the back. And we want to use a lot of pressure on the iron right here, but I don’t usually rely just on the iron. I like to take a roller like this, just a laminate roller, and just come over on the top of it, just to make sure that that gets pressed down very securely.
RON-VO:
WHEN I FINALLY COME AROUND TO THE STARTING POINT, I OVERLAP THE EDGING ON TOP OF ITSELF, THEN MAKE A DIAGONAL CUT THROUGH BOTH LAYERS, LEAVING A NICE CLEAN JOINT.
Ron:
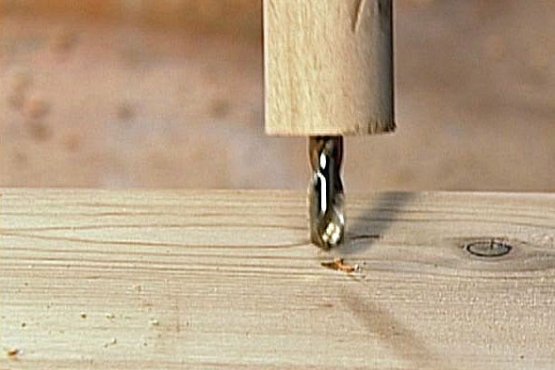
Now this is that bearing we’re going to be using, we want to make sure that we mount this exactly in the center of the base. This is actually a center-finding tool right here. You’ll notice that these lines are all crossing at one point; that’s the center of the circle right there. Now I can take the bearing, and just pretty much by eye now place it in the center. And then we can attach this with some pan head screws.
RON VO:
NEXT WE ROTATE THE OTHER SIDE OF THE BEARING A FEW DEGREES, PASS AN AWL THROUGH ONE OF THE MOUNTING HOLES, MAKE A STARTER MARK ON THE WOOD AND DRILL A HALF-INCH HOLE ALL THE WAY THROUGH.
NOW WE SET THE BASE IN PLACE BOTTOM SIDE UP AND ROTATE IT UNTIL THE HOLE WE JUST DRILLED LINES UP WITH A MOUNTING HOLE ON THE BEARING PLATE. THEN WE INSERT THE SCREWS THAT WILL ATTACH THE BEARING PLATE TO THE TOP.
WE REPEAT THE PROCESS FOR ALL FOUR HOLES OF THE BRACKET, AND FINALLY, I APPLY THESE FOUR SELF-ADHESIVE PLASTIC FEET, WHICH WILL KEEP OUR LAZY SUSAN STABLE ON ANY SURFACE.
Ron:
Well here it is, our lazy susan. Why do you think they call it lazy susan? Why not lazy Larry or lazy Ron? Well, whatever you call it, it’s bound to give you more storage space.
If you’d like some more information on how to build your own, be sure to check our website, ronhazelton.com. And join us next time for more great projects, and of course, more housecalls. We’ll see you then.