How to Build a Window Seat
A New Window Seat Can Increase the Space in your Home
A window seat can be the focal point of a room when you are entertaining guests. In this project, Ron's new friends have just such a window seat in their home, but it's a bit too narrow to really be comfortable. Follow along as Ron works with them to create a new window seat that is comfortable, functional, and looks great.
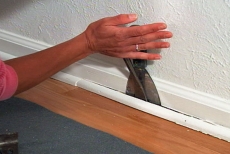
Remove the Trim
Remove the existing trim along the wall so that you can get an accurate measurement, and so that the base fits snugly against the wall once you built it. Take extra caution with the floor moldings, as you will want to re-install them. Use a putty knife behind your pry bar to prevent damage to the surface behind the molding. Also, you'll want to make sure you have cut through any caulk with a utility knife. This ensures that the wallboard won't tear when you pull the molding away.
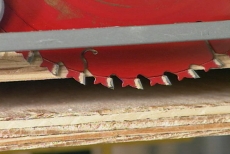
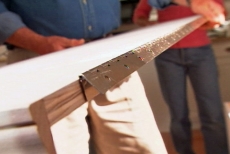
Cut Out the Pieces for the Window Seat
Using the measurements that you take after removing the trim, create a simple sketch of your seat. Once you have determined the proper sizes, you are ready to begin cutting out the pieces. Ron is using an aluminum straight edge to help cut the 4x8 pieces of plywood and had adjusted the saw blade depth to just cut through the plywood and not into the work surface below it.
Assemble the Base
Begin by applying a bead of glue to the edge of an end panel. After clamping, secure the glued joint with a finish nailer. If your seat is fairly long, a brace across the center will give a little bit of extra support for the top.
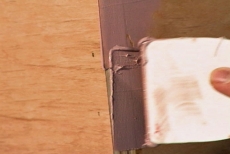
Seal the Edges
Apply car body filler to the exposed plywood edges. This will seal the rough edges, giving you a flat surface to paint. Car body filler is a great product for this step because it dries quickly and is easily sanded smooth. You will be able to move on to your painting quickly and your project won't be held back while waiting for other fillers to dry.
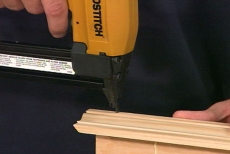
Make the Window Seat Top
Use another piece of plywood to make the solid top. Once the top has been cut to the proper size, use door, and window molding to create a frame for it. This is most easily cut using a power miter box. Just cut 45-degree angles at the corners, and then fit the pieces together around the outside of the plywood. Secure them using glue and a pin nailer. The seat is now ready for paint.

Install the Base to the Wall
The first step in the installation is to replace the plywood that was removed from the sill with a new piece. Next, the base that you built needs to be fastened to the wall. Drill holes through the back, and then secure the base by driving long screws directly into the wall studs. If you have any gaps between the base and the floor, be sure to slide shims into the gaps, so that the seat doesn't rock or wobble.
Install the Top
Screw a piano hinge to the top, and then secure the other tab of the hinge to the seat. A piano hinge is great for this application because it runs the full length of the seat, and will be durable under years of wear and tear.
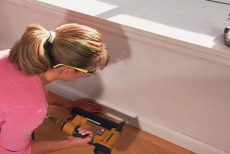
Install the Trim
Now that the seat is in place, it is time to re-install the trim that we removed in step one. Start with the corner trim, and then finish up with the base moldings.
Related Tips


Blog Articles

Maximize Your Yield with DIY Netting for Strawberry Beds
Keep your strawberries safe from pests with our DIY strawberry cage netting solution. Learn how to create sturdy frames and find the best netting for your strawberry plants.

Change It Up: Swapping Out Your Light Switch Plates
Tired of boring light switch covers? Upgrade your home decor with this simple guide on replacing light switch plates and make a statement in every room.

Revamp Your Outdoor Space: How To Stencil A Concrete Patio
Learn how to create a stunning patterned concrete patio with our easy-to-follow instructions for stenciling. Upgrade your outdoor space in no time.


