RON HAZELTON:
You know the longer I'm here, the more I enjoy my garden. But I've got one problem when it comes to watering, I'm on the road a lot and sometimes several days can go by and these guys don't get any water. Also, I've got several different situations — container plants back here, foundation plants over here and flowering plants.
So, what I'm going to do is install an automatic drip irrigation system. It will water the plants even if I'm not home and take into account, their individual requirements.
[SOUND OF THUNDERSTORM]
MAN:
As much as two-thirds of the water used in our homes is actually used outside, taking care of our yard and plants and drip irrigation can show as much as a 70 percent water savings over other methods. Also, studies have shown that plant material grows as much as 50 percent faster, using drip irrigation.
RON HAZELTON:
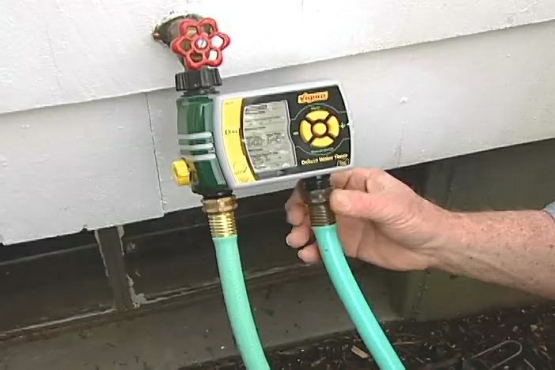
My drip irrigation system is going to start right here with this hose bib or faucet. Now the first thing I want to do is screw on this check valve. It's designed to keep the irrigation water out here from flowing inside the house and contaminating my household water supply. Tightening this set screw will keep vibration or maybe even the kids from loosening the valve.
The next thing I want to do is turn this single faucet right here into four, using what's called a hose bib manifold. Now these are pressure reducers. In a lot of homes, water pressure can run 60, 80, some places even over a hundred pounds per square inch. That's way too much pressure for a drip irrigation system.
So what this device does is drop it down from household pressure onto something in the 20-to 25-pound range. In the area that I've decided to irrigate, there are several different kinds of plants with different water requirements.
So I've set up three areas or zones, and each one of them is going to be served by one of these outlets. This fourth one over here will be for my garden hose. Now remember, in my case, I want the water to come on and turn off automatically.
So the next step for me is to install or, in this case, just screw on an automatic valve. These electronic valves operate using very low voltage. They'll turn the water on and off for each zone when they're instructed to do so.
Now this is the brain behind my automatic drip irrigation system. It's called a timer or controller, it's completely weatherproof, battery-operated and each of these automatic valves will plug into the bottom like this. And then the controller itself mounts on the front of one of the valves. Now I'm going to program this and it will tell each of these automatic valves, which day of the week to turn on, which time of the day to come on and how long to run.
Well, I'm finished with the work on my water source. Now I need to set up a distribution system to get the water from the valves, to where it's needed. That water highway, if you will, is half-inch polyethylene tubing.
Here are a couple of tips for working with this tubing. Put it out in the sun a couple of hours before you start. That will warm it up and make it more pliable. And two, invest in a pair of these cutters. One end of the tubing, I connect to the automatic valves.
In my case, since I have fairly deep mulch in my beds, I'm going to lay the tubing on top of the ground, so all I'll have to do is rake a path, then use tubing stakes to anchor the run in place.
Now when you reach the end of a run of tubing like this, you have to close or cap it off. There are a couple of ways to do that. One is to take a figure-8 clip like this, slip it over the tubing, bend the tubing and then slide the clip back up to keep it in position. Sort of like you'd bend a garden hose to stop the flow of water.
Another way to end a run of tubing is with a cap like this. When winter weather comes, I can just unscrew the cover and drain the lines. This half-inch polyethylene tubing brings water into a general area and this smaller quarter-inch tubing delivers it to individual plants or groups of plants.
To attach the smaller tubing to the large, I first use a special punch to make a small hole, then snap in a connector.
Next, I slip on a piece of quarter-inch tubing and cut it to length. On the ends of the tubing go the emitters, small nozzles, if you will, that emit different amounts of water —anywhere from one to four gallons per hour in a variety of patterns.
Drip emitters like this are extremely efficient, delivering water directly to the base of the plant. Misters, sprays and sprinklers are often mounted on higher stakes and distribute water in quarter-circle, half-circle, full circle, even rectangular patterns.
Just one of these can water several plants at once. For my container plants here, I'm going to use something called soaker tubing. The water actually penetrates through the wall. Now it's very easy to use. I start by putting a T in the end of the quarter-inch tubing like this, place one end of the soaker tubing on one arm of the T, lay the soaker tube around the base of the plant, cut it to length and then hook the end of the tube on the other arm of the T.
Now for my hanging plants, I'm going to use this flexible mister. With this part of my irrigation system in place and ready to go to work, I can rake the mulch back over the tubing, making it invisible, yet accessible. The tubing can also be buried.
Usually a trench just a few inches deep is adequate. Since the line is not under pressure, freezing is usually not a concern. The simplest way to run tubing across grass is to make an angle cut through the turf, using a flat garden spade, then lever the sod upward to create a shallow groove, set the tubing in the bottom of the cut and press the grass back into place.
This is called a sidewalk tunneling tool. It's simply a plastic nozzle attached to a length of PVC pipe with a hose connected to the opposite end. The stream of water actually bores a hole under the sidewalk. Once I'm through, I use a pair of PVC pipe cutters to snip off the nozzle and the hose connector.
The plastic pipe stays in place and acts as a conduit. I just push the irrigation tubing through it.
[ROOSTER CROWS]
Well, I'm up early this morning, but not as early as my automatic irrigation system. You know, it's good to know that even if I'm on the road or I want to sleep in late, these guys are not going to suffer because of it.