Build Your Own Slide Out Pantry
Learn how to construct and install a built-in pantry cabinet with pull-out storage sections
Construct a custom roll-out pantry and refrigerator enclosure using birch-veneer plywood and pocket-hole joinery. This organizer occupies less space that the previous cupboards and counter while making room for a larger refrigerator, more kitchen storage and easy-access adjustable shelves or racks. The dual pantry frames slide out all the way, operate independently, and match the existing cabinetry.
Read More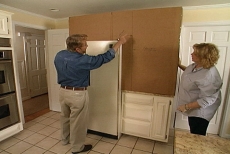
Plan the Pantry with a Cardboard Mock-Up and Computer Software
Make a cardboard mock-up to visualize the size of the pantry/cabinet. Plan it in detail with computer-assisted drawing software.

Remove All Components of the Existing Cabinets and Counter
Remove the doors and drawers from existing cabinets, after unscrewing hinges and drawer glides. Cut out cabinet frames, removing nails.
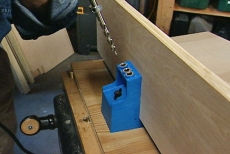
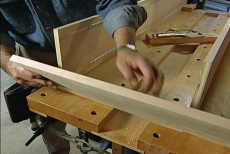
Cut and Pre-Drill Plywood Panels for the Kitchen Pantry Frame
Cut birch-veneer plywood panels on the table saw and pre-drill them for pocket-hole joinery with a special gig and bit.
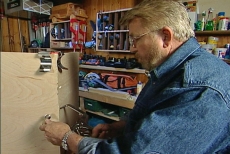
Clamp, Glue, and Screw the Panels Together
Assemble the panels with glue and screws, using special pocket clamps to pull and hold the pieces tightly together.

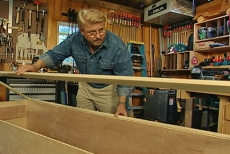
Slip Bottom and Back Panels into Place in Routed Grooves
Slip the bottom panel into place and slide the quarter-inch plywood back into position in grooves routed for this purpose.
Reinforce the Pantry Frame to Face the Raw Edges
Use poplar strips and pocket-hole joinery to construct a face frame to cover raw edges and reinforce the pantry shell.
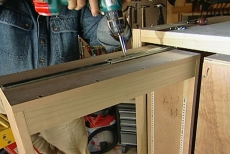
Construct Two Slide-out Shelving Units and Route for Shelf Hardware
Build two slide-out shelving units with dados/grooves for shelf standards. Install the hardware and glue and screw the pieces together.
Attach Full-extension Glides and Make Decorative Face Panels
Attach full-extension glides at the bottom and top of each slide-out pantry unit. Route decorative panels to face each unit.
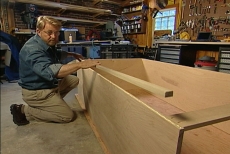
Build and Face the Plywood Refrigerator Enclosure
Build the refrigerator enclosure of birch-veneer panels secured with pocket-hole joints. Face them with glued and nailed poplar strips.
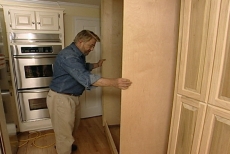
Place and Secure the Pantry and Refrigerator Enclosure
Set the pantry and refrigerator enclosure in place, screwing them to studs and each other. Add support pins and shelves.
Blog Articles

Creating a Glossy Bar Top Finish: A DIY Guide
Have you ever wanted to elevate the look of your home bar that looks like liquid glass? A glossy bar top can add a touch of sophistication and style to your space. In this DIY guide, we will walk you through the steps to create a stunning glossy bar top that will impress your guests and elevate your home entertainment experience.

Techniques for using Heavy-Weight and Light-Weight Spackle
A ding, small hole, or big scratch is bound to be in almost any home. Whether caused by moving heavy furniture or daily wear and tear, it’s something that is easily repaired. Did you know that there are two types of patching compounds used for repairing holes, dents, and cracks in walls?

Shiplap: The Wood That Says “Welcome Home”
Imagine a cozy cabin nestled in a snowy forest. What's one of the first things you notice? The warm, inviting shiplap walls, of course. Shiplap is synonymous with comfort, wrapping you in its rustic charm and timeless appeal. It's the wood that says, "Come on in, you belong here."


