RON HAZELTON:
Well I'm on my way to Apple Valley, Minnesota. Now Ernie and Dana Vauder[?] want to build a garden arbor, so I'm going to give them a hand.
And why did you guys decide on this spot? And I think it's a good spot but -- but is there any particular reason here?
ERNIE:
Well, you know, we both like to garden obviously and, but we also have our ways. So this is Dana's garden and this is my garden. And I don't know that this spot will ever be filled if it was just left to us and our gardens.
RON HAZELTON:
I think it's perfect. It is so like a passageway.
ERNIE:
Yeah.
RON HAZELTON:
From, from this one over here to this one. It's also almost really defined by your flowerbeds. Well, here's the sketch. The arbor will be open on the sides except for a pair of benches looking out on both gardens. It will be topped by a gracefully curved, semi open canopy.
ERNIE:
I think it's perfect.
RON HAZELTON:
This is a great way to start. We've begun to come together already.
[BOTH SPEAK AT ONCE]
See, it's working.
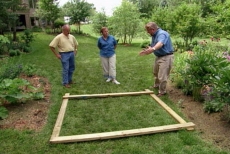
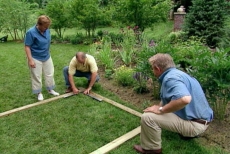
We use two by fours to experiment with the orientation of the arbor, determining whether we want it angled more toward the back yard or toward the house. Then we decide how wide we'd like it.
I think you're, you're probably looking at a path with the benches, because they're not really wide seats.
[BOTH SPEAK AT ONCE]
ERNIE:
Oh, that's plenty.
RON HAZELTON:
Like three and a half feet.
ERNIE:
Yeah.
RON HAZELTON:
Okay. Traditionally arbors are a little wider than they are deep. I guess what I would suggest is that maybe we bring this up a little bit, so maybe it's six wide by five deep, give us that, that proportion.
DANA:
Okay. As long as there's enough room to sit on the benches, I think that would look good.
RON HAZELTON:
There will be. This, now this won't affect the room on the -- oh, you mean side by side.
DANA:
Right.
RON HAZELTON:
Yeah. You'll have five feet --
[BOTH SPEAK AT ONCE]
ERNIE:
Does that mean you'll sit next to me on one of the benches?
DANA:
Me?
ERNIE:
Yeah.
DANA:
Okay.
[LAUGHTER]
ERNIE:
No problem.
RON HAZELTON:
No, you'll have room to spare.
[LAUGHTER]
DANA:
I appreciate that.
RON HAZELTON:
With an agreement on layout, we use framing squares to make sure the corners are a perfect 90 degrees. Then we mark them with chalk and remove the two by fours.
Now, at each corner here, we've got to dig a post hole and I understand it gets kind of cold here.
ERNIE:
A little bit.
RON HAZELTON:
This is Minnesota after all.
ERNIE:
Yeah, yeah.
RON HAZELTON:
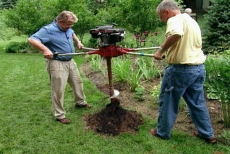
We've got to go down 42 inches, three and a half feet in order to get below the frost line. Otherwise, the ground could freeze and start pushing the posts up and that wouldn't be a good thing for an arbor.
ERNIE:
And you said we had to dig.
RON HAZELTON:
We have to dig.
[BOTH SPEAK AT ONCE]
ERNIE:
Because you're --
RON HAZELTON:
Now we can do it the old fashioned way with a post hole digger like this, but three and a half feet's a pretty deep hole, or we can do it the high tech way with a power auger. You guys can vote.
ERNIE:
Power auger looks kind of cool.
[BOTH SPEAK AT ONCE]
RON HAZELTON:
Boy, that was easy. [LAUGHS] What's the vote again?
DANA:
Power auger.
ERNIE:
Power auger.
RON HAZELTON:
We've already checked with the utility companies to make sure there are no underground pipes or cables. So we're cleared to bore our holes.
Start her up.
[SOUND OF AUGER]
As we bore deeper, it helps to lift the auger every few seconds to clear some of the soil.
Stand down. Okay. That's about as far as we can go with that auger on there.
ERNIE:
Okay.
RON HAZELTON:
So what we're going to do is take the engine off, put an extension on here and go a little deeper.
ERNIE:
Sounds good.
RON HAZELTON:
Okay. We remove the steel pin holding the power unit to the auger, insert the extension, slide the pin back in, then remount and pin the motor.
[MUSIC] [AUGER]
Stand down.
Finally, after removing the motor and extension, we pull out the soil packed auger bit, then bore three more holes the same way.
[SOT]
Well, our holes are down 42 inches. That wasn't so bad, was it?
DANA:
I don't know.
[BOTH SPEAK AT ONCE]
We know how to [ ? ].
[LAUGHTER]
RON HAZELTON:
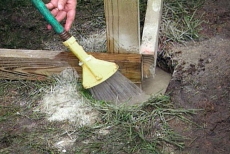
Now I'm just going to put a couple inches of rock in here for drainage.
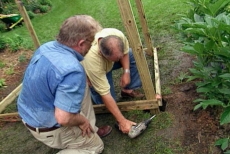
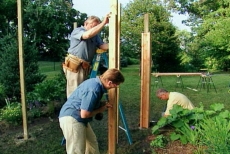
We pour crushed rock into the bottoms of all four holes. And now we're ready to set our posts. The green colored pressure treated lumber prevents future wood rot. After placing the first post, we use a post level to make sure that it's plumb or perfectly vertical.
Next, we attach a wooden brace, check the adjacent post for plumb and attach the opposite end of the brace to it. We repeat this process, bracing all four posts at both the bottom and the top. The braces not only keep the posts vertical, but also properly spaced. Next, we fill the holes with dry fast setting concrete, then add water. No mixing is required.
Well, we're going to keep putting the water on until this is saturated, so just kind of a gentle flow. And if it starts pooling up, just turn it off, let it soak back down.
As Dana continues to add water to the concrete mix, we repeatedly check the post to make sure it remains perfectly vertical.
Toward me. Oh, there we go, perfect.
ERNIE:
Okay.
RON HAZELTON:
We repeat the process with the remaining posts. As the water soaks into the dry concrete mix, we add more until the level stabilizes at the top. It takes only about half an hour for the concrete to set, and when it does, we remove the braces.
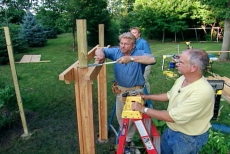
All right, that's our last brace. Now the next thing we're going to do is, for lack of a better term, I'll call it cladding. We're going to apply some cedar to this pressure treated lumber which goes down into the ground, to make it more attractive, to cover up the -- the green lumber here.
But also to give these posts some more bulk. They need, they need to, they look a little, they look too spindly now. So let's go over here. I've got the cedar laid out. We'll start cutting this to length and putting it on.
DANA:
Okay.
ERNIE:
Sounds good.
RON HAZELTON:
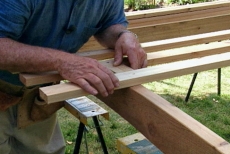
With 16 bores to cut, 4 for each post, we use a power miter saw. Since they're all the same length, I've set up a stop block which allows us to cut each bore to the same length without having to re-measure.
So here's the way this is going to work, guys. I'm going to -- I've got a line up here, it's seven feet -- that I've carried all the way around, all four posts, all right.
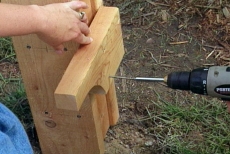
We first attach two by fours to the faces of the post using rust proof screws. Then we attach two by sixes to the sides. Not only does the post look more substantial, it also has some interesting detail. With this part of our job complete, we're ready to move on to a whole new phase of construction.
[MUSIC]
DANA:
Ron Hazelton's HouseCalls is being brought to you by the Home Depot.
[SOUND CUT]
RON HAZELTON:
Today's HouseCall, just outside Minneapolis has me helping Ernie and Dana Vauder bridge their husband and wife gardens with an arbor. We've just finished setting the posts in concrete and encasing them with cedar planks. Now we're about to cut the beams that will support the canopy that's soon to come.
Are you up for something a little adventurous maybe?
DANA:
Sure.
[BOTH SPEAK AT ONCE]
RON HAZELTON:
[ ? ] perhaps. Because I'm thinking a little curve in the end of these might look really nice.
ERNIE:
Yeah, sounds good.
DANA:
Okay.
RON HAZELTON:
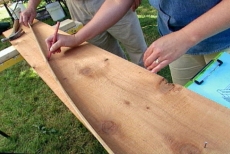
I think we can draw it out and we can decide. So here's the way we're going to do that. I'm going to come down this way about three and three quarters of an inch. I'm going to make a mark there and I readjust my square for six. I'm going to come down here and make the line at six.
Now I'm going to take a very high tech piece of curved drawing equipment, namely -- this bucket.
[LAUGHTER]
DANA:
Okay.
RON HAZELTON:
And I'm going to put it right on those two marks and then just trace the outline of this. Just like so and there's our arch. Pleasing to the eye?
ERNIE:
We're going to have to get ourselves one of those.
RON HAZELTON:
Yeah. I could arrange for this.
[LAUGHTER]
Dana cuts the curve [ ? ] with a jigsaw. Then after repeating this process on both ends of the beam, we lift the first one into position and screw it to the posts. We install two beams to each pair of posts, then trim each post to length with a handsaw.
Now we're ready to cut a second set of beams, the two arch shaped ones that will span the front and rear of the arbor.
You see, see it more clearly in this. Now it also has scalloped ends. We have used our bucket right here, or I have, to lay those out the same way we did before. Just couldn't find a round object big enough to do this arch.
DANA:
Okay.
RON HAZELTON:
So we're going to use a different method here. Actually what I've done is put some small nails in here. One down here which is one end of the arch, one right here which is the center of the arch or the high part, and then one here which is the other end.
And then we'll take this thin strip of wood and we're just going kind of weave it in between the nails like that. It will bend. And since it's a uniform thickness, it bends fairly consistently.
Ernie and Dana first trace the top of the arch. Then we reposition the wood strip and draw the bottom. There we go.
[SOUNDS OF SAW]
Now these are the two arches that you guys cut. All I've done is add two stringers in here and what we've got here is a sort of a canopy if you will, for the arbor. I think it's going to be easier to assemble this here and then set it up as one unit, okay?
DANA:
All right.
RON HAZELTON:
So I predrilled some holes down there, Ernie, in the end, some clearance holes.
Dana and Ernie attach the arched beams to the stringers with screws.
Now to finish up our canopy, I'm going to put these slats on here. Let's start right here in the center. I put some, some marks over there, you see them Ernie?
ERNIE:
Yeah, I got them.
RON HAZELTON:
You re-centered up, okay.
ERNIE:
Yeah.
RON HAZELTON:
We attach the slats starting at the center and use spacers to help us maintain a uniform distance between each one. With our canopy now assembled, we lift it up onto the beams, position it, and finally secure it in place by angling a couple of rust proof screws into each corner.
Next, we move back down to ground level in order to install four brackets that will support our two benches. Each bench seat consists of a pair of two by six cedar boards and once they're screwed down, our arbor is complete.
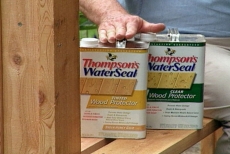
You know, this is only going to get better with time. Vines coming up the side, the wood kind of graying down a little bit. Do you see it?
DANA:
Mm-hmm [AFFIRMATIVE].
ERNIE:
Absolutely.
RON HAZELTON:
I would suggest that you put a preservative on here. You don't have to change the color of it but you want to protect it. You know, I've just got one question for you. Are you going to sit here on one side looking at your own garden and sort of admiring it? Or are you going to look at the other person's garden?
DANA:
Well, we decided it's Switzerland. That we can sit on either side so --
ERNIE:
And even though we might differ on gardening tips, we have, we have one habit in common and that is, at the end of every job, we toast. So -- cheers.
RON HAZELTON:
Ah --
ERNIE:
To a job well done.
RON HAZELTON:
Okay.
ERNIE:
We appreciate it.
RON HAZELTON:
I'm going to start a tradition.
ERNIE:
Absolutely.
RON HAZELTON:
Great job, guys.
ERNIE:
Thank you.
RON HAZELTON:
An arbor is an excellent addition to almost any size garden. In small spaces, it allows the garden to expand upward and in larger yards like this one, it can also be a decorative passageway, a transition from one area to another.
For Ernie and Dana, it's both of these things as well as the marital bridge joining their two terrific gardens.