Replacing Interior Doors – Learn To Do It Yourself
New Interior Door Slabs in Place of Old Hollow Core Doors
If the thin, hollow core doors that were originally installed when your house was built are starting to splinter, peel, fade, or you just don't like them, it may be time for an upgrade. Solid, paneled replacement slabs are more affordable than ever. With a few fairly simple steps and the right tools, a clean new look is just a days work away.
Read More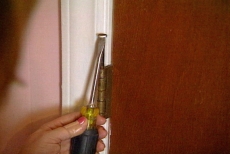
Remove the Old Door
Begin by removing the old door. The easiest way to do this is to place a thin bladed screwdriver beneath the pin that holds each hinge together and tap it through with a hammer. Once the pin starts to come out, you can pull it out and move on to the next one. You may find it easier to pull the pins if you have a partner support the weight of the door. This will keep the pins from pinching. Once the pins are removed, carry the old door to your work area, as you'll need it to make the proper cuts in the new interior door slab.
Use the Old Door as a Template
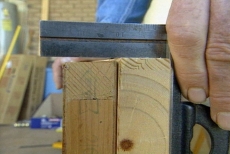
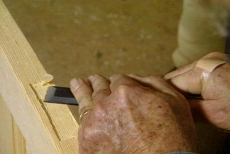
Using the old door as a template, begin marking the necessary cuts and mortises that you'll need to make on your new slab. You may find it helpful to clamp the two doors together. Use a square to ensure that they are lined up correctly before tightening the clamps. Use a utility knife to score the area for the hinge mortises and the new lockset.
Check the Door Width
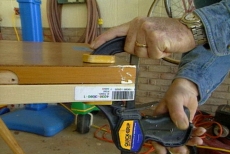
In this case, the new door is slightly wider than the old door. It will have to be planed down so that it will close once it is hung in the existing frame. Turn the doors on end, and using the old door as a guide, place the new door to the proper height. Don't try to remove to much wood at once. Ron is finding it easier to use a power planer for this project, but if you don't have one you can use a traditional wood plane.
Bore the Hole for the Lockset
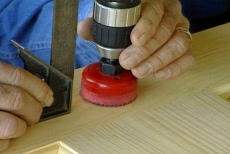
A hole must be drilled into the door to receive the lockset. Use a hole saw for this step. As with the previous steps, use the old door as a template. Instead of boring the hole straight through in one step, drill the hole into to door about halfway, just until the mandrel starts to poke through the back side of the door and provides a mark. Then turn the door over, and using the mark made by the mandrel, drill back through the other direction. This will prevent any splintering and will ensure clean sharp edges on your bore.

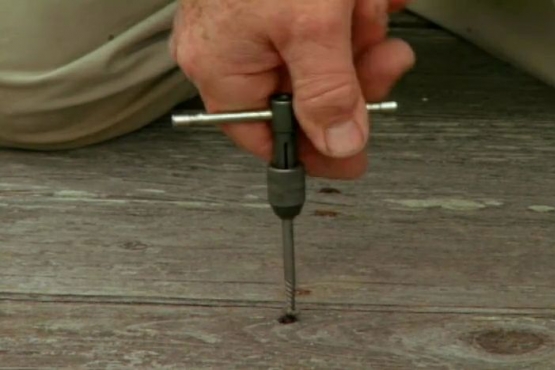
Create an Opening for the Latch
Set the door firmly on its vertical edge. You may find it easier to work with if you build a simple jig to hold it in place while you complete the next few steps. Use a spade bit to drill the hole for the latching mechanism. Use a square to ensure that this hole is perfectly straight, or else the latch may not operate properly. Once the hole is drilled, temporarily screw the latch and face plate into the door so you can scribe around the face plate with your utility knife.
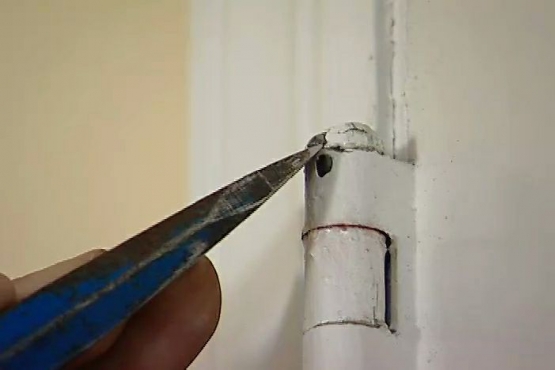
Prepare the Door Edges
Using the marks that you created earlier with the utility knife as a starting place, chisel out the mortises necessary to receive the hinges and the faceplate for the latch. Make sure that the bevel of the chisel is down as you tap it with the hammer. Once the majority of the wood has been removed, you can turn the chisel over and use it by hand to remove any high spots or excess wood.
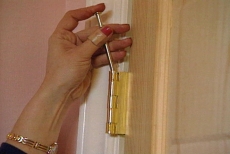
Install Hardware and Re-Hang the Door
Now that the mortises have been made, the hinges and lockset can be installed. If you've done your job correctly, the new hinges should set cleanly into place with the ones you've screwed into the door jamb. Drop the pins into the hinges and your new door is hung, and ready to use. Enjoy the fresh new look!
Related Tips


Blog Articles

Creating a Glossy Bar Top Finish: A DIY Guide
Have you ever wanted to elevate the look of your home bar that looks like liquid glass? A glossy bar top can add a touch of sophistication and style to your space. In this DIY guide, we will walk you through the steps to create a stunning glossy bar top that will impress your guests and elevate your home entertainment experience.

Techniques for using Heavy-Weight and Light-Weight Spackle
A ding, small hole, or big scratch is bound to be in almost any home. Whether caused by moving heavy furniture or daily wear and tear, it’s something that is easily repaired. Did you know that there are two types of patching compounds used for repairing holes, dents, and cracks in walls?

Shiplap: The Wood That Says “Welcome Home”
Imagine a cozy cabin nestled in a snowy forest. What's one of the first things you notice? The warm, inviting shiplap walls, of course. Shiplap is synonymous with comfort, wrapping you in its rustic charm and timeless appeal. It's the wood that says, "Come on in, you belong here."


