RON-VO:
TODAY’S HOUSECALL BRINGS ME TO THE FIRST CITY IN AMERICA NAMED AFTER CHRISTOPHER COLUMBUS. COLUMBIA, SOUTH CAROLINA IS LOCATED IN THE CENTER OF THE STATE, WHICH IS PRECISELY WHY IT WAS CHOSEN AS THE CAPITOL IN 1786.
BURNED TO THE GROUND DURING THE CIVIL WAR, IT HAS RE-GROWN INTO A GLEAMING CITY WITH ENOUGH ARTISTIC QUIRKINESS TO CLAIM ITSELF HOME TO THE WORLD’S LARGEST FIRE HYDRANT.
AND BELIEVE IT OR NOT, RIGHT HERE IN THIS 1930’S BUNGALOW NEAR DOWNTOWN, LIVES HOMER SIMPSON.…NO NOT THAT ONE. THIS ONE. HOMER NATHANIEL SIMPSON OF COLUMBIA HAS LITTLE IN COMMON WITH HIS FAMOUS NAMESAKE.
HE AND HIS WIFE AMANDA ENJOY THE THEATRE AND SIPPING WINE WITH FRIENDS. NOW NOTHING WOULD BE BETTER ON THOSE WARM SOUTHERN NIGHTS THAN TO MOVE THE GATHERING OUTDOORS AND THE SIDE YARD OFF THE KITCHEN WOULD BE PERFECT…IF THERE WERE A LITTLE MORE TO IT THAN DIRT AND WEEDS.
SO, THE SIMPSONS HAVE ASKED ME TO HELP THEM CREATE A COTTAGE-LIKE BACKYARD PATIO AND GARDEN.
Amanda Simpson:
Hi.
Ron:
Hi Amanda. How are you?
Amanda:
Good. It’s so nice to meet you.
Homer:
Nice to meet you.
Ron:
I can’t believe it. Homer? Homer Simpson.
Homer Simpson:
At your service.
Amanda:
We just didn’t get any of the royalties you know.
Ron:
What’s it been like to go through life as Homer Simpson?
Homer:
We all have our cross in life to bear. This is one of the first good things that’s come out of it.
Amanda:
That’s right.
Ron:
Oh well I've got to tell you. I had to come meet you.
Amanda:
Absolutely.
Ron:
I couldn’t pass that name up. So we’re, we’re going to work in the yard today? The patio?
Amanda:
Yeah come on we’ll show you.
Amanda:
This is it.
Ron:
This is your sand pit, huh. Yeah.
Amanda:
Not much to look at.
Ron:
Well you’ve done a great job on the front of the house. Now you just haven’t gotten back here yet.
Amanda:
We haven’t. We have not.
Ron:
So the material I was thinking about guys is kind of a, it’s a paver but it looks a little bit more like natural stone. It’s, it’s in curved shapes. It’s kind of irregular shapes. Will that work for you?
Amanda:
I think that’ll be perfect.
Homer:
That’d be great.
Ron:
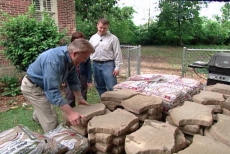
Ah yes the materials are here. Well you know the only depressing thing about this is that we’re going to have to lift every one of these and carry it to the other side of the house. This is a product called Nature Walk by Matt Stone. Now this is actually a man made material but I have to tell you that’s pretty convincing.
Amanda:
Very. Very nice.
Ron:
They’re designed to interlock the shapes one with the next. We’ll get into more of that later. And we have some other materials here as well. This is leveling sand. We’ll be digging out a little bit of the soil that’s there, putting some leveling sand down so that we get a nice level surface on these.
This is pea gravel. There’ll be some gaps along the edges perhaps, so we’re going to run probably an edging block along the side and then fill the space between the edging block and the pavers with the pea gravel right here.
Amanda:
Great.
Ron:
But before we do anything with this I want to go back around to the other side and sort of lay this out on the ground there so we can sort of get into agreement on what the shape is going to be.
Ron:
All right. Well that’s three down, two hundred and seventy to go right?
Amanda:
Oh yeah.
Ron:
So let’s talk layout here guys.
RON-VO:
AFTER DETERMINING THE BOUNDARIES OF OUR PATIO…WE BEGIN STAKING THEM OUT.
Ron:
Okay can I give you a hammering suggestion?
Amanda:
Please do.
Ron:
This is a very heavy hammer. Actually it’s called a two pound sledge. So the idea is to let gravity do some of this work for you. You’ve had a lot of wrist action in here. So raise it up a little higher and if you just almost let it fall….
Ron:
That’s almost, ooh.
Amanda:
Oh are you okay?
Ron:
Oh, oh. That’s almost just the weight of the hammer there.
Ron:
Just try that.
Amanda:
Okay.
Ron:
Just let it fall on the stake…
(SOT: HAMMER)
(MUSIC)
RON-VO:
AFTER DRIVING IN OUR FIRST FEW STAKES, WE OUTLINE THE BOUNDARIES WITH STRING, PULLING IT TAUT FOR A STRAIGHT LINE.
(MUSIC MONTAGE)
Ron:
Run that down to Nat. Just let him take it down there. Get right up over the stump.
Ron:
Well there it is. What do you think? Is it going to work?
Amanda:
I think it looks great.
Homer:
It’s going to be great out here.
Amanda:
My only question is could we not go a little deeper with the pavers?
Ron:
Yeah we could. I’ve kind of drawn the line there because I’m not sure how much material we have right now.
Amanda:
Okay I understand.
Ron:
And if we don’t have enough material today you guys can always extend this back further on.
Amanda:
That’s right because we’ll know how to do it now.
Ron:
You’ll know how to do it.
Homer:
And you’ll come back and help.
Ron:
And I won’t come back and help. Otherwise this would be meaningless.
Amanda:
Right. That’s right. That’s right.
Ron:
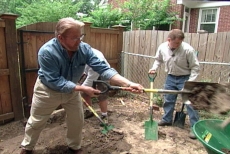
All right so that’s the good news. We’ve got a plan to start with right now. The bad news is we’ve got to take about three inches of soil out every place inside the string here.
RON-VO:
DIGGING OUT THREE INCHES IS NECESSARY TO KEEP THE TOP OF THE PAVERS LEVEL WITH THE REST OF THE YARD, BUT IT’S ALREADY GOT NAT WONDERING WHAT HE’S SIGNED UP FOR.
Homer:
I thought this was the part that was done with the magic of television.
Amanda:
Whoa.
Ron:
The magic of television. Now there’s an illusion. This is the reality of hard labor.
Homer:
There you go. The reality.
Ron:
The reality of hard labor meets the magic of television.
Amanda:
We’re not scared.
David:
The magic of television is here.
RON – VO:
MEET DAVID SCHULTE…MY ALWAYS PRESENT BUT RARELY SEEN CARPENTER WHO HELPS SPEED UP JOBS LIKE THIS ONE FOR THE SAKE OF TV. WE’RE ALSO GETTING A HAND FROM MY ASSISTANT CARPENTER SCOTT HAINES, WHICH GIVES ME A CHANCE TO GET BETTER ACQUAINTED WITH HOMER “NAT” SIMPSON.
Ron:
So seriously Nat, what’s it been like, growing up Homer Simpson?
Homer:
I think one of the first tricks learned was unlisted phone number.
Ron:
Really?
Homer:
That, and going by my middle name.
Ron:
Now what’s the most common thing people say to you?
Homer:
D’oh!
Amanda:
Needless to say none of our children will be named, Bart, Lisa or Maggie.
(MUSIC STING)
Ron:
Now probably the single most important step in a patio project like this is making sure that the ground underneath is properly prepared. We’ve done three things: first of all we made sure that the area we dug out here is uniformly 3 inches deep. This line right here is at grade down at that end and up here and we’ve measured in several places to make sure that it is consistently 3 inches from the string, down to the ground.
Secondly, we want to make certain that the patio slopes from the house outward, that’s because any water that runs off the roof up here, will hit the patio, run away from the house and not back toward the foundation. And third, we’ve taken a lot of care to be sure that this area is very flat in here because whatever high spots or low spots would be in here would telegraph right through to the pavers. The flatter this is the flatter the patio will be. And finally we’ve gone ahead and tamped the soil, compacted it so that it won’t settle underneath the pavers. Okay guys tamp away.
Homer:
Alright this is the fun part.
Ron:
Yeah it is the fun part. But you can feel how much more solid this is after you do that. You don’t feel like you’re sort of sinking down into it.
Ron:
Dirt loves to be tamped.
Ron:
I’d help but we’ve only got two tampers. You want me to spell you there for a minute, Amanda, are you tired?
Amanda:
Sure.
Ron:
OK, that’s it.
RON – VO:
WELL, THE TAMPING IS LIGHT WORK COMPARED TO WHAT COMES NEXT…
Dave:
You couldn’t get this delivered on the other side of the house?
Ron:
And this is where I wish I’d paid a little more attention in Geometry class.
A
RON-VO:
BEFORE LAYING OUR FIRST PAVER STONE HERE IN THE YARD OF HOMER AND AMANDA SIMPSON, WE COMPACT THE SOIL WITH TAMPERS…WHICH IS ACTUALLY A LOT EASIER THAN CARRYING OVER ALL THE STONES AND SAND BAGS FROM THE OTHER SIDE OF THE HOUSE…
Dave:
You couldn’t get this delivered on the other side of the house?
Homer:
That would have been too easy on us.
RON – VO:
…BUT FORTUNATELY MY CARPENTER DAVID SCHULTE IS HERE TO HELP.
Ron:
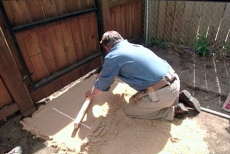
Alright this is leveling sand and the idea is to put down just one inch of this. So to help us get the right thickness I’ve put down these two pieces of PVC pipe. It’s three-quarter inch pipe but on the outside it’s exactly one inch in diameter. These are called screed rails and I’ll show you in a second how they’re going to work but for the time being let’s just dump some sand out here.
RON-VO:
NOW LEVELING SAND IS RELATIVELY COARSE, WHICH MAKES IT MORE STABLE AND ALSO ALLOWS FOR DRAINAGE.
TO GET THE PERFECTLY LEVEL, ONE-INCH THICK SAND BED WE NEED FOR THE PAVERS, I DRAG A TWO BY FOUR -- CALLED A SCREED -- ACROSS THE PLASTIC PIPES.
Ron:
All right? Now if each one of you would take a hold of one of those and slide it out.
RON-VO:
WE REMOVE THE SCREED RAILS, FILL IN THE TRENCHES WITH SAND, AND SMOOTH THE SURFACE WITH A TROWEL. NOW WE’RE READY FOR THE PAVERS.
RON-VO:
BECAUSE OF THE UNUSUAL SHAPE OF THESE PARTICULAR PAVER STONES, IT’S ESSENTIAL THAT THE FIRST FEW BE PLACED IN SUCH A WAY THAT THE OUTER-MOST POINTS CREATE A PERFECT 90 DEGREE ANGLE. ESTABLISHING THIS ANGLE ASSURES THAT AS WE EXPAND THE PATIO, WE’LL MAINTAIN STRAIGHT LINES ALONG BOTH AXES.
Ron:
And this is where I wish I paid a little bit more attention in geometry class because the solution is in something called a 3, 4, 5 triangle.
TIP GRAPHIC
(SOT – TIP GRAPHIC SOUND EFFECT)
Ron:
The law says or the rule that is, that if you have a triangle with one 4 foot side here, one 3 foot side here and one hypotenuse or diagonal that’s 5 feet, then this angle right here has to be exactly 90 degrees.
So this is what we’re gonna do. I’m gonna take my tape measure and measure 3 feet down this string, make a mark with my felt tip marker…okay? And I’m gonna ask my friend Dave over here to measure 4 feet down this string, okay? Now I’m gonna put my tape measure on his 4 foot mark and he’s gonna move that line back and forth, left to right until I get 5 feet on my mark over here.
Keep moving Dave, move it in a little bit more, little bit more, in…Okay there we go, alright 5 feet. Now I know that this angle right here is exactly 90 degrees.
RON-VO:
HOMER AND I PLACE THE FIRST THREE STONES MAKING SURE THE OUTER-MOST POINTS LINE UP WITH THE STRINGS THAT FORM OUR 90 DEGREE ANGLE. NOW, WE’RE READY TO EXPAND OUTWARD.
(MUSIC)
Ron:
Alright, we’re gonna stop here now and we’re gonna put some more sand down here and screed back a little further but we’re gonna continue this process just working our way, all the way down to that end.
Amanda:
OK.
(MUSIC)
Ron:
This will go right in here.
Nat:
This is it.
Ron:
The ceremonial stone.
Ron:
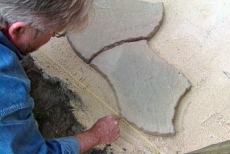
Well we’ve put in all of our whole stones. Now we’re gonna have to do some cutting. For example right up here where the stones meet these steps. And over here where they meet this pipe.
RON-VO:
TO DETERMINE WHERE TO MAKE THE CUT, I TRACE THE SHAPE OF A STONE ONTO A MANILA FOLDER… THEN CUT IT OUT. NEXT, I PLACE THE FOLDER WHERE THE STONE WILL GO… DETERMINE WHERE I WANT MY CUT LINE … MARK IT… AND CUT OFF THE EXCESS. FINALLY, I TRANSFER THE CUT LINE FROM THE FOLDER TO THE STONE.
(MUSIC)
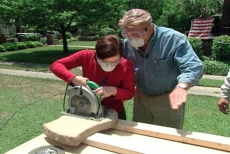
Ron:
So how do you cut a concrete pathway stone? With a saw. But not just any saw.
This is a diamond saw blade in here. A lot longer life and probably will cut a little bit faster. So that’s what we’re going to try today.
Here’s what we’re gonna do. I’m gonna make a first scoring cut, about a ¼ inch deep here. Then we’re gonna lower the blade down. So that we’re making a deeper cut and then you guys can each make some passes with that.
(SOT: SAWING)
(MUSIC MONTAGE)
Ron:
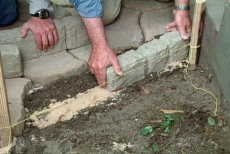
Now these are pre-cast edgers. Again made by Matt Stone they actually match the stone texture and color right here. These we’re going to be used to define this flowerbed in here. They can also be used to define the edge of the walkway if you want a straight edge. All right?
Amanda:
Right.
Ron:
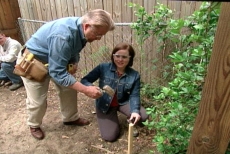
So Nat why don’t you start here. Just dig down here. I put this line, this is a level line that’s going to serve two purposes. It’ll show us where the top of the edgers should be and it’ll also make sure that we go in a straight line. It is level so let me take the line level off.
So you’ll need to dig down, you and Amanda need to dig down a little trench there about probably an inch or an inch and a quarter. Make it an inch and a half actually.
RON-VO:
HOMER AND AMANDA DIG THE TRENCH, THEN WE POUR IN SOME SAND, LEVEL THE SURFACE, AND SET THE EDGER STONES IN PLACE.
(MUSIC MONTAGE)
Ron:
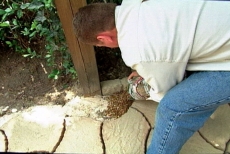
Nat, we’re going to be putting pea gravel in here underneath the arbor and I’m putting down some landscape fabric right here. Some people call it weed cloth. This will keep the weeds from growing up through the pea gravel but it also has got a loose enough mesh so that water will drain through.
(MUSIC)
Amanda:
That looks really great. I like the color.
Homer:
Me or the patio?
Amanda:
The stone. I like the contrast a lot.
Amanda:
This just helps to give it that cottagey look that we were sort of going for. I mean the stones themselves are certainly that way but these, this gravel really adds to that.
Homer:
All right.
Ron:
Hey thank you very much Nat.
Homer:
You’re welcome. Thank you.
Amanda:
Thank you.
Ron:
Well I think we have something to toast right here.
Amanda:
It’s just what we wanted. It’s a complete extension of our home… it’s a new room for us!
RON-VO:
WELL OUR DAY BEGAN WITH A YARD CONSISTING OF LITTLE MORE THAN DIRT AND WEEDS. BUT THANKS TO THESE EASY-TO-INSTALL STONE-LIKE PAVERS ALONG WITH THE EDGER STONES... PEA GRAVEL... AND OUR NEW FLOWER BEDS, THE TRANSFORMATION IS REMARKABLE. ANY VISITOR TO THIS QUAINT, COTTAGE PATIO WILL HAVE NO TROUBLE DISTINGUISHING THE GOOD TASTE OF THE SOUTH CAROLINA SIMPSONS FROM THAT OF THEIR CARTOON COUSINS.