RON HAZELTON:
Well, I'm heading clear across the country to the coastal town of Pacifica, California, ah, just a short distance south of San Franciso's Golden Gate. I'm going to be visiting deck lovers John and Brenda Hall.
BRENDA HALL:
Hey, Ron.
RON HAZELTON:
Good morning.
[SEVERAL SPEAK AT ONCE]
BRENDA HALL:
How are you. Nice to see ya.
[SEVERAL SPEAK AT ONCE]
JOHN HALL:
Welcome to our house. Great to meet you. Thanks for coming by.
RON HAZELTON:
Oh, thanks very much. Well, I don't have to ask if the materials got here, huh?
BRENDA HALL:
They’re certainly here.
JOHN HALL:
Well, it all showed up, everything's here.
RON HAZELTON:
With our decking material already here, we get right to work.
Okay, guys. Um, first thing that we want to do here is get these old deck boards up.
BRENDA HALL:
Okay.
RON HAZELTON:
And these are all put down with screws. Ah, some of them may come up easily, some of them may not, but I've got a couple of ways to deal with those.
[MUSIC]
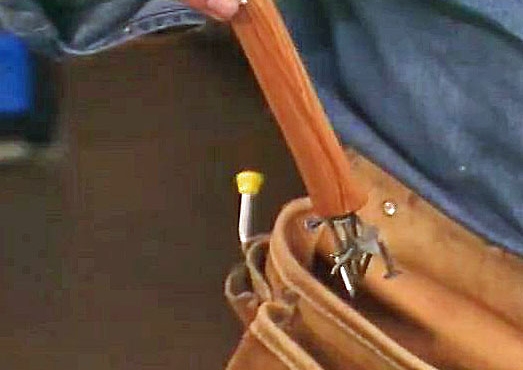
Now there's a sound you hate to hear. A screwdriver bit just slipping in the head of a screw. But there are a couple of ways that you might be able to get those screws out easier than you think. This is one right here. These are called friction drops.
Actually, it's a gritty material that's suspended in a gel. It's designed to go right in the head of the screw here. Let’s put a drop. It's actually going to create some friction between the tip of the drill bit and the stripped out screw head. Watch.
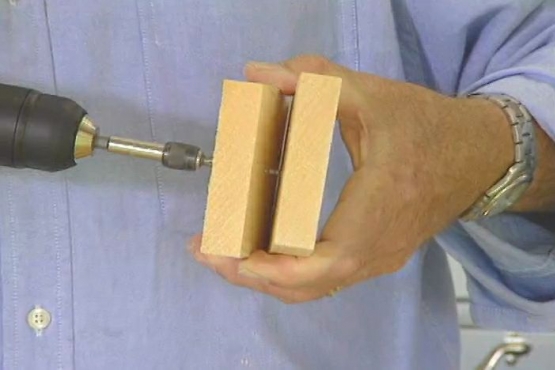
Out comes the screw. No more slips. Now if this doesn't work, you might try a screw extractor. That involves two steps. First of all, you've got to drill a small hole in the head of the stripped out screw.
The second tool is this extractor. It has a tapered coarsely threaded shaft and then what you do is put it right in the hole you just drilled and turn it counter clockwise. It sort of bites in and eventually it will start to turn the screw. So if you've got a stripped out screw head, now you've got at least a couple of ways to get those troublesome screws out.
Brenda, John and I go to work removing all the screws and while we have a solution to the stripped out screw head problem, we soon encounter another predicament: the salt air here has rusted some of the screws so badly, they just snap in half.
We're left with no choice but to pry off several of the boards. Fortunately, they come loose without too much effort.
Well, we've got all those old deck boards out. Now the good news is that all of our joists and our posts down here are in very good shape. The bad news is that the new decking boards that we're gonna be putting in here, require that the joists be spaced a maximum 16 inches on center, these are 24.
So we're going to have to add a joist between each of the existing joists and in order to do that, we're going to have to put a rim joist around the outside. So guys, want to bring that on in. This is pressure treated two by six and we're gonna nail this right on the ends of the existing joist here.
We attach the rim joist with a butane-powered nail gun.
BRENDA HALL:
I love this.
RON HAZELTON:
Ah. The distance here is just too great for a,a two by six joist to span. So we'll put this in the center.
We hold the support rail in contact with the bottom of the existing joist, then nail it to the sides of the post. Next, we center these metal joist hangers between each of the existing joists. Then attach them to the rim joist with rustproof galvanized hanger nails.
You'll have to demand equal tool time now. Making the refreshments is no longer enough.
BRENDA HALL:
No. But I'll probably have to do that too.
RON HAZELTON:
All right, you two, here's your first new joist. Don't get too excited now. We want to just drop this right in here. John, you got your end going?
JOHN HALL:
Yeah, we're good here.
RON HAZELTON:
Okay, now push it down. There we go, nice. Nice and flush here on the top. Now, right down here, you'll notice on the joist hanger are a couple of toenail guides, so you start your nail like that, drive it right in. Hold it at just the right angle.
JOHN HALL:
Right, I got it here.
RON HAZELTON:
We work our way across the deck, installing the new joists. Now we're just about ready for our new decking.
[MUSIC]
ANNOUNCER:
Ron Hazelton's HouseCalls is being brought to you by the Home Depot and by GMC.
[SOUND CUT]
RON HAZELTON:
Here at the Pacifica, California home of John and Brenda Hall, the three of us have been busy dismantling their weathered backyard deck. We're going to replace it with a new long lasting deck made from recycled materials. We've also decided to install a handrail made from the same material in front of the pond.
Now the railing post is gonna be supported by this railing post bracket and it's gonna mount right here on the inside like this, of the rim joist. What we want to do to attach this is we're gonna put some bolts in. And John, I've given you some marks right here. So why don't you go ahead and drill through.
John drills four holes through the rim joist, then taps a bolt through. We slip a washer and nut on the end and then tighten the nut with a socket wrench. Next, we slip our post through the bracket and tighten the bracket around the base of the post.
We'll install the railings later after we've put down the deck.
Now that seems very fair to me. You carry a board, I carry a board. [LAUGHS]
[LAUGHTER]
JOHN HALL:
Wait a minute here.
RON HAZELTON:
So this is your new decking.
BRENDA HALL:
Great.
RON HAZELTON:
This is called composite decking. It's made of recycled polyethylene plastic and recycled wood from wood chips and sawdust, furniture factories and the like. Great thing about it, you'll never have to paint this, it will last forever.
JOHN HALL:
Looks great.
RON HAZELTON:
And it should work really well for you out here, especially being this near the ocean. Well, here's our first plank and our first challenge too.
BRENDA HALL:
Okay.
RON HAZELTON:
Because we've got to notch it to fit around this post right here. So what we'll do is take a couple of straight edges, this is out of my combination square here and we'll lay this one up along this side of the post. We'll just draw a little line out here that way. Now we're gonna carry that angle out here.
BRENDA HALL:
Okay.
RON HAZELTON:
And then I've made a sort of a template right here at the right thickness.
I'm gonna lay that up against the other side of the post, draw a parallel line and this is what we're gonna cut out right here.
Brenda cuts out the notch using a cordless jigsaw.
BRENDA HALL:
All right.
RON HAZELTON:
They don't make notches any better than that. Are you guys getting the feeling I'm making you do all the heavy lifting?
JOHN HALL:
Ohh - no.
BRENDA HALL:
No.
RON HAZELTON:
Okay.
[LAUGHTER]
Let's clamp this in place, guys. That notch fits really well right there. Ah, we're gonna come back and actually ah, screw this in position ah, in a short while, but for now, I'm just gonna clamp it. There we go. This is our second board right here.
John, for the time being, put this right up against the, ah--
JOHN HALL:
Post?
RON HAZELTON:
-- post down there, right.
JOHN HALL:
Here we go.
RON HAZELTON:
Now, what's important is, any two boards have to meet directly on top of a joist. So we want to cut this so that the end of it falls right in the middle, right here.
Using a speed square as a guide, we make the cut using a cordless circular saw.
That's all there is to it. Now slide it back in, in position and we should be falling right where we want to, which is in the center of this joist. There you go. So what's gonna happen is, this -- the end of this one we've now got room to screw into the joist and the end of the one that's gonna -- made up of this.
Before we actually screw the deckbords in place, we lay down several more rows using wood shims to keep the spaces between the boards uniform.
Are you ready to fasten?
JOHN HALL:
Ready to go, sir.
[LAUGHTER]
RON HAZELTON:
We're gonna have some fun now, let me tell you.
JOHN HALL:
Yeah.
RON HAZELTON:
This is an auto loading screw gun. One of the things I love about it is that you can do all the attaching standing up. You don't have to bend over, get down on your knees.
JOHN HALL:
That will be nice.
RON HAZELTON:
And the screws come collated like this into strips. There's a lot of technology in these screws. They've got specially machined ends right here that actually bore a hole. Ah, they're rust resistant, they're both galvanized and coated and they have very small finish heads right here with a square drive.
So they're almost invisible once they go in. And you can carry extra supplies around in this quiver right there, if you want to. Now to use this, all you have to do is, you turn your drill on and I let mine just continue to run like this.
Get in position over the joist, push this down. That's it.
Now I've laid down a lot of decks, and the most grueling part of a job has always been working on my hands and knees to drive in screws or nails. I gotta say, this tool makes deck installation a snap.
[MUSIC]
We simply continue cutting and laying down more rows and attaching them with the auto loading screw gun. In a short time, our deck is done. With all our deck boards secured in place, we turn our attention back to the railings.
This is the base right here.
JOHN HALL:
Okay.
RON HAZELTON:
It just slips over the post which you put in earlier.
JOHN HALL:
All right.
RON HAZELTON:
Comes right down here.
JOHN HALL:
That's good.
RON HAZELTON:
Then take this piece -- this is called universal railing, it's used on the top and the bottom and it's -- it fits right into a recess here on the --
JOHN HALL:
Well, look at that.
RON HAZELTON:
-- on the post and it sets on top of these trim pieces on the bottom. All we have to do is to take a short piece of this stock and put it right here in the center --
JOHN HALL:
I see.
RON HAZELTON:
it's kind of a center support.
John HALL:
Ah,huh.
Ron HAZELTON:
And we can attach that with a screw.
In addition, we install brackets to secure both the bottom rail and a top rail to each post.
Good, okay, John. Ah, brackets bottom and top. This is that same universal rail. We're going to install this one though, bottom side up --at least relative to the first one and then we'll secure that in place with some more screws going up through the rail here.
[MUSIC]
Okay, our first baluster. Now the balusters on the end get attached with a long screw right through here. Okay, good.
We simply slide the other balusters between the railings and use spacers to give us a consistent distance between each one. Finally, we put a few dollops of silicone on top of each post and set the decorative post caps in place.
Well, the main part of our deck is down and it's looking very, very good. And guess what, a friend of mine dropped by. Hi, Jill.
JILL SLATER:
Hi, Ron.
RON HAZELTON:
This is Jill Slater who does the Good Gardening segments for KGO TV. I got my start there. KGO TV, San Francisco.
JILL SLATER:
That’s right.
RON HAZELTON:
And, ah, we are definitely gonna put some plants on this deck, but there are some things we've got to keep in mind and particularly water, right?
JILL SLATER:
That's right. We're putting a container garden on the deck. And it's very important that containers are watered properly. So what we are going to do is we're going to install a drip system to each plant. And what a drip system does is that it delivers a very steady, slow rate of water to the root system of each plant.
RON HAZELTON:
And they like that.
JILL SLATER:
They like that. And the reason is, is it makes them more healthy and it doesn't stress them out. And that's why -- because you get watered regularly and that's why it grows into a healthier, more vigorous plant.
RON HAZELTON:
So where do we start on putting in this kind of a system for a deck?
JILL SLATER:
Well, we're gonna put in a timer so it becomes automatic, and we need to go over to this hose bib.
RON HAZELTON:
I'm all for automatic, especially when it comes to taking care of plants.
JILL SLATER:
Me too. We have a hose adapter that allows us to use both our hose and our drip system. So we'll just screw this on.
RON HAZELTON:
So we don't, we don't lose the use of the hose bib by installing this -- this system.
JILL SLATER:
No, we don't.
RON HAZELTON:
Okay.
JILL SLATER:
And that's really handy. Okay. There we go. Now this is the timer that I was talking about. It's electronic and it runs by a battery.
RON HAZELTON:
The timer unit also includes a filter, a pressure reducer and a back flow valve. Next, we run half inch flexible vinyl tubing around the perimeter of the deck. Then attach the smaller spaghetti lines which will run up through the drainage holes in the bottom of each container.
JILL SLATER:
This is where the water comes up. This is a long pick -- there we go, and you just pick it in.
RON HAZELTON:
That is the cleverest idea. So you don't see the hose because it's running up through the drainage hole.
JILL SLATER:
Right.
RON HAZELTON:
Now over here, there's something I wanted to look at which kind of caught my eye earlier. You've got what look like trivets under here.
JILL SLATER:
Yes. Well --
RON HAZELTON:
What's that all about?
JILL SLATER:
Well, these are a new plant stand we found that you can actually cut to the size of the bottom of your pot. And then it's allowing us to put the drip system through it so that, as you set the pot on here, it doesn't squish the hose.
RON HAZELTON:
Doesn't squeeze the hose.
JILL SLATER:
Right.
RON HAZELTON:
And you've got a real collection of, of planters here. You've got the -- what is that, a wash tub?
JILL SLATER:
Right. What you want to do in here --
RON HAZELTON:
Terracotta.
JILL SLATER:
-- when you're deciding on your plants and your pots, is think of style, think of color and of course, every single plant has to go in your environment.
RON HAZELTON:
Well, thanks to some expert assistance from Jill Slater and this durable, maintenance-free decking material, we've created an environment that's not only beautiful, but also ecologically sound. The deck will last one heck of a long time and the watering system won't waste a drop.