How to Put in an Underground Dog Fence
Learn how to install an invisible electric dog fence to confine your pet to your yard.
Installing an underground fence to keep your dog confined and safe is a fairly simple project. The fence uses a buried wire that continuously emits a radio signal. Your pet must wear a special collar with a receiver on it and two small prongs/electrodes. When the dog approaches the wire, the radio signal first causes the collar to beep as an audio warning and will then activate the collar to deliver a mild corrective shock to the pet that will cause it to turn back from the fence.
Read More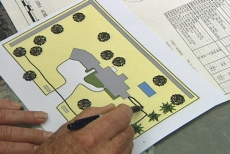
Plan the Location of the Underground Dog Fence
Draw a plan to indicate the location and size of the underground dog fence. Separate back yard from front by looping fence back on itself at the sides of the house to maintain a continuous circuit.
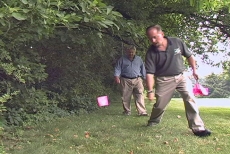
Mark the Underground Dog Fence Location with Temporary Flags
Use garden flags to mark the desired path for invisible electric fencing. Leave them in place briefly after the underground dog fence is completed to add a visual cue to help the dog recognize the boundary during initial training.
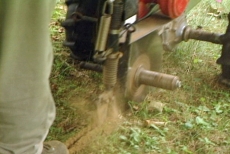
Lay the Underground Dog Fence with a Wire Trencher
Install the underground dog cable with a gasoline-powered wire trenching machine. Guide the motorized tool along the flag markers to cut a slot in the ground and insert the invisible electric fencing wire at the same time.
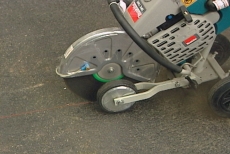
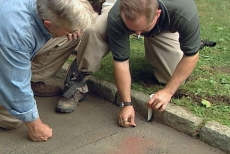
Slot the Driveway for the Underground Dog Fencing
Position the slot for the underground dog fencing to avoid edging stones and snap a chalk line as a cut mark. Use a rolling saw equipped with a masonry blade to cut through the asphalt driveway.
Seal the Underground Dog Fencing into the Driveway
Stretch the underground dog fence wire across the driveway and tamp it into the slot with a narrow plastic putty knife that will not abrade or damage the insulating jacket on the wire. Overfill the crack with sealant.
Splice the Underground Dog Fence Wire Where Necessary
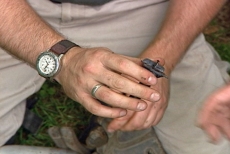
Lay the wire for the underground dog fence as one continuous loop , splicing it as necessary. Widen the slot for the splice, stripping off some wire insulation, joining ends with a gel wire-splice, and burying the device.

Fish the Underground Dog Fence through the Garage Wall
Bore an unobtrusive hole near ground level in the garage wall. Fish the two ends of the wire loop for the underground dog fence inside to connect to the transmitter. Caulk around the hole.
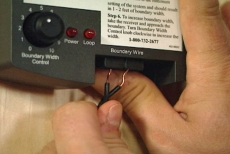
Mount Underground Dog Fence Radio Transmitter to the Garage Wall
Mount the radio transmitter for the underground dog fence to the interior garage wall and attach the ends of wire loop to the terminals. Secure the wire to the garage wall with arched staples.

Plug in the AC Power Adaptor to Step-Down the Voltage
Plug in the AC power adaptor for the underground dog fence to step-down the voltage of the house current. Check its two lights to confirm the power is working and the loop is continuous.
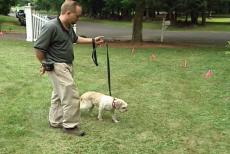
Teach Your Pet about the Underground Dog Fence
Put the collar on your dog. Walk your pet slowly towards the underground dog fence until the collar's audio signal is triggered. When the dog turns away, praise it. Approach near enough for a mild static shock, if necessary. Repeat.
Blog Articles

Expert Tips: How to Mount a TV on the Wall
Get step-by-step instructions on how to mount a TV on the wall, especially for big screen TVs. Master the art of wall mounting with our tips.

Frustrated by Stripped Screws? Here’s How to Get Them Out Fast
We've all been there. You're in the middle of a project, and suddenly your screwdriver spins uselessly in the screw head. The screw is stripped, and frustration sets in. With a little know-how and this simple trick, you can tackle a stripped screw and get your project back on track.

The Secret to Finishing Plywood Edges
Plywood projects are fantastic, but exposed edges can be an eyesore. This blog post unveils the magic of edge banding - a simple technique to create flawless, finished edges on your plywood projects, making them look professional and ready for paint or stain. Watch the video to learn how to apply edge banding like a pro!


