RON HAZELTON:
Well, it's time for another road trip. Today, I'm headed to Lexington, Kentucky. It's here that Steve and Donna Hertz live with their children — seven-year-old Tanner and five-year-old Caroline. Now Caroline has a large desk and shelving unit in her bedroom. Tanner's room on the other hand, lacks this amenity. We're going to even things out by creating a wall-mounted desk and shelving set that's ideal for a young boy.
Well, I've taken the liberty, based on our earlier conversations about it, of drawing something here for you.
DONNA HERTZ:
Mm-hmm [AFFIRMATIVE].
RON HAZELTON:
It's going to have shelves on both sides and a desk across the bottom. So how does that look to you?
DONNA HERTZ:
That looks great.
STEVE HERTZ:
That really looks good.
RON HAZELTON:
All right. So I'd like to get started. We'll move this stuff out of the room and I want to, first of all, check the location of the wall studs. But give me a hand here.
[BOTH SPEAK AT ONCE]
STEVE HERTZ:
Okay.
DONNA HERTZ:
All right.
RON HAZELTON:
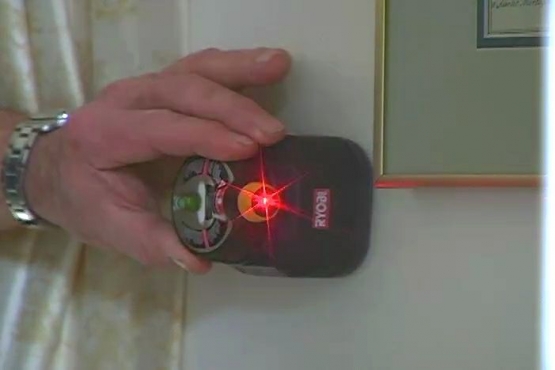
After cleaning out the room, Donna and Steve use electronic stud finders to locate then mark, each of the studs on the wall where we'll be installing the shelving unit. It's on these studs that we'll attach four standards or wooden strips onto which we'll mount movable support brackets for the desk and shelves.
Next, we go outside where I've set up my compound miter saw. Now I've already cut the standards to length, but we're about to give them a decorative touch by making a champer or angled cut on each end.
Okay, and then we'll cut this off using the power miter box. Let's get some glasses. Hey, who wants to cut first?
STEVE HERTZ:
Go ahead, hon.
DONNA HERTZ:
Okay, I'll try.
RON HAZELTON:
Ah, victim number one.
After getting a few tips, Donna cuts the first champer then Steve takes a turn.
Right on the money, that's good. Can not do better than that. Okay, we're ready now for a very boring experience. Get it?
DONNA HERTZ:
Oh, boring — boring — got it, got it, gotcha —
RON HAZELTON:
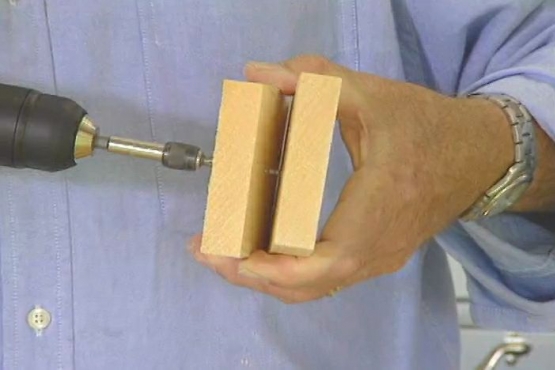
We're going to bore a row of holes through the sides of each standard. Then we'll drill matching holes in each shelf bracket, slip the bracket over the standard and secure the bracket to the standard by driving in dowels.
In order to make sure that those holes are evenly spaced, I made up this little jig for you here. It's called a boring jig, it's out of plywood.
DONNA HERTZ:
Mm-hmm [AFFIRMATIVE].
RON HAZELTON:
We're going to lay this right on top, like so. Make sure the end is flush up here and then kind of put this on the edge of the table like that.
STEVE HERTZ:
Okay.
RON HAZELTON:
All right, Steve and take one of these clamps over there, if you would and you're going to clamp the — the boring jig right to the table top like this.
STEVE HERTZ:
Okay.
RON HAZELTON:
With the jig clamped in place, we begin drilling. This portable drill press, attached to our hand drill will keep the drill bit straight up and down, making certain these holes will align with those we'll drill later in the bracket.
Next, we drill a second set of holes on the front. These are for the lag screws that will attach the standards to the wall. First, Donna drills larger countersink holes which will allow the screw heads to sit below the surface.
Steve follows behind, drilling shank holes that go all the way through. Then it's back inside for installation.
[STEVE AND RON SPEAKING TOGETHER]
STEVE HERTZ:
— right there, right there.
RON HAZELTON:
Steve and I hold the standard in place while I run a drill bit through the shank hole just far enough to make a locator mark on the wall. We take the standard away and I get Donna set to drill pilot holes.
Place this in the marker hole there. And find the center of the hole.
We repeat the process for each of the standards. And now we're ready to mount them with lag screws and washers.
Are you on the marker, Steve?
STEVE HERTZ:
Yes.
RON HAZELTON:
We give the screws a couple of turns by hand. Then use a socket wrench to tighten them. With the standards up, it's back outdoors.
Now we're going to build a shelf bracket.
DONNA HERTZ:
Alright.
RON HAZELTON:
Now the bracket attaches to the standards that we've already put up —
DONNA HERTZ:
Okay.
RON HAZELTON:
— with a dowel. And then the shelf sits on top of the bracket. Now we're going to make this bracket up out of three pieces of material —a core on the inside here, and two skins on the outside. The core material is going to be inch-and-a-half thick pine.
And the skins are going to be cardboard like this and it's going to get sandwiches in between.
DONNA HERTZ:
Okay.
RON HAZELTON:
But you notice that these are in kind of a triangular shape, so we're going to have to cut both the core and the skins to this shape. And to do that, we're going to use the table saw. Give me that, Steve.
[BOTH SPEAK AT ONCE]
STEVE HERTZ:
All right.
RON HAZELTON:
And we're going to set the table saw up with a little accessory here. A jig called a sled. So I’ll tell you in just a second, how this works. It's going to slide back and forth like this.
We nail a precut piece of wood to one of our pine cores directly onto the sled then run it alongside the saw blade, creating two triangular-shaped pieces. The sled holds the wood at the proper angle and allows us to keep our hands a safe distance from the blade.
Alright. Now we want to cut the skins that are going to go outside that core in that same triangular shape. The only difficulty here is I don't want to nail through these because they're going to show. I don't want to have the holes left. So I'm going to figure out another way to sort of clamp these down.
I think if we take a block of wood and put it right there, another block of wood right here and I run this screw in here, it will hold it while we make the cut.
Once all of our bracket parts are cut, we assemble them — first with glue, then with nails.
There you go, there's your first bracket right there.
STEVE HERTZ:
Yeah, that looks good.
RON HAZELTON:
Steve and Donna assemble a dozen or so shelf brackets and then a couple of longer brackets that will support the desk. Now there's one more step in completing the brackets. The fins or tail ends of the brackets must each have matching holes bored through them. In order to slide over the standard and be secured with a dowel, it's essential that these two holes line up exactly.
I've made up this jig here - another boring jig. And all you guys have got to do is actually slip this in here like so.
Once again the jig, along with our portable drill press assures two holes that are in perfect alignment.
Pretty hard stuff, isn't it?
DONNA HERTZ:
Mm-hmm [AFFIRMATIVE]. Looks good though.
[BOTH SPEAK AT ONCE]
It does look strong.
RON HAZELTON:
— it is. We've got to put the holes right where we need them.
We've cut our shelves and desk top to size from sheets of plywood. But now I want to add strips of 1 x 2 edging to make them stronger and thicker in appearance.
Well, let's start on the ends over here first. Donna, come on around here.
DONNA HERTZ:
Okay.
RON HAZELTON:
Donna brushes glue on the edge of the shelves then we press the edging into place and secure it with nails.
[MUSIC]
Very nice. I see that shelf isn't going to go anywhere except up.
DONNA HERTZ:
Yeah, great.
STEVE HERTZ:
That sounds great.
DONNA HERTZ:
Put books on it.
RON HAZELTON:
We install the shelving brackets by hammering the dowels through the bracket and standard holes. If Tanner ever wants to relocate the shelves, these dowels can be driven back out and the brackets repositioned. Soon, we're ready for the shelves.
STEVE HERTZ:
Donna, grab that side and we'll put this up.
DONNA HERTZ:
That side in.
RON HAZELTON:
The shelves rest very solidly on the brackets. But because Tanner may decide to put a heavy object on one side or the other, they could tip. For that reason, we'll secure the shelves to the brackets with a couple of countersunk screws.
All right, Steve, one desk top. How does it look to you?
STEVE HERTZ:
Oh, it looks great. I love how it ties everything together. I'm real happy about it.
RON HAZELTON:
Very nice. Well, let's grab Donna, get some books and trophies and set that up.
[MUSIC]
The more I see this, the more I like it. You know, it's, it's a work space, a storage space, play space.
DONNA HERTZ:
Exactly.
RON HAZELTON:
You guys happy with it?
STEVE HERTZ:
Real happy.
DONNA HERTZ:
Very happy, very happy. It eliminates a lot of furniture in this room which I think we needed.
RON HAZELTON:
Yeah.
DONNA HERTZ:
And then it gives us all this storage space and you know the fact that we can adjust it, he can grow with it — I think it's great.
STEVE HERTZ:
And it's a great place for him to study.
RON HAZELTON:
Well, I almost feel like I want to sit down and hit the books.
STEVE HERTZ:
Right.
DONNA HERTZ:
Exactly.
[LAUGHTER]
RON HAZELTON:
Well, I actually did sit down and hit the books, this time with Tanner himself at his brand new desk which, along with the shelves, feels like the perfect addition to any boy's room.