RON HAZELTON:
You know, after finishing a job like patching that hole in the wall, I like to relax a little bit and nothing is more relaxing for me than grilling outside. Well, Tom Bourbon and Rebecca Sweet, they live out in Los Altos, California love to cook outside too.
They asked me to come out and give them a hand with a very interesting project.
[SOUND CUT]
RON HAZELTON:
So this is where you were thinking, right here, huh?
TOM:
Right in this corner.
RON HAZELTON:
Now, you cook outside. Who's the outdoor cook?
TOM:
I do the outdoor cooking.
REBECCA:
Tom yeah, indoor.
RON HAZELTON:
And Rebecca, you're the indoor.
[BOTH SPEAK AT ONCE]
REBECCA:
Indoor, indoor cooking.
RON HAZELTON:
You have a nice division of labor there.
TOM:
Right.
RON HAZELTON:
So, how are you doing it now?
TOM:
Well I have a barbecue that I have to wheel onto the lawn here. And it kind of tears up the lawn as I move it. And then I'm shoving it back in the corner so it's not the prettiest solution.
RON HAZELTON:
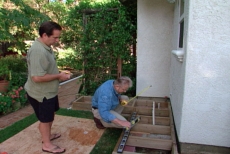
Okay. This L-shaped brick area is the perfect spot for a backyard kitchen installation. We're going to build what is essentially a kitchen counter with a tile countertop. Built into the counter will be compartments for a mini refrigerator, a rinsing sink and a built in gas grill.
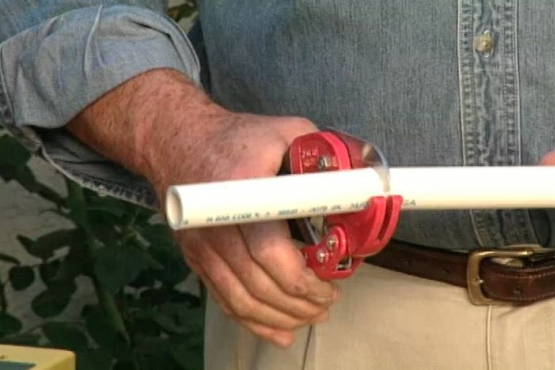
Our first step involves removing the lawn sprinkler distribution manifold, currently located in the exact spot of our future grill. Tom and I use plastic pipe cutters to remove it. Later on, we'll reroute the water pipes and reinstall the manifold at a different spot. Next, we stake out the boundaries of the counter. All right, let's get some wood and start doing this for real.
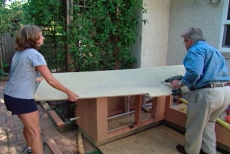
All the various components of our kitchen will be built on top of a wooden platform. So the first step is to build a joist assembly which is the base for the platform. After measuring and cutting all the wood, we assemble all the joists as a single unit, using a butane powered nail gun.
Since the joists will be in contact with the ground, we use pressure treated lumber which resists rotting. Once it's put together, we set our joist assembly into place. So we're level left to right and we're level front to back, all the way around.
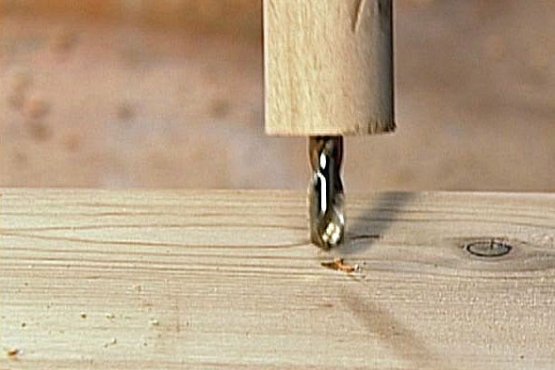
The next step is going to be to put a piece of plywood on top of this. First we drill a series of holes to accommodate the sprinkler pipes. Then, set the plywood deck in place.
Right, all right -
TOM:
Hey, not bad.
RON HAZELTON:
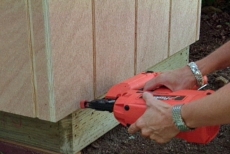
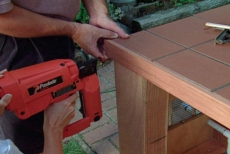
Well done. We attach the plywood by driving rust proof galvanized deck screws into the joists. Now this is the base for your new grill. It's all insulated.
TOM:
All right.
RON HAZELTON:
We'll get back to this a little bit later. But it's fairly heavy as you can see and it's going to get even heavier when we put the workings on the inside. So it has to be supported. We're going to create a little platform made up of four of these frames right here. Those two are together.
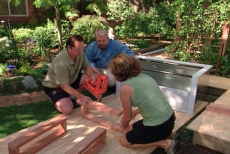
What I want to do right now guys is make up two more, and then we'll put a piece of plywood on top of that. Tom and Rebecca nail the two by fours together, using simple butt joints. So think of those as kind of legs, guys and this is going to be the top.
So just make it flush on the edge over there. All right, just do that side first and then the screw gun is behind you, Rebecca.
While Tom and Rebecca finish off the grill platform, I cut the sprinkler pipes down so that they'll fit beneath it. Okay, Tom, well we got a start on the plumbing here. We're going to have to put the rest of those pipes in a little bit later and make our connection to the manifold.
Right now though, I want to drop this platform in place. Help me pull this out a little here, okay. And we're going to put the base to your grill up on top here. We'll attach this down permanently a little bit later. But let's grab the end of this. Right now, I need to get some measurements. All right. Now, the critical measurement for us right now is the height. This measurement gives us the proper height for the wall frames which we're about to construct next.
We'll also build a pair of interior frames to be installed on either side of the grill platform. They'll form a separate compartment into which the gas grill will set. Tom and Rebecca take turns cutting the two by fours needed for each frame.
TOM:
That was great.
RON HAZELTON:
We then return to the nail gun and assemble the frames. And Rebecca, we can bring this in now. And we're going to set this right back here. We attach the rear wall frame to the platform by driving nails through the bottom plate and into the base framing.
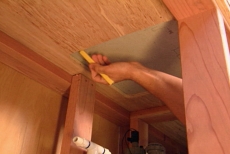
Wall number two going in. I think we can put this in now for the final time. Great. Okay, this is going to form a side of our compartment. Next, I work on reinstalling the sprinkler manifold while Tom and Rebecca attach finish grade plywood sheeting to the wall frames.
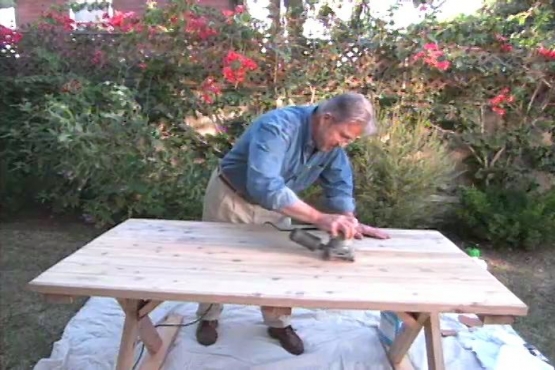
With the walls of our kitchen complete and the sun going down, we call it a day. We begin day two of our project by cutting a sheet of exterior grade three quarter inch plywood to size.
It will serve as an underlayment or substrate for the tile countertop. We attach the plywood with screws, driving the heads just below the surface. Next, I trade the sink template onto the plywood. Steve then uses a hole saw to bore holes at each corner.
And Rebecca cuts out the opening with a jigsaw. Now this is called cement backer board. It's designed to go behind or under tile. It's waterproof and it really is, it has a cement core and then on each side, it's got this nylon mesh and that's covered with another thin layer of cement, okay.
Now the way you cut this is with this tool right here. This is called a scoring tool. It's got sharp carbide tips on both ends right here. So this is our mark right here. Pencil line. Just use some kind of a straight edge here.
And then take the scoring tool and just pass it over the material several times.
REBECCA:
Okay, okay.
RON HAZELTON:
So the idea here is, don't try to do all this in one pass. Maybe four or five. And each time you'll be cutting a little deeper into the board. Great, right. Now, this is sort of like cutting wallboard. Since we've cut through that mesh, we can now break this [ ? ] the edge, drops down like that.
REBECCA:
Ah, that's great.
RON HAZELTON:
Now we're going to flip this over. The cement has broken through at this point, right.
REBECCA:
Right.
RON HAZELTON:
But there's still a mesh in here.
REBECCA:
Okay.
RON HAZELTON:
So we're going to cut through that. After cutting the mesh on the other side, Tom and I position the backer board on the counter. Now we need to cut an opening for the sink. This time, Tom traces the opening from underneath.
All righty, you got it?
TOM:
Yeah.
RON HAZELTON:
Again we score along the cut lines, then after flipping the board over and lightly scoring the other side, we tap out the scored portion with hammers. And this is the screw that we're going to use. It's designed especially for cement board. It's got a self-drilling tip on it right here. And a rust resistant coating on it.
While I cut the remaining sections of backer board, Tom and Rebecca go to work driving in the screw at [ ? ] intervals along grid lines that I've drawn on the surface. Once each section is screwed down, we apply nylon mesh reinforcing tape to the joints, then spread on a coat of thin set mortar.
Put it right on top of the tape. Okay and then just draw it off.
TOM:
Force it in there.
RON HAZELTON:
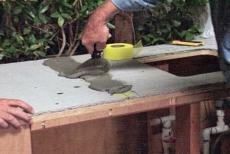
And force it in. You don't want to leave anything up on the surface. Just like that. After reinforcing and skim coating the joints, we next apply thin set to the face of the backer board. Okay, now we're going to put, we're going to spread this stuff out using a trowel. It's got a straight side and it's got a notched side.
So I'm going to use the straight side just to kind of spread this stuff out like this. Kind of get a uniform thickness going here. [ ? ] like this. And then I'm going to come back, I'm going to take the notched side of the trowel.
I'm going to tip this up so that it's almost vertical, not quite, and we're going to drag this through the mortar just like that, leaving these ridges or, and furrows right here.
TOM:
Okay.
RON HAZELTON:
And then, just take the tile, drop it in place here, give it a little wiggle and move on to the next one.
When Tom gets a few more tiles in place, he begins inserting spacers to make sure the gaps between the tiles are uniform. Now not too many HouseCalls get spread over three days. But once all these tiles are laid, they need to set overnight before we can fill the gaps between with grout.
Early next morning, we're back to work mixing again. This, guys, couldn't be simpler. You take a little bit of it out of the bucket here with the [ ? ] trowel, some down here. We apply the grout with a foam float, pushing the material firmly into the joints.
In this case, you're using the float fairly flat. And just think of it like you want to fill up that groove all the way to the bottom. And drag it across the tile on a diagonal from corner to corner that will clean the face of the tile off, but it will leave the grout in the joints, all right.
TOM:
Okay.
RON HAZELTON:
And don't worry if there's some left here. We're going to clean that later on.
REBECCA:
Okay.
RON HAZELTON:
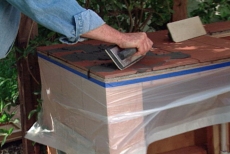
After applying our grout, we allow it to firm up just a bit. Then move on to our next step. Now this is the second part of grouting here and that's just taking off the excess from the face of the tile. And I like to use this kind of a sponge.
This has actually got two faces on it. This is sort of a scrub face here and this is a regular cellulose sponge. The scrub face I use and this really gets this stuff loosened up. You don't want to wait too long to do this cleaning. But you want the grout to have firmed up in the joints so you won't pull it out, right.
So there, we've got it pretty much loose now. Flip the sponge over. And again, pretty much work on the diagonal. That's the safer way to go at this point. As we sponge off the excess grout, we frequently change the rinse water. And after several passes, the tiles are almost entirely clean.
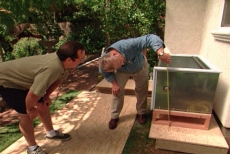
Now we're ready for the finishing touches. Wood trim is applied to the edges and of course - well no outdoor kitchen would be complete without a refrigerator, huh? There's your grill. Now this is what I'd call an outdoor kitchen.
Got a patio heater from Coleman so you can use it even when the weather turns cool and for the purist, a smoker by Brinkman over here which can also double as a charcoal grill. We've got our built in refrigerator right here behind the door in a water tight compartment and of course, we've got our sink with running water.
And over here, this beautiful Weber grill. As a matter of fact, I've even started their first meal for them right here.
[SEVERAL SPEAK AT ONCE]
TOM:
That looks great.
RON HAZELTON:
Yeah, you happy with it?
[SEVERAL SPEAK AT ONCE]
TOM:
Do a lot of cooking.
RON HAZELTON:
I'm going to turn over the tongs to you.
TOM:
Right, thank you.
RON HAZELTON:
Well, the credit for today's project goes to Tom and Rebecca's do it yourself spirit and their appreciation of a gourmet lifestyle. Two key ingredients that made this outdoor kitchen project such a success.