RON HAZELTON:
The other day, Shawna Feeley, a neighbor of mine, called me with a question. She had an old chair that had definitely seen better days. Everything about it seemed to need attention. She really wanted to make it part of her home, but it needed so much work, she wondered if it was worth the effort. So I went over, took a look and suggested we bring the chair back here for a makeover.
[MUSIC]
So where did you get this chair?
SHAWNA FEELEY:
I got it from my in-laws. They acquired it about 35 years ago. They got four of them for a dollar at a yard sale.
RON HAZELTON:
[LAUGHS] Twenty five cents apiece, huh?
SHAWNA FEELEY:
Twenty five cents apiece and they used them for a while and then they've been in their garage.
RON HAZELTON:
This has probably got the original finish on it. If you look, you can see it's all crazed. That's typical of what happens to these finishes after, well, in this case, more than 100 years. And also you can tell down here too, it's just black.
But before we get into the refinishing, I want to point something out to you, you know. This is pretty wobbly, all right?
SHAWNA FEELEY:
Yes, I see that.
RON HAZELTON:
So my thought is, if we're gonna invest all this time and energy in refinishing it, that we ought to probably make sure you can sit in it.
SHAWNA FEELEY:
That would be a good idea.
RON HAZELTON:
We begin our rebuilding process by removing a pressed fiberboard seat, revealing something much older below.
SHAWNA FEELEY:
Oh. So that's what it's supposed to look like, sorta.
RON HAZELTON:
This is the original seat right here.
SHAWNA FEELEY:
Okay.
RON HAZELTON:
This is hand caning. Very nice job. And even to this day, this type of caning still has to be woven.
SHAWNA FEELEY:
Right.
RON HAZELTON:
So what do you think? I mean you can, we could probably find you another -- a replacement seat, or we could go back --
[BOTH SPEAK AT ONCE]
SHAWNA FEELEY:
Well, I think seeing as we're going and doing this whole effort here, I'd like to do the caning.
RON HAZELTON:
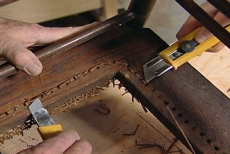
We remove the old cane seat by first snipping out the center with scissors.
Okay, I think we'll have better luck reaching the rest of this if we turn it over and go at it from the bottom.
Then cutting what remains, using a utility knife and a fair amount of patience.
All right, let's turn this over for the last little bit here.
SHAWNA FEELEY:
Getting an idea of how difficult the caning might be. [LAUGHS]
RON HAZELTON:
It's an art.
SHAWNA FEELEY:
I can knit and I can sew, so it's another variation on that kind of stuff.
RON HAZELTON:
Well, we're ready to start taking this apart.
SHAWNA FEELEY:
Okay.
RON HAZELTON:
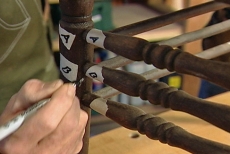
Before we do, let's take some masking tape right here, give you a piece. Just tear off little pieces and we're going to label all the parts, so that when we put this back together, we'll put it back --
SHAWNA FEELEY:
That makes sense. That seems like the step my husband would forget and I'd have a pile of wood in my basement.
[RON LAUGHS]
Okay.
RON HAZELTON:
All right. We're ready to dismantle. Now this, this chair is put together with both glued joints and with screws. So let's start by taking the screwed parts apart first.
[MUSIC]
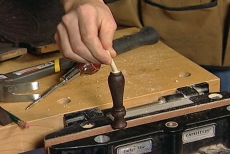
Now we're gonna have to go to brute force to get this apart, although I don't think it's gonna take much. There are a couple ways to do this but most common -- usually I do it by tapping the joints apart. This is a hammer that I've just wrapped some cloth around, so we don't dent the wood. But this is an even better tool. This is a dead blow mallet. There's lead shot in here and it's gonna transfer more force to the wood without damaging the wood itself.
SHAWNA FEELEY:
Whoops.
RON HAZELTON:
Oh, look what you did.
[LAUGHTER]
Now sometimes, if these are really strong in here, I might leave them. I might -- I wouldn't force them out.
SHAWNA FEELEY:
Okay.
RON HAZELTON:
I just want to be sure now that they're loose. See, they're loose. They're not coming out easily but they're -- there we go, there it goes. Okay. Now move them a little bit.
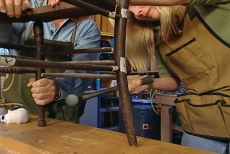
Now we've got to separate these -- all these joints at the same time. There's eight of them here. And you pointed out to me earlier, there were some small nails.
A pair of diagonal cutters ground to sharp point is the perfect tool for removing embedded objects like these.
Now this is an adjustable clamp. And normally it would be used to, you know, squeeze things together. But this one is reversible. We can take this end off, put it down here.
SHAWNA FEELEY:
Cool.
RON HAZELTON:
And it becomes a spreader to push things apart.
SHAWNA FEELEY:
Right. Oh, okay.
RON HAZELTON:
Okay. Now this was -- there we go.
[BOTH SPEAK AT ONCE]
SHAWNA FEELEY:
There we go.
RON HAZELTON:
Here we go, huh. Again, if I get one of these that's really in here and it just doesn't feel like it's, you know, loose, we can always leave it. That may be one right there. So for this, probably our dead blow mallet is gonna work best.
SHAWNA FEELEY:
Oops. Weren't expecting that.
RON HAZELTON:
[LAUGHS] Well --
SHAWNA FEELEY:
It didn't --
RON HAZELTON:
Yeah. That probably was cracked.
SHAWNA FEELEY:
I think so. I didn't really -- [SNAPPING SOUND] uh [LAUGHS].
RON HAZELTON:
Wow.
SHAWNA FEELEY:
Wow, I'm glad you did that one.
RON HAZELTON:
Wow, that's not supposed to happen.
SHAWNA FEELEY:
Can you fix it?
RON HAZELTON:
Yeah. Boy, I wish you hadn't done that.
SHAWNA FEELEY:
Oh, come on, you did that. [LAUGHS]
RON HAZELTON:
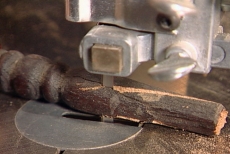
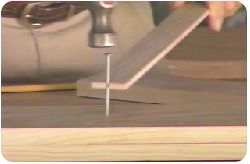
I did, guilty. All right. No, but it's easy enough to fix. What's happened is the end of this stretcher is just broken off. This piece right here. So we're gonna fix this by making what's called a scarf joint. Come on over to the band saw.
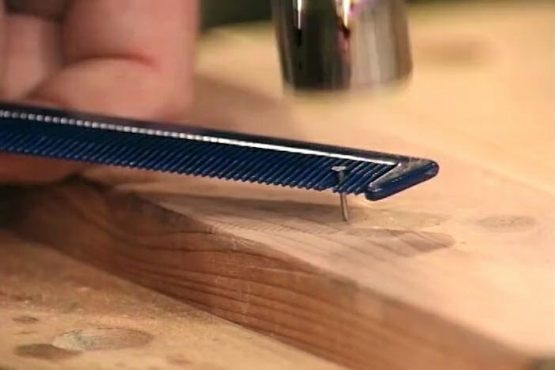
To make the joint, we first cut off the damaged end at an angle. Then smooth the cut on the belt sander. Next, we trace the cut end of the spindle onto a small piece of oak and cut out the matching shape. We will attach or scarf the new onto the old by gluing it. Before clamping, we'll drill a hole and insert a small nail to keep the two pieces from slipping as the clamp pressure is applied. Once the glue has dried, we remove the clamp and small nail, then using an undamaged spindle as a pattern, we outline the shape for the new end.
It's back to the band saw for some rough cutting and then a bit of final shaping, using a wood rasp and sandpaper.
[MUSIC]
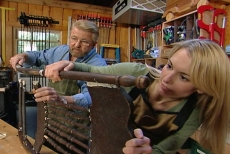
Okay, now we're gonna have to glue this chair together in sections, and then each section has to kind to go together all at once. You'll see why in a sec, and then we'll put the major sections together to the chair. That way if anything isn't fitting quite right, we'll catch it before the glue dries and we can make little adjustments, okay.
SHAWNA FEELEY:
Okay.
RON HAZELTON:
So this is the bottom of the back. I'm gonna put some glue in these holes and spread it around. If you can take the spindles and just paint some glue on those.
SHAWNA FEELEY:
Sure.
RON HAZELTON:
Okay, MT.
SHAWNA FEELEY:
Okay. Starting to look like my chair.
RON HAZELTON:
And now we can apply a little pressure to these joints.
SHAWNA FEELEY:
Okay. Now you always like to glue it back together before you strip it.
RON HAZELTON:
I do and that's kind of just a personal preference in a way. There are a couple reasons that I like to. First of all, we've got all of our labels on here. If we strip that, we have to take those off and put them back on in the right spot.
[BOTH SPEAK AT ONCE]
But also, you noticed when we glued, some of the glue squeezes out onto the surface and it's easy to clean that glue off while the old finish is on here. And now we're gonna take it off, take it all off.
[SHAWNA LAUGHS]
SHAWNA FEELEY:
Okay. If you say so.
RON HAZELTON:
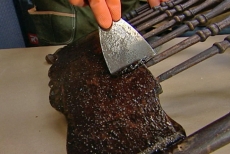
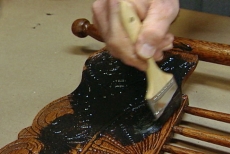
[LAUGHS] Chair's back together. We're gonna strip off the old finish here. This is a --kind of a semi paste. It's a little bit thick, you can see here. And the reason I've chosen this is it, it's gonna stick to the surface a little bit better.
SHAWNA FEELEY:
What, what kind of finishes are coming off?
RON HAZELTON:
I think what we're dealing with here is probably varnish.
Now the real key to getting this finish or any finish off easily is to lay on a heavy coat of stripper, don't overbrush it, and give it time to do its work. When the surface blisters and looks loose like this, you should be able to lift off the old finish, using a putty knife without the need for a lot of scraping or scrubbing.
Okay, that's about all we're gonna get with the putty knife. I want to move over now to some steel wool.
Getting the old finish out of recesses and carvings and turnings is better done with medium coarse steel wool.
SHAWNA FEELEY:
Now these look a lot better.
RON HAZELTON:
Now this is a brass bristle brush --
Soft bristle brash brushes also work well when it comes to cleaning out nooks and crannies. You'll find these brushes in the paint department.
SHAWNA FEELEY:
Feel like a dentist?
RON HAZELTON:
Another tool that can be very useful is a simple piece of wood dowel that has been sharpened to a point, using an ordinary pencil sharpener.
There's still some old finish in there.
And finally, one of my favorite tricks for doing that last bit of cleanup on spindles and legs is a piece of jute twine.
This has really come out very nice, great wood. There's one final step I want to do in terms of removing the old finish. And that's to -- to do a wash. This is lacquer thinner.
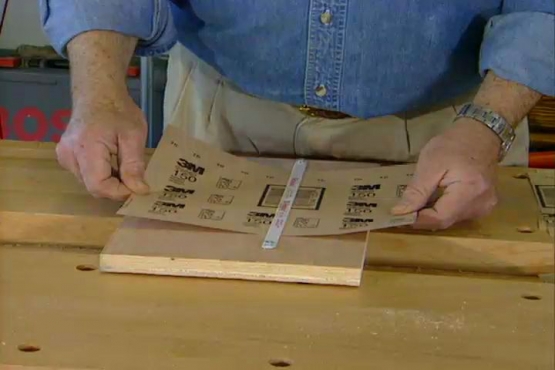
This wash will remove any residue left by the stripper. Now a quick sanding with fine paper. We won't need much sanding because this type of stripping does not raise or roughen the wood grain. While I leave Shawna to finish up the sanding while I head off to the home improvement center and go shopping for some materials. We'll need some stain. I'm gonna pick out three different colors, a polyurethane varnish for a top coat, and a can of paste wax.
Shawna's not completely sure what color she prefers, so we test the three that I bought by applying them side by side on the bottom of the chair.
SHAWNA FEELEY:
I think I like the walnut.
RON HAZELTON:
Well, you got a winner, so let's get to work.
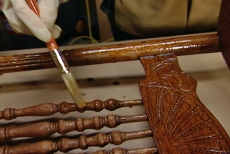
On projects like this, I like to apply the stain with a brush and work it well into the recesses. Then give it time to soak into the wood and finally, wipe off the excess.
SHAWNA FEELEY:
This is definitely the fun part.
RON HAZELTON:
I usually do a chair like this in sections, starting at the top and working downward. One final wipe and we'll let the stain dry overnight.
This is a tack cloth.
SHAWNA FEELEY:
Okay.
RON HAZELTON:
And since we're now gonna be putting our first kind of coating on here, I want to make sure that we get all the dust off this that might have settled on it overnight. Now this is shellac, it's an absolutely natural product, actually produced by bugs, so this dries very fast.
I'm using the fast drying shellac to seal in the stain before we move on to our next step.
Okay.
SHAWNA FEELEY:
Looking great.
RON HAZELTON:
No more drips. So let's let this dry. This won't take long, maybe a half an hour or so. So this is very fine steel wool, 4.0, that's about the finest you can get. And what we're doing here is just kind of knocking some of the sheen from the shellac down a bit.
Now this is called glazing liquid here. It's just a medium really to carry the color on the chair.
SHAWNA FEELEY:
Okay.
RON HAZELTON:
And these are colorants or tints.
Now what we're trying to do here is to add some dark coloration to the recesses for two reasons. It will help highlight the details on the carvings and turnings and it will give the chair an aged look by simulating the kind of dirt and dust that would have accumulated over decades of use.
We're coming down to the finish now.
SHAWNA FEELEY:
Can’t wait.
RON HAZELTON:
What we're doing now is putting on a clear top coat.
The top coat in our case, polyurethane varnish is what will protect the surface from wear, add a pleasing sheen and give the wood a feeling of depth.
[MUSIC]
After prying off the fiberboard seat, we discover the original, but badly deteriorated hand caning underneath. Since we've come this far, Shawna's decided she wants to reweave the seat. So we're going to the source to find out how.
Hey, Rhonda.
RHONDA:
Hey, Ron.
RON HAZELTON:
How are you. Say hello to Shawna.
RHONDA:
Hi, Shawna.
RON HAZELTON:
And this is our creation here.
RHONDA:
Can't wait to see it.
RHONDA:
Beautiful.
RON HAZELTON:
It came out nicely.
RHONDA:
Look at that, that's gorgeous.
SHAWNA FEELEY:
Yeah, Ron hooked me up.
RHONDA:
Yeah. Nice work. This is the cane that we're gonna use to start weaving your chair with.
RON HAZELTON:
Now where does that come from?
RHONDA:
This is, comes from the rattan plant. It actually grows in Indonesia and I'm gonna show you a sample here. This is rattan like they use in rattan furniture.
RON HAZELTON:
The same thing.
RHONDA:
It's the same thing. It looks like bamboo on the outside, but whereas bamboo is hollow, this is solid. And they peel off this outside bark into different widths and that makes the cane that we use to repair chairs with.
RON HAZELTON:
So where do you start?
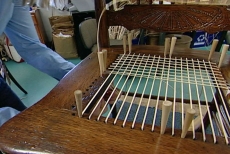
RHONDA:
Well, we start by figuring out how many holes there are in the chair. We have to center the cane. These are called caning pegs, we use them to hold the ends of the cane as we're working. Then you can put that through and you can grab it underneath there and pull it down whichever way you want to go.
You're gonna come straight across the top --
[BOTH SPEAK AT ONCE]
SHAWNA FEELEY:
And no weaving.
RHONDA:
No weaving at this point. The first three steps there is no weaving.
SHAWNA FEELEY:
I like this – this is nice and easy.
[SOUND CUT]
Starting step three now and -- which is the second time we're going front to back, because after this stuff, you will start weaving. So this is your last easy step.
RON HAZELTON:
So how's it coming?
SHAWNA FEELEY:
Going great.
RHONDA:
It's great, she's doing a great job. She's on step four, which is the first weaving step but this will set us up for the fifth and sixth step, which are the diagonals. They’re little boxes.
RON HAZELTON:
Well, Rhonda, do you have any final words of wisdom or advice here?
RHONDA:
Well, you've got enough cane here I think to finish the chair.
RON HAZELTON:
Okay.
RHONDA:
And I hopefully have given you enough knowledge to go --
[BOTH SPEAK AT ONCE]
SHAWNA FEELEY:
You have, it was a great lesson. I think we're off to a good start. So I feel very confident. Thank you for all your good tips.
[BOTH SPEAK AT ONCE]
RON HAZELTON:
I’ll do the heavy lifting.
RHONDA:
Okay, guys.
[BOTH SPEAK AT ONCE]
SHAWNA FEELEY:
Thank you very much.
RHONDA:
Thank you, good luck.
RON HAZELTON:
Thanks, Rhonda, bye bye.
A couple of weeks later, Shawna calls to say she's finished her caning and I head over to take a look.
Wow, I'm impressed.
SHAWNA FEELEY:
Thank you.
RON HAZELTON:
That is a really good job.
SHAWNA FEELEY:
Thanks a lot.
RON HAZELTON:
I mean it looks totally professional to me.
SHAWNA FEELEY:
It took a long time though. It's a time -- you know, labor of love type thing.
RON HAZELTON:
Listen, there's one more thing I want to do which is not gonna change the way the chair really looks but it's gonna make it feel great, and that's to put some paste wax on it.
SHAWNA FEELEY:
Okay.
RON HAZELTON:
I like to apply this with a pad of steel wool. This is the finest, 4.0 -- 0000.
I let the wax dry for a few minutes, then buff it out with a soft cloth.
You want to help, you want to shine?
SHAWNA FEELEY:
Yeah. If you remember, I have another chair, a sister chair to this. We should take a look at it.
RON HAZELTON:
Oh, that's right. There was, there was -- they were originally a group and you got two, right?
SHAWNA FEELEY:
I have two, yeah.
RON HAZELTON:
You have the other one here?
SHAWNA FEELEY:
I do.
RON HAZELTON:
Well, let's take a look.
SHAWNA FEELEY:
Yeah. Here we go.
RON HAZELTON:
Oh, my gosh. I had forgotten, I had forgotten what we started with.
SHAWNA FEELEY:
It's incredible.
RON HAZELTON:
Well, this is, this is a perfect before and after, isn't it?
SHAWNA FEELEY:
It is. It's nice to see it that way. Gives me some inspiration.
RON HAZELTON:
The good thing is we had good bones. We had a good chair to start with. Nice wood, nice patina, plenty of carving in here and we've just taken advantage of all of that.
SHAWNA FEELEY:
I couldn't have done it without you.