Ron:
You know, I’ve always enjoyed being a Good Samaritan of sorts, dropping in on folks and lending a hand where it’s needed. And even though I’ve put down my roots I don’t see any reason not to keep on doing that. Just a few days ago one of the gals in town called me to complain about washing dishes. No it wasn’t the pots and pans she was upset with, it was her sink.
Natalie:
I hate the old sink. It’s disgusting. I think it’s the original sink that was here when they uh, renovated this. And we’ve redone everything and that sink has stayed the same. It’s corroded under the faucet. It sprays when I go to spray the dishes. I always kind of squirt myself, the way it comes out of the sink, I really just want something nice and clean and new in there.
Natalie:
Hi, nice to see you.
Ron:
Show me the sink.
Natalie:
Come on in. All right Ron so here is the sink.
Ron:
So this is it? You’re really unhappy with this?
Natalie:
I think it’s disgusting. It’s old, it just needs to go.
Ron:
Okay I get it. There’s no repairs involved here, just replacement. Why don’t we go out and do a little looking around, some shopping, and uh, you know see what you’d like to replace it with.
Natalie:
Great.
Ron:
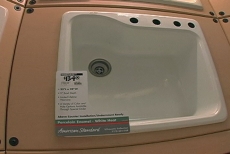
Come on along for a little ride. Okay so this looks pretty much like what you’ve got right now huh? Do you like this one or this one right here? So do you want to go back with the stainless steel?
Natalie:
Um, you know what, I think I kind of want a change, because I feel like it gets fingerprinty, and dirty, on this sink I see that the drain is kind of off to the side. What’s the difference between that and the ones that are in the center?
Ron:
It’s off to the side.
Natalie:
I love that side drain.
Ron:
Alright let’s do that. Let’s go over here and look at the faucets. Whoo. Lots to choose from huh?
Natalie:
Yes there are.
Ron:
Well the first thing you’ve got to decide is do you want metal or plastic, or silver chrome versus white
Natalie:
I think definitely the silver.
Ron:
You like the shiny silver?
Natalie:
Yeah that’s really nice.
Man:
Need some help?
Ron:
Ah, we’d like this faucet right here.
Man:
That one, the Moen?
Ron:
Yeah, Moen.
Man:
This is it right here.
Ron:
Ok, great, that’s beautiful. Now did you want a soap dispenser?
Natalie:
Yeah I think that would be really neat.
Salesman:
And this one is chrome, and that matches.
Natalie:
It matches good.
Ron:
Ok, home again.
Ron:
Okay. Alright why don’t you grab the faucet, I’ll get the sink.
Natalie:
Okay.
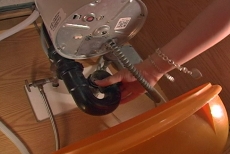
Ron:
What we’re going to do is we’re gonna take the sink out. There’s a lot of stuff attached to it. But one of the things we cannot, I don’t want to take out, attached is the garbage disposal.
Natalie:
Okay.
Ron:
You turn the garbage disposal on, okay, and run some water. I’m going to go around and flip some breakers and when it goes off just give me a yell.
Natalie:
Alright great.
Ron:
Go ahead and turn it on.
[garbage disposal]
Ron:
Still going?
Natalie:
It just stopped, there you go.
Ron:
It’s off?
Natalie:
Yeah. It’s off.
Ron:
Okay good. If you look in the back, you see that black pipe coming down? Now we want to disconnect that. Try that with your hands first of all and see if you can loosen it.
Natalie:
Yeah it’s tight, I can’t get it.
Ron:
Okay, you can’t get it, alright let me get you a wrench for that.
Natalie:
There we go. Oh there’s water coming out.
Ron:
Now if you follow that around, that’s a u-shaped pipe, to the other side, you’ll see a connector over there with the same thing.
Natalie:
Oh, there it goes. Uh-oh.
Ron:
That came off.
Ron:
See that white pipe coming up?
Natalie:
This one?
Ron:
Yeah.
Natalie:
Is that where the garbage comes out of, from the garbage disposal?
Ron:
No, that’s where your waste water from the dishwasher goes.
Natalie:
Okay. Back there it is.
Ron:
Alright now, see down here in the bottom. See that um, sort of um, metal wire coming in?
Natalie:
Yeah.
Ron:
Well that’s the electrical to the uh, to the disposal, we might be able to just leave it alone, and, and move it over, we’ll see later on. But what we do have to do now, is disconnect the dishwasher. And disconnect from the sink. Now for that, if you look way up on top of the garbage disposal. Do you see a ring up there? Put that screwdriver right through that, one of these loops right here. Pull it in that direction. It’s just a ring that going to rotate. Actually just rotate in that direction. Oh there you go. Good. Okay. Alright now you see those two valves back there. One’s hot, and one’s cold. Just reach in there and turn it off. Now you see those pipes coming in from the top, just above the top?
Natalie:
These?
Ron:
Okay here’s a wrench.
Natalie:
Oops thank you. Oh there we go.
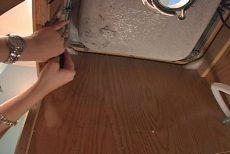
Ron:
We’ve disconnected all the plumbing. But the sink, is held in place, it’s attached to the countertop up here. So what I want you to do is lie on your back, and put a towel right here to help. Here put these on. Now look up here between the sink where your hands are, do you see there’s a little clip there? You just have to unscrew those.
Natalie:
And here it is. That’s the last one.
Ron:
Last one, okay. Come on out. Now the, the sink should be loose at this point, alright.
Natalie:
Oh my hair is all wet.
Ron:
Grab the faucet and lift it straight out. There you go, bring it out. Yeah and just take it right outside. Bye, bye sink.
Natalie:
Bye, bye.
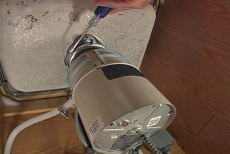
Ron:
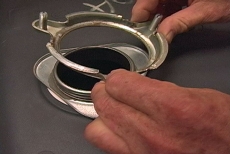
Now we’ve got a bare sink here with no fittings on it. Now it may look like we’ve taken a recess to sculpt some modeling clay, but its called plumber’s putty. We apply it to the sink flange and slide the flange through the hole in the sink. Then we slip on a fiber gasket, a backup ring and a mounting ring. Now put that ring on there. The snap ring holds everything in place. Finally the entire assembly is tightened securely to the sink. See. So now just take your fingers and remove the excess. There he is. To mount our faucet, we first set trim plate on the sink deck then pass the faucet through. Next we turn the sink over, slip the mounting bracket into place and hand tighten the mounting nut.
A lot of plumbing manufacturers have been doing this lately. They’re packing special wrenches. Slip this on the nut, tighten it up a little bit. I’m going to try to keep this center here. Alright. With the faucet assembly in place, we insert the sprayer hose through the center of the faucet. And then pull that thought, now take this and slip it up on here, and attach it to the discharge tube. What about that soap dispenser?
Natalie:
Soap dispenser.
Ron:
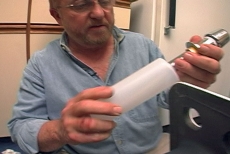
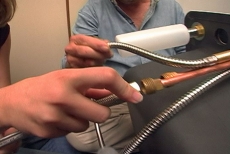
So this is obviously the, take that brass nut off there, so we’ll just drop this in through here. Okay now you go ahead and put the nuts back in. And that’s the bottle that contains your soap, so you can go ahead and put that on. Just thought of one more thing, that we’re gonna do down here, because it’s going to be easier. And that is put on the water supply lines.
Natalie:
Oh yeah, these?
Ron:
Right.
Natalie:
Well these are different than the other ones right?
Ron:
So these uh, you just screw these right onto the ends. And again, the reason I like to do this out here, is it’s just much easier than lying on your back.
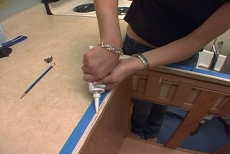
Ron:
Okay. This sink actually is going to get glued into place with silicone. To keep the adhesive from oozing out onto the countertop, we lay strips of masking tape around the opening. This is um, silicone, and you’re gonna put a nice healthy bead right up to that line.
Natalie:
Just like caulk.
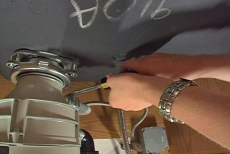
Ron:
Okay. Alright this is it, the final time. Now we want to go high, so we don’t hit any of our, our silicone right. Okay now dip your finger in the alcohol. A finger dipped in alcohol an drawn over the bead of silicone smoothes it out and blends it in. Hop back under there. You should see the water lines hanging down. Screw them onto the uh, the valves. Okay so now we’re going to put the garbage disposal back up. Now this I need to get in here and give you a hand. Now the trick is to hold this up, and then turn this collar. So Natalie. What’s next?
Natalie:
I need to attach, hmm, the, the lines coming from the dishwasher going to the disposal. Okay I think I, okay. Yep.
Ron:
Nice and tight?
Natalie:
Yep.
Ron:
Okay so what’s next?
Natalie:
Next I have to reattach the u-pipe is that right?
Ron:
U-pipe. Let’s call it a p-trap, it is a u- piece shape of drainpipe yeah.
Natalie:
Yep, it’s working.
Ron:
Get it as tight as you can.
Ron:
Water is on, drain is attached. Let’s fire it up.
Natalie:
Alright.
Ron:
What did you do?
Natalie:
No seriously why isn’t it working?
Ron:
Did you turn the water on?
Natalie:
Yes I turned it on. Or did I turn it on or off.
Ron:
You better take a look under there. After consulting the directions, it seems I’ve overlooked a key step. We were supposed to flush out the water lines before attaching the pull out spout. So we unscrew the spout and do a little test.
Natalie:
Whoa.
Ron:
You were trying to get even with me , you told me that…take that.
Natalie:
Laughs. I thought this faucet was not supposed to get me wet.
Ron:
Oh my gosh. It turns out most of the debris in the water line got trapped in the screen washer, so we rinse it out.
Natalie:
Alright try again. Oh. There we go.
Ron:
You’ve got to love it.
Natalie:
I do love it.
Ron:
You know this is taking no larger an opening than we had before, and because of this cut away back here, and the fact that it’s deeper, I don’t know to me it looks like a much bigger sink.
Natalie:
Oh yeah definitely it does.
Ron:
And I think also because it’s white, it just looks a lot more open.
Natalie:
It’s great.
Ron:
It’s very interesting material, I’ve actually checked this out a little bit. This is actually a porcelain enamel, over a um, sort of a um, metal base. And then behind that is a composite, that really gives us the feel, and the sound, the dullness of a cast iron sink, but a fraction of the weight. Believe me if this had been cast iron, getting this in and out of here, would have been a struggle, even for two people.
Natalie:
I thought it was going to be harder. Than it was. And I’m pretty impressed that I was able to do it. But it still was a lot of hard work. It wasn’t just you know turning on and off the water. So yeah, let me give it one last shot. I love it.
Ron:
Enjoy it neighbor.
Natalie:
I didn’t mean to do it, sorry Ron.