The ancient Egyptians and Romans adorned their garden with them and undoubtedly found shade beneath them from the blazing sun. It’s the pergola of what I speak and I am heading to Orlando to help Bill and Francis Post build one.
[SOUND CUT]
Now one thing that sold them on this property was the back yard. It's teeming with so much sub tropical greenery, that Bill and Frances spend weekends just trying to document all the different species. All this garden of Eden needs now is something to dress up this unattractive corner where a work shed once stood. They feel and I agree, that a pergola would be perfect. Now a pergola is an open air structure, a large arbor of sorts designed to provide shade, charm and style by allowing vines to climb its post and spread across the rafters.
Now this is the perfect area for a pergola if I ever saw one. There's a word you don't use very often, pergola.
FRANCES:
No, we don't.
RON HAZELTON:
What are you guys going to use it for?
FRANCES:
Well we thought about putting the two chairs back here and they're ready to go. Make it a reading area, a nice little way to get away.
RON HAZELTON:
A little kind of cozy nook sort of eh?
FRANCES:
Yes, yes.
RON HAZELTON:
And what about down the road, any other plans for it?
BILL:
Well we were thinking, maybe a hot tub would be a really nice touch.
RON HAZELTON:
Like that? I'm liking this.
BILL:
Yeah.
RON HAZELTON:
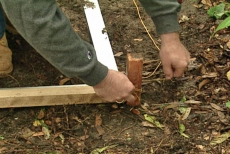
Our first step is to determine where exactly to sink the pergola's six posts. They must be lined up perfectly straight and parallel to each other. After checking with the utility companies to make sure the area was clear of underground gas, water and electric lines, I mark the first corner post by driving in a stake. What we hadn't planned on though was the rain shower that came through here. So things have gotten a little bit damp. I'm convinced we could work around the showers. What do you think?
FRANCES:
I think so.
RON HAZELTON:
All right. That's good. Take it -- one more, maybe one more wrap and then just lay the string out this way. Now what we've done for the front line or front edge of our pergola -use this piece of two by two. It's perfectly straight.
Now I'm going to take this oversized right triangle right here, put the base of it up against that two by two, just like that. Bring it up so that the edge of it is right at the string there.
BILL:
Ready.
RON HAZELTON:
Now what we want to do is move this string back and forth, left and right until it's perfectly parallel with this edge right here. That guarantees us that this angle right in here is a right angle or 90 degrees.
FRANCES:
How's that one, Ron?
RON HAZELTON:
Come over here -- well, you know, what? I'm going to trust your eye.
BILL:
That's not always a good thing.
[LAUGHTER]
[SEVERAL SPEAK AT ONCE]
RON HAZELTON:
[ ? ] kind of comments Ron never makes. Husbands can make them. Okay, that's great. I want to stay right on the edge of your -- of your line.
FRANCES:
I hope you stay on the stake.
RON HAZELTON:
As opposed to your hand?
FRANCES:
Yes.
RON HAZELTON:
How am I doing?
FRANCES:
You're doing fine so far. I'm afraid to watch [LAUGHS].
[LAUGHTER]
RON HAZELTON:
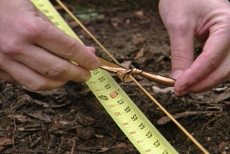
Well you know, this is our front corner post here. Now we want to locate the two on the side. So the first one's going to be at 48 --
[BOTH SPEAK AT ONCE]
BILL:
48.
RON HAZELTON:
There you go. And just tie that off. Probably one knot will do it.
FRANCES:
Okay.
RON HAZELTON:
You can slide it. Now you're right on the money, okay.
FRANCES:
Yeah.
RON HAZELTON:
Perfect. Okay, then move down to 96, which will be our rear corner post.
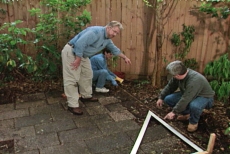
We line up stakes alongside each ribbon and drive them in. Then we repeat the entire process on the other side. And our six post locations are staked out.
RON HAZELTON:
Thank you. Now this is a bucket. Take this piece of brick and put it in here. Oop -- how about that. No bottom in the bucket.
FRANCES:
Why?
RON HAZELTON:
Why, I'm glad you asked that. I'm going to use this as sort of a marking gauge. I'm going to put this right over that stake which is the center of the hole that we want to dig now.
FRANCES:
Okay.
RON HAZELTON:
And then you've got some chalk here, it's the same chalk you use for a chalk line. What I want you guys to do is just to go around in here and put this chalk right at the base of the bucket like this.
FRANCES:
Okay. I can do that.
RON HAZELTON:
-- I'll finish, I'll do this one and I'll hand off to you.
FRANCES:
Okay.
RON HAZELTON:
What we have here, when we take the bucket away, got a perfectly round circle, centered right over the stake.
BILL:
That's good.
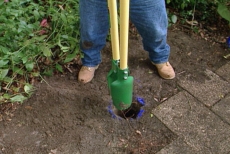
RON HAZELTON:
Now this is a posthole digger. Its sole aim in life is to dig holes. Loves to dig holes. Unfortunately it can't do it by itself.
FRANCES:
Didn't think so.
RON HAZELTON:
[LAUGHS] --
[SOUND CUT]
FRANCES:
When we get finished --
RON HAZELTON:
It will all pay off.
FRANCES:
Okay.
RON HAZELTON:
It's a lot of work for one guy to do by himself.
FRANCES:
Glad you're here.
RON HAZELTON:
Now you may think that this is a lot of concrete for six holes right here. But the reason we have so much and this isn't all of it, by the way, is that we had to make these holes three feet deep. Why? Well, because we're hurricane country here.
And the building department says we've got to go down at least that far to keep this stable in a high wind situation. So we're actually a little over feet, three feet because I want you to take some of this -- Frances, why don't you take this.
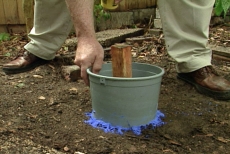
This is just crushed rock --
FRANCES:
Okay.
RON HAZELTON:
And pour about two or three inches in the bottom give it some drainage --
And drainage provided by the crushed rock will help keep the ends of the post from soaking up moisture and rotting. And considering the effort it takes to drop them into place, well, they'd better last as long as possible.
[SOT]
FRANCES:
We're not much use on this, Pat.
[BOTH SPEAK AT ONCE]
RON HAZELTON:
Now this is a post level right here. It's going to strap right on.
[SOUND CUT]
And this will let us know that the post is vertical or plumb in both this plane and this plane without our having to hold a level up there, all right.
FRANCES:
Okay.
RON HAZELTON:
I clamped some temporary braces onto the post for added support, as we make the incremental adjustments necessary to reach the perfectly vertical state known as plumb.
RON HAZELTON:
Okay, that's it. Now we're plumb or vertical in both directions.
Now to keep the posts in position while we add concrete, we drive in a stake near the bottom of the bricks and clamp the two together. Next, we pour in the dry concrete and add a gallon of water per bag. Now this is quick setting concrete and requires no mixing. What could be easier?
[announcer]
Ron Hazelton's HouseCalls is being brought to you by the Home Depot
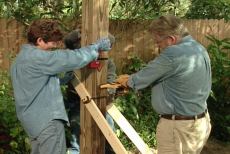
RON HAZELTON:
Today I am in Orland helping Bill and Francis Post build a pergola… that’s a outdoor room without a roof or walls. So far, we’ve laid out the dimensions, dug the post holes and set our posts.
All right, see this Frances?
FRANCES:
Yes.
RON HAZELTON:
You know, what that is?
FRANCES:
No.
RON HAZELTON:
It's a support. As I get up in years, I do this more and more. Instead of holding heavy boards like this, not that you're getting up in years, I didn't want to imply that.
FRANCES:
I haven't had a --
[BOTH SPEAK AT ONCE]
RON HAZELTON:
I want to make this easy for you.
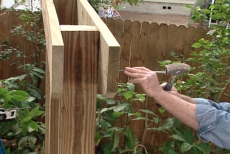
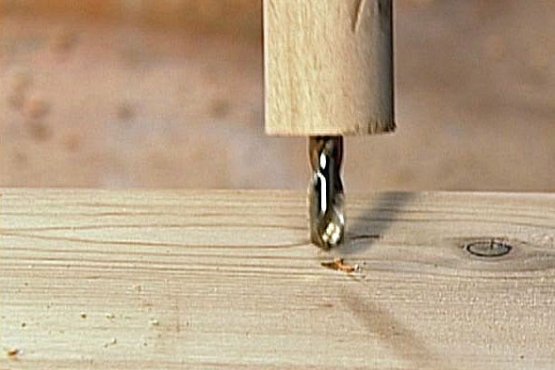
We drive a couple of screws through predrilled shank holes to temporarily attach our first beam, then the second beam to the post. The beams will be permanently attached with carriage bolts. That means we'll have to drill very deep shank holes all the way through the two beams as well as the post.
Now that's a bigger drill bit, huh?
FRANCES:
That's a very --
[BOTH SPEAK AT ONCE]
RON HAZELTON:
What it's going to take to go all the way through here.
FRANCES:
If I make a mistake with that, I'm in big trouble.
BILL:
Getting more confident.
RON HAZELTON:
But you won't -- because you have mastered the drill. Okay, guys. What I've done is, I've marked two holes up here on a diagonal. And I put Xes, you see where they are?
FRANCES:
Yes, I do.
RON HAZELTON:
Placing the bolts diagonally like this reduces the chance of the post splitting later on. There you go, all right.
RON HAZELTON:
Well bill is off to an early lead, and Francis seems to be catching up as both go into the third turn, Francis closing that gap, this is going to be a very tight race… there you go.
BILL:
Right, very nice, very nice.
[LAUGHTER]
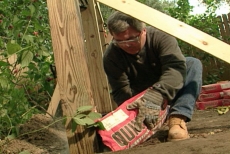
RON HAZELTON:
Well I really do like that drill bit. So we decided to replace it with carriage bolts which we drive in, secure with nuts and washers, then tighten with a socket wrench.
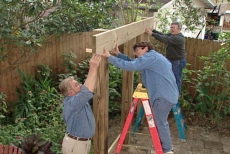
Well this is our rafter the first one we're going to put up guys. We've got that same champer on the edge here and that we have on our beams.
BILL:
It looks nice.
RON HAZELTON:
I'm going to hand this up to you. Would you get that edge.
BILL:
Yeah.
[BOTH SPEAK AT ONCE]
RON HAZELTON:
- this in, this -- set it right up on top of the beam there.
FRANCES:
Okay.
RON HAZELTON:
And then bring it out to me a little bit further this way.
[SOUND CUT]
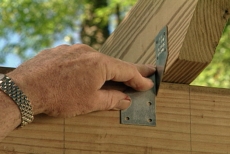
Since Orlando is susceptible to hurricanes, we need to attach these rafters as securely as possible. These hurricane clips are the way to do that. I temporarily hold them in place with a screw, then hammer in hot dipped galvanized bracket nails.
We use a spacer board to create an equal distance between each rafter. So where do you want this?
BILL:
A little to the right Ron, if you would.
RON HAZELTON:
Your right or my right?
BILL:
Yeah, my right.
FRANCES:
I like it a little to the left.
RON HAZELTON:
The left. You know, what, I got a hook here, I'm going to hang it right here. How's that look?
[BOTH SPEAK AT ONCE]
BILL:
That looks good. I enjoy sitting here watching you do some work.
RON HAZELTON:
Yeah, yeah, I meant to talk to you about that. The way this is supposed to work, Bill is, I watch you work and I'm the cook. You know, this hasn't quite turned out that way.
BILL:
I didn't realize that.
RON HAZELTON:
You guys put me to quite a bit of hard work.
[BOTH SPEAK AT ONCE]
Actually you did all the hard work and it turned out great.
FRANCES:
It's beautiful.
RON HAZELTON:
You know, I can just picture this pergola in a few short months with climbing vines providing a cool green canopy across the rafters. And when Bill and Frances install that hot tub underneath, well, it will be their personal kingdom and just as magical as any other here in Orlando.