How to Use a Waterproofer for Exterior Surfaces
Seal Porous Outdoor Objects with Multi-surface Waterproofer to Prevent Water Absorption and Related Damage Such as Freezing and Cracking
Protect porous outdoor objects from absorbing water to preserve their appearance and help stop them from freezing and cracking during the winter. Apply multi-surface waterproofer with a spray to concrete birdbaths, terracotta pots, wooden bird houses and feeders, and paper maps. Let the treated surface dry for 48 hours and know they're sealed when the water beads on the surface.
Read More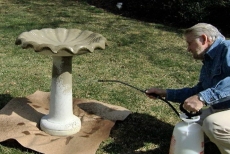
Apply Multi-Surface Waterproofer to Large Areas with a Garden Sprayer
Spray large areas, such as a concrete birdbath, with multi-surface waterproofer from a garden sprayer. Pour the solution in, pump it up, and spray about 12 inches from the surface in even strokes to avoid pooling. Cover the work surface.
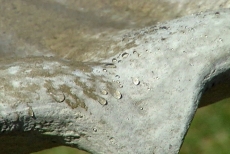
Dry for 48 Hours and Perform a Splash Test
Let the treated surface dry for 48 hours. Splash a limited amount of water onto determine if it beads and demonstrate that the surface is sealed. If not, another coat is required.
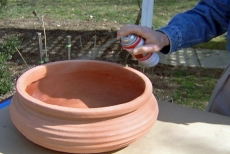
Spray Smaller Surfaces with Multi-surface Waterproofer from a Can
Protect smaller surfaces such as terracotta or other porous clay pots with multi-surface waterproofer in a convenient aerosol can.
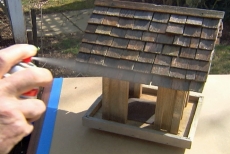
Use the Outdoor Multi-surface Waterproofer on Wooden Objects
Protect wooden objects such as birdhouses with the multi-surface waterproofer applied from an aerosol can. For a cedar bird feeder, the treatment protects the surface while letting the wood beneath age naturally.
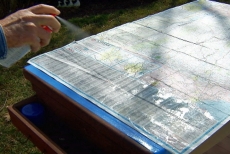
Waterproof Maps and Charts with Multi-surface Waterproofer
Waterproof maps and charts to protect them from the elements as you boat, camp, or hike. Lay the article out flat and coat one or both sides. On drying, the paper remains flexible but sheds water like a duck's back.
Related Tips

Blog Articles

Expert Tips: How to Mount a TV on the Wall
Get step-by-step instructions on how to mount a TV on the wall, especially for big screen TVs. Master the art of wall mounting with our tips.

Frustrated by Stripped Screws? Here’s How to Get Them Out Fast
We've all been there. You're in the middle of a project, and suddenly your screwdriver spins uselessly in the screw head. The screw is stripped, and frustration sets in. With a little know-how and this simple trick, you can tackle a stripped screw and get your project back on track.

The Secret to Finishing Plywood Edges
Plywood projects are fantastic, but exposed edges can be an eyesore. This blog post unveils the magic of edge banding - a simple technique to create flawless, finished edges on your plywood projects, making them look professional and ready for paint or stain. Watch the video to learn how to apply edge banding like a pro!


