Build Your Own Slide Out Pantry
Learn how to construct and install a built-in pantry cabinet with pull-out storage sections
Construct a custom roll-out pantry and refrigerator enclosure using birch-veneer plywood and pocket-hole joinery. This organizer occupies less space that the previous cupboards and counter while making room for a larger refrigerator, more kitchen storage and easy-access adjustable shelves or racks. The dual pantry frames slide out all the way, operate independently, and match the existing cabinetry.
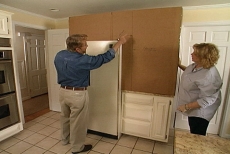
Plan the Pantry with a Cardboard Mock-Up and Computer Software
Make a cardboard mock-up to visualize the size of the pantry/cabinet. Plan it in detail with computer-assisted drawing software.

Remove All Components of the Existing Cabinets and Counter
Remove the doors and drawers from existing cabinets, after unscrewing hinges and drawer glides. Cut out cabinet frames, removing nails.
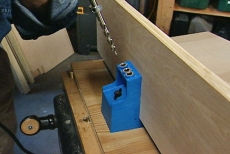
Cut and Pre-Drill Plywood Panels for the Kitchen Pantry Frame
Cut birch-veneer plywood panels on the table saw and pre-drill them for pocket-hole joinery with a special gig and bit.
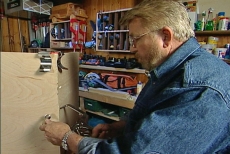
Clamp, Glue, and Screw the Panels Together
Assemble the panels with glue and screws, using special pocket clamps to pull and hold the pieces tightly together.

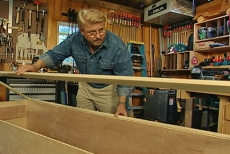
Slip Bottom and Back Panels into Place in Routed Grooves
Slip the bottom panel into place and slide the quarter-inch plywood back into position in grooves routed for this purpose.
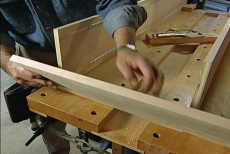
Reinforce the Pantry Frame to Face the Raw Edges
Use poplar strips and pocket-hole joinery to construct a face frame to cover raw edges and reinforce the pantry shell.
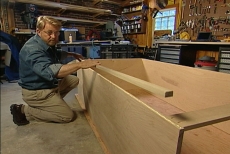
Construct Two Slide-out Shelving Units and Route for Shelf Hardware
Build two slide-out shelving units with dados/grooves for shelf standards. Install the hardware and glue and screw the pieces together.
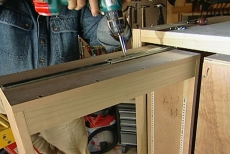
Attach Full-extension Glides and Make Decorative Face Panels
Attach full-extension glides at the bottom and top of each slide-out pantry unit. Route decorative panels to face each unit.
Build and Face the Plywood Refrigerator Enclosure
Build the refrigerator enclosure of birch-veneer panels secured with pocket-hole joints. Face them with glued and nailed poplar strips.
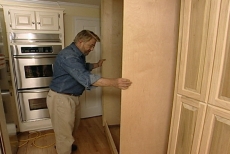
Place and Secure the Pantry and Refrigerator Enclosure
Set the pantry and refrigerator enclosure in place, screwing them to studs and each other. Add support pins and shelves.
Blog Articles

Maximize Your Yield with DIY Netting for Strawberry Beds
Keep your strawberries safe from pests with our DIY strawberry cage netting solution. Learn how to create sturdy frames and find the best netting for your strawberry plants.

Change It Up: Swapping Out Your Light Switch Plates
Tired of boring light switch covers? Upgrade your home decor with this simple guide on replacing light switch plates and make a statement in every room.

Revamp Your Outdoor Space: How To Stencil A Concrete Patio
Learn how to create a stunning patterned concrete patio with our easy-to-follow instructions for stenciling. Upgrade your outdoor space in no time.


