RON HAZELTON:
Building together is one of the things I enjoy doing most with my kids. And today, I'm going to have the pleasure of that with someone else's children and it's putting a smile on my face. I'm on the road again and headed for one of my favorite spots in the Midwest, Chicago.
The Windy City is famous for, among other things, its architecture, and I'm in town to visit one young Chicagoan who just might be the city's next architectural wonder. Five-year-old Rachel Shaw has been busy sharing her vision for a dream playhouse with her little brother, Thomas and her parents, Chris and Christine.
Today's HouseCall is going to turn her vision into reality.
What color do you think you want the house? You like yellow?
RACHEL SHAW:
Of course, I love yellow.
RON HAZELTON:
So you've got a second story up here? I might have to get a building permit for that and I may not, I -- I won't have time to do that. So I might today, only be able to just make it one story high. So what if we make that the front of the house?
How about that for one side, right there where your toe is. Okay, that's for the other side. Tom, you, you take this, okay, move it back here, put it back here. Right, back here. Where would you like to put the door, over here?
RACHEL SHAW:
Mm-hmm [AFFIRMATIVE].
RON HAZELTON:
Right here? So -- right here, somewhere? Knock, knock, knock. Hello, is Rachel home?
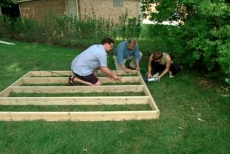
While Rachel, Thomas and I continue working out floor plans, my carpenter, David Schulte is busy cutting pressure-treated lumber which we're going to use for a joist system.
We'll start right here. You notice we've drawn some lines every 16 inches. So we're just gonna put these together --
We make sure the joists are flush at the top and then attach them together with a nail gun.
Perfect, how is it?
CHRISTINE
It's good.
RON HAZELTON:
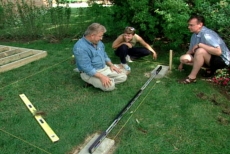
We're going to set our joist assembly aside for a while, but first, Christine and Chris drive in corner stakes to mark its location.
Now, you may have noticed that the, the lawn kind of drops down to this corner right here.
CHRISTINE:
It used to drop a lot more.
RON HAZELTON:
Oh, it did. Did you fill in some already?
CHRISTINE:
Yeah.
RON HAZELTON:
Okay. Well, I, it looks to me like maybe three or four inches. But we want to set this on some of these blocks right here. This is the high corner, right here, so we'll start here.
Our goal here is to create a level foundation. So I first cut away the sod from the high corner, then add a layer of sand. We'll need to create a level bed for the concrete block, and sand is easier to move around than compacted soil.
Christine runs a string around the perimeter of our foundation. If we align the edges of the blocks with the string, we can be certain the blocks are positioned correctly.
If we get these four corner blocks level themselves, and level with each other, everything we build on top of this, is gonna be level.
CHRIS:
See if it's level still.
RON HAZELTON:
That's close. Before you go to any more trouble though, I'm gonna put this stone on the top, because we've got a second thing going on here is that, this has to be the right height, so it will be level relative to this one up here. So I may have to have you just raise or lower the whole thing.
RON HAZELTON:
Ha ha ha ha.
CHRIS:
Is that good?
RON HAZELTON:
It's real good.
RON HAZELTON:
We lay several additional blocks around the perimeter. Together, they'll form our foundation.
RON HAZELTON:
Foundation's ready.
The building is only as good as its foundation.
Good, all right, we are solid, great.
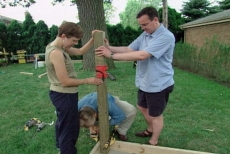
Now, our playhouse will have a front porch. So our next step is to install four posts. We clamp the first one to the rim joist, then use a post level to make sure it's plumb or perfectly vertical. Christine bores a hole all the way through the rim joist and the post. Chris hammers in a bolt.
Now, this is galvanized steel, because it's gonna be outside here.
Then Christine adds a washer and nut and tightens it with a socket wrench.
Just so that washer starts to compress the wood a little bit.
We repeat the process on the adjacent side, then attach the remaining three posts in the same way.
CHRIS:
Oh, Rachel's gonna love this as a birthday present.
CHRISTINE:
Yup.
RON HAZELTON:
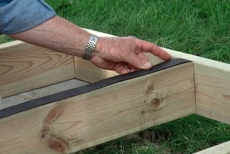
Now we're ready to install our flooring, which in this case, is very similar to outdoor decking. Now if you're about to put new decking down on top of joists like this, here's a tip that you might went to consider: after decking has been down a while, it tends to dry out and can slip a little bit around the screws and nails, and when you walk on it, it will cause a squeaking sound as these two pieces of wood rub together.
Well, here's a solution. Take strips of roofing felt; some people call this tar paper, lay it on top of the joist and then just tack it with staples, like this. Now you've got a cushion for the decking, so that it won't make any noise and some additional waterproofing as well.
With the strips of roofing felt on top of the joist, we get ready to lay down our first deck board. However, it has to be notched to fit around the posts. To begin, we transfer the location of the post sides, to the deck board.
Then I set a combination square to the thickness of the post and use the square as a guide to transfer this dimension to the board. Chris and Christine then get busy using jigsaws to cut out the notches. I'm seeing like a perfect fit in my mind.
CHRISTINE:
Perfect.
RON HAZELTON:
That's a nice snug fit. Let's attach that down.
We attach the deck board by driving rustproof galvanized screws into the joists. The remaining boards, we install in assembly line fashion. I start the screws by tapping them into the surface, then Chris and Christine follow behind, driving them in.
Well our decking is all down. Now we can start on the walls. I cannot take this hot weather anymore, so I've got on my summer outfit here. Actually I, well, you don't have shorts on. You okay?
CHRISTINE:
I'm okay. I have no sleeves, so I'm okay.
RON HAZELTON:
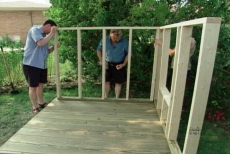
Now, this is called framing, we're gonna make up one wall at a time. I've precut each of the pieces and marked them. You can kind of think of this as like a wall kit if you will. So all we have to do now is nail them together.
Okay, I'm gonna put some screws in, right here.
We drive the screws through the base plate of the first wall section, then do the same with the second section. Next, we attach the wall sections together with screws.
Hey, wall number three.
CHRISTINE:
Wall number three.
RON HAZELTON:
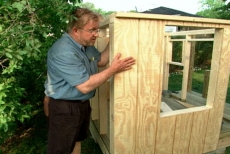
That one in, complete with window. Our final wall, with door, with windows. All right, folks, we're gonna turn this framed wall into a -- a sheathed wall. This is T-111 sheathing here, paneling.
We've trimmed the sheathing to fit the wall and have also cut out the window opening. Christine fires in nails about every 16 inches across the top only.
Now, right now, this building is not very structurally sound. It can move back and forth or rack. We're gonna use this skin right here to do two things. To make sure that it's square, and also to stiffen it up. So what I want to do is kind of look back here and make sure that it's the same, it's the same margin from top to bottom. That's it about right there. All right, Christine about right this far in from the edge. This nail, again about 16 inches apart.
Even with just these two rows in, all that's gone, all that wiggle is gone. By the time we nail this off on all of the studs, this is gonna be very stiff and very, and, and structurally, very sound.
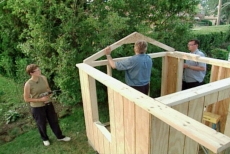
Now, while Chris and Christine are out cutting some more sheathing, I'm gonna start to work on the roof and the first thing I'm doing here is making up what are called roof trusses. There are two pieces of two by four, we cut these earlier and I've put a couple of jigs down here on the floor.
Just tack some strips of wood down to hold these in the right position. I'm gonna put this piece of triangular-shaped wood called a gusset right on the top, I'm gonna attach it all together with some screws. This is gonna go up here on the roof and that will form the shape of the roof, and give it its strength.
But before we install the trusses, we have to put sheathing on the front, and other side of the house. We'll do the back later. We've got all of our sheathing up except this back wall, and we've left that off because we're gonna bring that right up to the peak here.
On top of the sheathed walls, we've placed overhanging two by sixes to form eaves. We align the ends of the truss with the outside of the eave and then attach it by driving screws up from underneath. Once all the trusses are up, we call it a day but we'll finish up tomorrow on what I am told is a very important birthday.
Up next, we finish off the roof and add some quality touches.
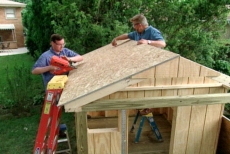
Okay, guys, a little roof sheathing. We're gonna be dried in in no time here. Now Christine, there's a little gauge I cut down there. You have to overhang about one inch no the front. You got it, okay. Hold it right there. Chris, you're perfect. You're perfect.
To eliminate any nailing guesswork, I've drawn lines on the roof sheathing to show the location of the trusses underneath. With the sheathing up, we attach fascia boards to cover the ends of the roof trusses.
One drip cap coming your way. Right over the edge, guys.
Drip caps installed along the bottom edges of the roof, will keep rainwater from seeping into the edge of the plywood sheathing. Roofing felt is our first waterproof barrier. We start at the bottom and then overlap the upper strip, attaching the material with staples. Asphalt shingles laid on top, will make the playhouse water tight.
When you invited me over here to help you build this playhouse, did you think you'd up on a roof doing shingles?
[BOTH SPEAK AT ONCE]
CHRISTINE:
No, I didn't think I'd be up on the roof.
RON HAZELTON:
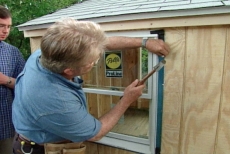
And yet you look so natural up here. All right, guys, we're up to the windows now. I'm putting a bead of sealant on here. Now this is an excellent window that we're putting in here. In fact, probably better than the windows you've got in the house right now.
It's dual, dual glaze, two panes of glass.
[BOTH SPEAK AT ONCE]
The kids could live out here. That's what I had in mind actually, you know, if it comes to it. Now put this right down on the sill.
Chris and Christine tip the window upright, and press it firmly against the wall.
This window has got great insulation value. All right, now if you noticed, we've put the caulk here. Here's the -- this is called a nailing flange. You see it's kind of squishing out there. That means that we've made a really good seal. And to put this in, we're using an inch and a half or two inch roofing nail here.
After the flange is securely nailed, we can seal it with strips of one by four wood trim.
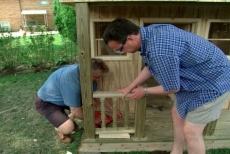
Now, no front porch would be complete without a railing, right?
CHRISTINE:
That's right.
CHRIS:
Sure.
RON HAZELTON:
So were gonna make one up. Actually, we're gonna make this out of very standard parts. This is just a piece of railing right here that comes machined this way in eight foot lengths. And this is a standard baluster. We've cut these down so that they're a little bit shorter and have obviously cut the railing into short pieces, because we don't need very, a very long railing here.
And this is how this is gonna go together.
I squeeze a dollop of construction adhesive into each baluster opening in the railing.
Now I'm gonna take one of these, drop it in this precut hole right here. Christine, if you'll pick up that nail gun, this is actually a pin nailer, and what we want to do is, we want to toenail this. So we're gonna be coming in at an angle, so you probably want to hold it about like that, okay. Pull the trigger.
[NAIL GUN] Now the sound you hear, this is, you notice there's no cord to this, there's no hose coming to this, it has its own compressor built into the nail gun. So for small jobs like this, it's really very nice, okay. All right, now we're gonna take another piece of exactly the same material and we're gonna put it on this way. This is actually gonna be the bottom.
Christine drives screws through the bottom rail, while Chris holds the balusters in place.
Well, now that we've got that railing made up, let's just set it in place, Chris. Just -- I want to put that block down there as a spacer, okay?
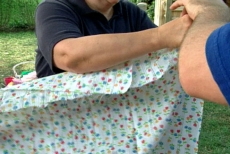
Once the railing is set into position, I toenail it into place. Well, it's getting close to birthday time. So now little Rachel's aunts, friends and relatives have all gotten into the act, fashioning homemade curtains and other housewarming touches.
Now I have a thought here. You could even sell lemonade out of here, couldn't you? Huh? And you could greet the neighbors when they came to call. Hi, Rachel. Could I come in and have a cup of tea with you?
RACHEL SHAW:
And I says, sure.
RON HAZELTON:
She's loving it, and it's perfect for her, but you actually built it. You did this with your own two hands.
CHRIS"
We had a great two days. Building this was a lot of fun, a lot more fun than I thought it would be. A lot more -- see what it's turned out.
CHRISTINE:
A lot of it wasn't quite as complicated when you had all that wood and stuff, and I thought I don't know what we're gonna do with all, but it was easier than I thought. A lot of it was easier than I thought it was gonna be when we started the project.
RON HAZELTON:
Great. Now this is just the beginning. Because in a few years, Thomas is gonna be big enough, you're gonna have to put on a second story and an addition over here.
CHRIS:
Yeah
[BOTH SPEAK AT ONCE]
CHRISTINE:
A garage.
RON HAZELTON:
I can see this taking up the whole backyard one of these days. Rachel, enjoy your house, hon, okay? Oh, here comes the other occupant. This gonna be a territorial thing?
CHRIS:
It could be. That extension may come sooner than we thought.
RON HAZELTON:
Bye, guys.
Well, our playhouse may not rival the stunning architectural wonders of the Windy City, but to one little girl in Chicagoland, this is absolutely the most wonderful house on the planet. Happy birthday, Rachel.