How to Make a Four Season Room from a Porch
Convert an Existing Porch into Space that can be Used Year Round
If you have an existing screened in porch or patio, you may be surprised by how simple it is to convert this space into a four season room that can be used all year round, no matter what the weather outside. The framework is already there, all you need are some walls and windows, and you've got a more livable square footage.

Remove Old Screen Panels
Begin by pulling away the molding or stops that hold the old screen panels into place. Once these have been removed, the panels should be easily tapped out of the frame with a hammer. If there is any additional trim on the exterior of the posts that will serve as your framework, you should also use a pry bar and a hammer to remove it during this step.
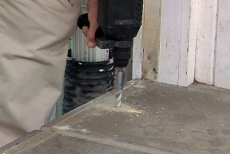
Install the Bottom Sill Plate
Before you build the walls, you will need to install a bottom plate. This plate consists of two boards, one on top of the other, that are bolted directly into the concrete pad below. This step ensures the stability of the walls as the room is finished. The bottom plate should be treated lumber, as it will be the most exposed piece to the elements. Install anchor bolts into the concrete so that the plate can be bolted tightly to the floor. You may also want to place a thin piece of foam insulation between the concrete pad and the bottom board, to make sure that it is weather tight.
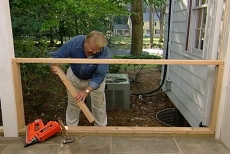
Frame the Walls
When framing the walls, you will need to make a plan according to the size of the windows that you've purchased. The walls should then be framed to the appropriate height for the windows to fit. Begin by nailing vertical 2 x 4's to the existing posts, and then nail a top plate across them. Once that plate is in place, then additional studs can be nailed into place, 16 inches apart. Nail through the plate into the top of the stud, and then toenail the bottom of the stud into the bottom plate.
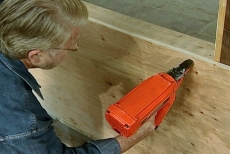
Install Exterior Sheeting
Once the walls are framed, you will need to apply the exterior sheeting. An exterior grade plywood is perfect for this application. Simply cut the sheets to the proper size and nail them into place. You may find it helpful to build a simple square and to make a pencil mark along the straight edge. This will help you ensure that all of your nails are going directly into the heart of the stud, and not shooting around the sides. Once the sheeting is installed, then you should notice that the walls have become much more rigid.

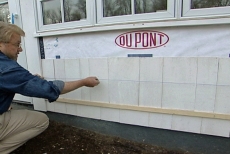
Apply Tyvek Housewrap
Housewrap will help weather proof the new room that you are building. It will act as a barrier to both moisture and wind, and will keep the wood framing and sheeting from rotting. Tyvek is a popular product often used for this application. Always make sure that the top piece overlaps the bottom, so that water always flows away from inside of the wrap. This will keep moisture away from the wooden framing of your four season room.

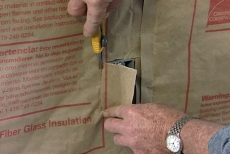
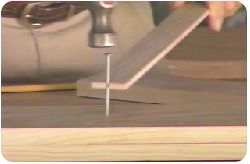
Seal the Window and Door Frames
Before you install the windows and doors to your new four season room, you will need to make sure that the bare and exposed wood around the frames and jambs is sealed. Use a foil backed tape to do this. Overlap the sills and corners about 8 inches up the vertical sides and fold down the flaps. Think of it as gift wrapping the 2 x 4's that make up the frame.
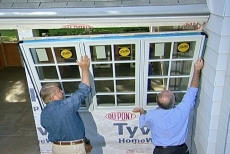
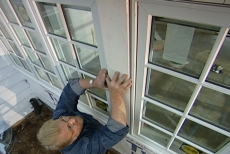
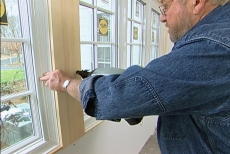
Install Windows and Doors
Once the frames are sealed with foil tape, you are ready to install the doors and windows. Begin by unfolding the nailing flanges and applying a bead of silicone to the inside of the flange. As you set the window into place, put the bottom onto the sill first, and then tip the top of the unit into place. Have a friend help you hold it in while you install the nails through the flange and into the framework of the wall.
Apply Exterior Trim
Now that your windows and doors are in place, you are ready to install the exterior trim. The trim design that you choose will be particular to your house, but for any project, you will need to install trim around the windows with a drip edge. This ensures that the water doesn't flow back under the sill and into your wall. 1 x 6 is also commonly used to fill the spaces between windows. It can easily be ripped on a table saw to fit whatever space you may need to fill. Cornice pieces can also be installed between the exterior wall and the eave to dress up the appearance of your new four season room.
Install Exterior Siding
Whatever product you choose to utilize for your exterior walls, it is important that it is level. In this case, Ron is using a cedar shake shingles, and after using a thin strip of wood to ensure that they first row is lined up correctly, he snaps a chalk line after each successive course to ensure that the spacing is uniform all the way up.
Insulate the New Walls
Use paper backed fiberglass insulation to insulate the walls. The bats of insulation can be cut to the proper length before you install them. Set the bats into place, unfold the paper tabs over the studs, and use a staple gun to fasten the tabs to the studs. The paper acts as a vapor barrier, so always make sure that it is installed facing the interior of the room that you are insulating. A utility knife can be used to cut around any electrical outlets or light switches that you may have chosen to install.
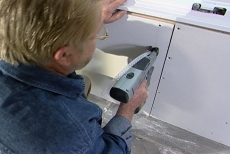
Install Wallboard
Begin this step by cutting the wallboard to the proper size. Try to utilize as many factory cut edges as you can, as this will make the finishing process a little easier. Screw the pieces into place using a screw gun. Ron is using a drill designed just for this process and it allows him to install the screws very quickly.
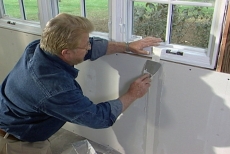
Finish Wallboard Screw Holes and Seams
Begin the finishing process by filling the screw holes with joint compound. This may take several coats, with a light sanding job in between. The seams will require drywall tape to finish correctly. Coat the seam with joint compound, and then press the tape into the seam with a putty knife, pressing out any excess compound. It usually takes 2 or 3 coats to completely finish the seam, using a wider knife for each coat.
Apply Interior Trim
The final step is to apply the interior trim. This job is done quickly and easily with a cordless nailer that doesn't require a compressor. You can choose trim that matches the rest of the woodwork in your home, or give your new four season room a look and feel that is completely unique.
Related Tips


Blog Articles

Maximize Your Yield with DIY Netting for Strawberry Beds
Keep your strawberries safe from pests with our DIY strawberry cage netting solution. Learn how to create sturdy frames and find the best netting for your strawberry plants.

Change It Up: Swapping Out Your Light Switch Plates
Tired of boring light switch covers? Upgrade your home decor with this simple guide on replacing light switch plates and make a statement in every room.

Revamp Your Outdoor Space: How To Stencil A Concrete Patio
Learn how to create a stunning patterned concrete patio with our easy-to-follow instructions for stenciling. Upgrade your outdoor space in no time.


