Ron:
Hey, what a great trip that was, hunh, down to the Gulf Coast? You know, that was a simple project on that Bay St. Louis Patio, but what a difference it made. And I didn’t mind those crawfish, either. Now, I’ve got another great project for you, also an outdoor project, that’s going to be just as easy, and it won’t require you to complete that Seabee training course to do it. We’re going to build an outdoor planter, and we’re going to use a material that you often think of as a plumbing material. This plastic PVC pipe. Now, the way it’s going to work is we’re going to take sections of this pipe, connect them together with fittings like this, as a matter of fact, take a look at the drawing right here.
It’s a three-tiered design, so when we get the frame finished, we’re going to set in three of these plastic planters just like this one. As I said, inexpensive, simple to make, so let’s get started.
Now for this project, we’re going to have to cut several pieces of this plastic pipe to exactly the same length. So we’re going to make up a jig to do that, out of two pieces of 1x3 lumber. Actually, what I’m going to do is make an L-shaped sort of fixture out of this, just going to lay this piece right on top…
RON – VO:
I’LL NAIL THE BOARDS TOGETHER, CLAMP THEM TO THE WORKBENCH, AND THEN CUT A SLOT THROUGH BOTH BOARDS.
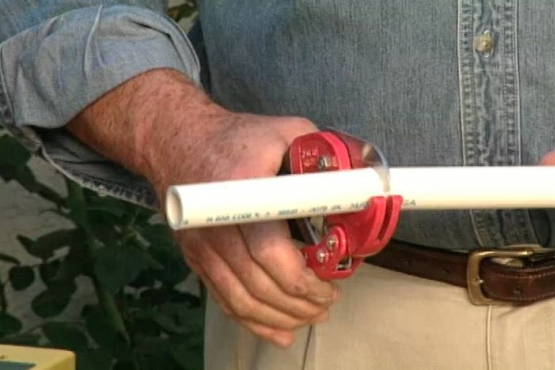
Now in effect, what I’ve made right here is a small miter box. So, let’s say for example I want to cut the first pieces twelve inches long. I’ll put my tape measure right in that groove, in the saw groove there. Come back here, I’ll mark twelve inches like that. Take this piece of scrap wood, put the end of it right on that mark. And clamp this in place. This is called a stop.
Now I can take my pipe, lay it in the jig, or the miter box here. Put the end of it right up against this stop. Drop my saw down to that kirf that I made earlier, and cut this off. Now, no matter how many of these I cut, they’re all going to be the same length, and what’s just as important is that the ends are going to be perfectly squared. See, every time, exactly the same length.
Okay, now we’re going to have some fun. We’re going to assemble this planter, and we’re going to do that by using fittings and this pipe, all of which has been cut to length now. We’re going to begin with this frame, into which the planter is going to sit. We’ve got one, two, three of these. They’re essentially rectangles. So for those we’ll need four corner pieces, these are three-way elbows (?), and we’ll need four straight pieces, two long ones, and two short ones.
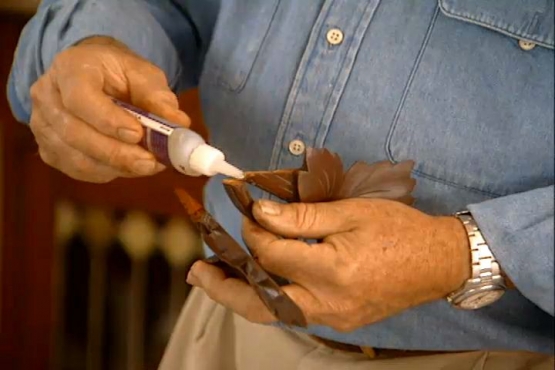
So we’re going to glue these two things together, and we’ll be using two materials right here, a primer, which is this purple stuff here. We’re just going to go around the pipe twice, inside the fitting twice with the primer. This is the adhesive right here, the cement, same thing, around the pipe twice, around the fitting twice, then we’re going to just put these two together, like that, give it one quarter turn, hold it for a second, and our pipe joint is welded.
RON – VO:
IT ONLY TAKES A MATTER OF MINUTES TO ASSEMBLE ALL THREE FRAMES.
Now, we can actually begin to connect these together with these vertical pieces right here. This is kind of like…what… building with an erector set? Or Legos? Something like that? This, by they way, would be a great project for kids. You could do the cutting for them, and they could do the assembly.
OK, well this is going to be our top frame right here. So what we’ve got is we’ve got all of this, up through here. Now I’m going to put on the back piece right here.
RON – VO:
I’VE TURNED THE PLANTER UPSIDE DOWN, IN ORDER TO INSTALL THE REAR LEGS, AS WELL AS THE BASE, WHICH I’VE ASSEMBLED SEPARATELY.
Now this is a little bit tricky, because I’ve got to glue all four of these legs at the same time. So I’m going to just kind of do a little test here. Be sure everything looks pretty good. All right, that looks like it’s going to line up all right. But I won’t have much time for this, so I’m going to go real fast here. One, two, three, four. OK, here we go. Put it up on top. Get those legs on there. Come on, just got a few seconds left here, get everything started, come on down. OK legs. Come on down legs, come on down. OK. Down. Get down. I’m going to flip this over now, so I can press down on these. I think we did it!
RON – VO:
WELL, A COUPLE OF COATS OF SPRAY PAINT, SOME GOOD QUALITY POTTING SOIL, AND OF COURSE SOME PLANTS, AND OUR PROJECT IS COMPLETE.
Well how about that? Oh, I know what you were thinking. Now how can he make a good-looking planter out of PVC pipe? But you know, I think this turned out pretty nicely. And one thing I especially like about this, is it’s almost maintenance free outdoors – everything here is plastic.