RON HAZELTON:
I'm on my way to Knoxville, Tennessee to visit Beth and David Booker. This 1904 Queen Anne Victorian, owned by Beth and David Booker, is part of the old North Knoxville Historic District. The Bookers and their neighbors are intent on preserving and restoring the homes in this part of town which were all built between the 1880s and the 1940s.
Beth and David have about completed their renovation except for a few finishing touches. Some of the doorways are missing the original casings. The Bookers would like to make new casings for these doorways that are exact replicas of those found throughout the rest of the house.
All right, so the options. Go out and find some casing at a store. I take it you've done that, there's nothing close, right?
BETH BOOKER:
It doesn't match. We can find the — the
quality of wood that matches, the kind of wood that matches.
RON HAZELTON:
Okay, option two. Go to a millwork shop and say, you know, make this for me. Probably doable but can be pretty expensive.
BETH BOOKER:
Right.
RON HAZELTON:
Option three, which is what we're going to do today is we're going to start with a piece of wood that matches the wood here and we're going to make or fashion, a casing to match that one over there, all right.
Then we can all go in the millwork business after that and be happy ever after.
BETH BOOKER:
And make a lot of money.
RON HAZELTON:
Oh, I don't know about that. I tried that once. Had a lot of fun, but I didn't make a lot of money [LAUGHS].
[DAVID LAUGHS]
This is the wood that we're going to be using. This is cypress, by the way, which I've never actually worked with before.
But that's what you have in your house and we're going to be cutting the casings, the sides and the top casing out of these 1 x 8s here.
So I've got the saw all set up for the proper width cut. You guys can go ahead and make the cut. How many times have you used a table saw?
BETH BOOKER:
Never.
RON HAZELTON:
Never.
BETH BOOKER:
Never.
RON HAZELTON:
Okay, so then you may get the use of your tools today.
BETH BOOKER:
Right, great.
RON HAZELTON:
All right, so let's start over here. David, if you would —
DAVID BOOKER:
Sure.
RON HAZELTON:
You'll take the out-feed as it comes off here. That black bar will support it for a while.
DAVID BOOKER:
All right.
RON HAZELTON:
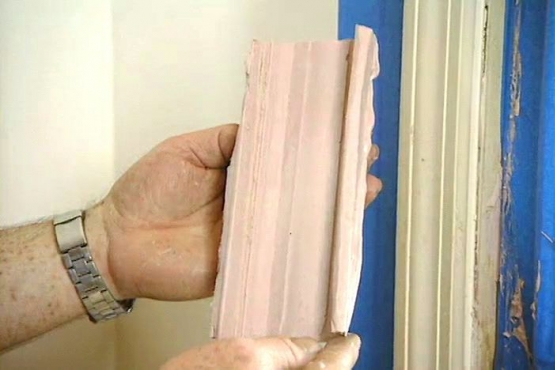
David and Beth rip each piece to width. Later on, we'll cut them to length. But first, we're going to create the decorative grooves found on the original door casings. We'll do this with a table-mounted router. We pass each casing section over the high speed cutting bit.
After the first pass, we turn the wood over and run the opposite edge through.
Isn't that nice?
BETH BOOKER:
It looks wonderful.
RON HAZELTON:
See? So we got half of it by doing this side, the other half by doing this side.
Next, we install a small round-nosed bit and once again pass the board over the bit twice. This time, the board is placed facedown on the router table. We wind up with narrower grooves and an overall pattern that is nearly identical to the original casing.
Our next step is to make the upper corner blocks and the lower plinth blocks. The plinth blocks make the side casing look more like a column. We use a slightly thicker stock for the plinth and corner blocks, and cut them to size using a sliding compound miter saw.
Next, we found off the corners of these pieces, using a round-over bit on the router. We've created what is essentially a door casing kit, and now we're ready to install it.
Ever used one of those before?
BETH BOOKER:
Not in my life.
RON HAZELTON:
Oh, you're going to love this, okay. Now, here's the wood that we're going to be nailing into. There's also a stud back here, there may be two. We know for sure, we've got one right there. So that's what we want to — to nail into.
And I'm going to set this back about a quarter of an inch, because that's the way the other ones are set back in the house, right. So why don't you — this is where the nail comes out, right here. So pull that part of it up against the wood.
BETH BOOKER:
Does it matter, the angle?
RON HAZELTON:
We want to be straight, pretty much straight on this.
BETH BOOKER:
Wow.
RON HAZELTON:
Yeah. I want to do it again.
RON HAZELTON:
Okay. You're on your own now, so get the plinth here and one there.
Beth finishes nailing the plinth block in place and I can tell that this nail gun is making quite an impression.
You like that?
BETH BOOKER:
Yeah. I want one.
RON HAZELTON:
There you go. Gift list.
[LAUGHTER]
BETH BOOKER:
Yeah. Absolutely [LAUGHS].
RON HAZELTON:
Now the reason I've drawn this line up here is that we want to set this casing back, not only on the sides, but also on the top. So I use this like a gauge and took a — sort of set it up down here off the plinth block and then took that same dimension and brought it up here on the top, okay.
So now it's time to cut this first piece of casing to length. Let's get a measurement here. David, if you'd put the tape up there, that could hold down the top of the block.
DAVID BOOKER:
Sixty-nine and a half.
RON HAZELTON:
Oh, well, it's like 69 and — 7/16th to me, buddy.
DAVID BOOKER:
You're the one going to hang it, you tell me. [LAUGHS]
[LAUGHTER]
RON HAZELTON:
Close enough — 69 and a half. David transfers his measurement to the first piece of casing.
No, 69 and a half.
DAVID BOOKER:
That's what it is.
[LAUGHTER]
RON HAZELTON:
No, no, no, my goodness.
Well, lets regroup, we're ready to cut. I've moved the saw inside, because for these, cuts, we're likely to go back and forth a few times, fitting and trimming pieces to the exact length.
Back up.
DAVID BOOKER:
Yeah.
BETH BOOKER:
I want one.
RON HAZELTON:
I have a feeling every power tool I show you today, you're going to want, right?
[BOTH SPEAK AT ONCE]
BETH BOOKER:
I'm going to want one, yeah.
RON HAZELTON:
Nice cut, huh?
BETH BOOKER:
Yeah.
RON HAZELTON:
Okay.
[BOTH SPEAK AT ONCE]
Now guys, take this board over, put it on the plinth block and it should come right up to that line.
DAVID BOOKER:
You need about a 16th of an inch more.
BETH BOOKER:
Okay.
RON HAZELTON:
Well, okay. Right, so we're going to trim a 16th off that.
We make one very fine cut and this time, we have a fit. Beth uses her new favorite tool, and soon our first section of casing is up.
[BOTH SPEAK AT ONCE]
BETH BOOKER:
Better.
RON HAZELTON:
Let's take the other one. What have you got there, David?
DAVID BOOKER:
Sixty-eight-and-a-half inches. Wow, that's a whole inch shorter than the other side.
RON HAZELTON:
Yeah. Well, you know, that sometimes happens in an old house. Things settle and you can get dramatically different measurements, even on opposite sides of the same doorway like this. So I'm glad we made the measurement and didn't assume it would be the same as this one. All right, let's cut that one.
We repeat the process and install the trim on the opposite side, then set the corner blocks in place. Next, Beth and David measure the distance between the two corner blocks.
Now this is going to be our most accurate cut. It's gotta fit — drop precisely in there. So we're going to cut this intentionally, a little bit long because if it's too short, it's unusable. A little long, you can always trim it then.
To be safe, we've added about a 16th of in inch to David's measurement. Then we make the cut.
Let's see — da da da —
BETH BOOKER:
As predicted, just a tiny bit long.
RON HAZELTON:
A tiny bit. Okay, we're just going to shave a tiny bit off the end.
[MUSIC]
Beautiful.
David nails the top section into place, but there's still some unfinished business between our new casing and the old casing.
RON HAZELTON:
Since you've got this wide baseboard in other parts of the house, I want to drop this piece right in here. But because it is so wide, we're going to have to nail the upper edge of this to a wall stud. So, if you take the stud finder there, Beth and run it across the wall, start about right here —
Beth locates and marks, the wall studs, then nails the baseboards to the studs and along the bottom edge. Finally, we add a strip of molding to the bottom of the baseboard. Now all that's left for David and Beth is to stain the new casing to match the old.
BETH BOOKER:
It, it looks wonderful and it matches the other.
RON HAZELTON:
And it's so nice that you've got an older house like this to know that by using a few router bits like this, you can match this kind of woodwork.
You know, one of the real challenges in renovating an older home is finding the right materials for an authentic restoration. Isn't it good to know that sometimes we can just make them?