How to Hang Heavy Objects on Walls

Video Transcript

Video Transcript

Ron:
You know, I was just looking over some of my emails, and the question that I seem to get a lot from folks is how do I hang heavy objects on the walls of my house without worrying that they’re going to fall down?

Well, there are five different pieces of hardware that are used very often for this.  I’d like to show them all to you, then go over the advantages to each. 

Now, pretty much everything that I’m going to be talking about right now is designed to go into this type of wall material.  This is wall board, and if your house was built or remodeled since about 1950, this is what the walls are made of.

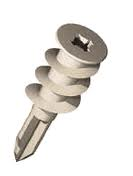
So, here are the five things that I want to show you , starting with these picture hangers that use very small nails, then moving on to the plastic anchors with screws, and from there to the screw anchors, also using screws, and then these hollow wall fasteners also known as Molly bolts.  And finally, over here are the big guys, the ones that can handle almost any hanging job, the toggle bolts.

So what I’ve done is set up a couple of demonstration walls.  Let’s go over there and I’ll show you how to use each one of these.

Let’s start with these picture hangers, which are ideal for small, medium, even large size pictures.  As a matter of fact, you would be amazed at how much weight a little hanger like that can actually support.  I’m going to show you.

Okay, we’ll just drive this in.

What I have here is a twenty-five pound barbell, we’re going to hang this over the hook.

Now this guy here, with the two nails, is rated for fifty pounds.  Okay.  Now, I don’t advocate pushing these hangers to the limit like this.  But I just wanted to show you that these are really a lot stronger than they look.

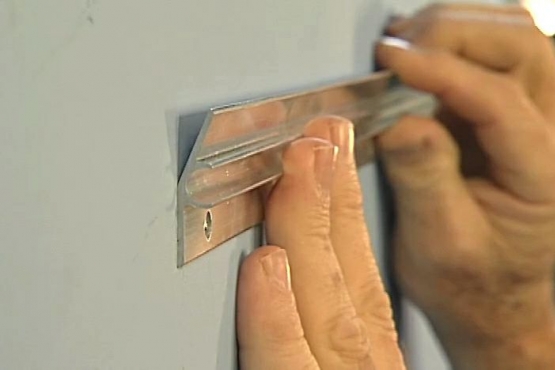
A lot of accessories that you hang on your wall, like this towel bar, come packaged with these.  They’re called plastic anchors.  Let me show you how to put them in.

Select a drill bit that’s the same diameter as the plastic anchor.  Then go ahead and bore through the wall board.

(SOT: Drill)

There.  Now, we’ll just insert these plastic anchors. 

(SOT: Hammer)

With those in, we’re all set to attach whatever kind of bracket we’re going to be using.  This is for the towel bar right here, and these screws go right into those plastic sleeves.

Now what’s happening here is as I put this screw in, it’s actually cutting a thread into that plastic insert, and sort of forcing it open and jamming it in the hole here.  Now this feels pretty solid, but what I don’t like about these plastic anchors for a towel bar like this, is if you put a lot of pressure downward on this, like a child might do trying to climb up, you can rip it right out of the wall.

Now the reason those plastic anchors don’t work so well for a towel bar or say a shelving bracket like this, is that the pressure is not just down like this, but it’s also pulling out.  For a situation like that, you need an anchor that grips the wall from the back.  Something like this.  This is called a hollow wall anchor, sometimes known as a Molly bolt.

(Music Sting)

Now watch what happens when I tighten this up.  That Molly bolt is going to flare out on the back side of the wall.  Just like that.  Okay now that we’ve flared those anchors out on the back side of the wall, I’m going to reverse the drill and take the screws out.

(SOT: Drill)

Now, we just take these screws that we just took out, and put them back in through the holes of the bracket.  And that is really snug.  But, if you’ve got really heavy objects, big books, large stereo speakers, or if you’re hanging anything from the ceiling, then you’ll want to go to these.

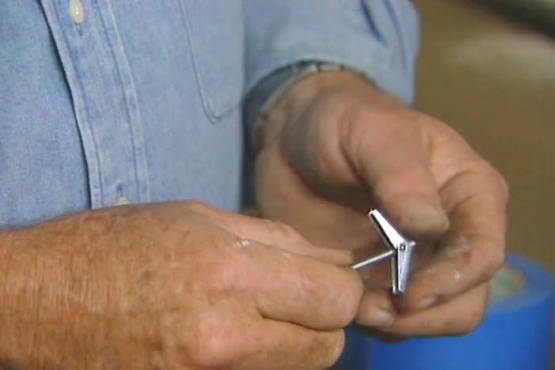
These are called toggle bolts.  Now, when you’re drilling the holes for the toggle bolts you have to pick a bit that’s the same diameter as the folded toggle.

(SOT: Drill)

To install these, we’re going to squeeze the wings of the toggle together like that, just push them into the hole, now watch what happens on the back side as it comes through.  See, it sort of springs out like that, and then catches on the back side of the wall.  All we have to do now is tighten up those bolts.

(SOT: Drill)

Now.  You’ve got a bracket that is really strong.

Now I don’t recommend doing chinups on a bracket that’s put up with toggle bolts, but as you can see both of these types of anchors can support a lot of weight!  I’ve got almost a hundred pounds up here on this shelf.  So whether you want to hang a five pound picture, or put up a shelf that can support a hundred pounds or more, now you have the know-how to do it.
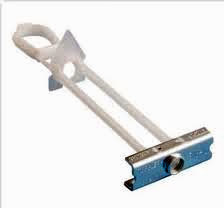
A video demonstration of how picture hangers, plastic anchors, molly and toggle bolts work.

In this video I demonstrate four different types of wall hanging devices designed for carrying heavier loads.  In addition, I've included below, a link to a fifth type called a threaded wall anchor.  One of these should work for hanging just about anything from larger pictures and heavy mirrors to shelf brackets and cabinets.  With the possible exception of the toggle bolt, all are intended for use primarily in drywall or wallboard.   With a basic understanding of the differences between these and a clearer idea of how they work, you'll be able to choose right one for whatever hanging job you're tackling.

For a video demonstration of threaded wall anchors  click here.

Click here for a handy table that shows the drill diameters for different size toggle bolts.

21Project Comments

We welcome your ideas and suggestions. Read through comments from other readers or leave your own.

HI RON,THANK YOU SO VERY MUCH FOR YOUR HELP ON BOLTS. I HAD TO USE SOOO MUCH PUDDY,ON ALL THE HOLES I MADE,UNTIL I SAW VIDIO. NOW I CAN PUT UP ALL 4 SHELVES WITH TOGGLE BOLTS,AND I KNOW THEY WILL STAY!!!!!!!!!!! THANK YOU AGAIN.

avatar
Bobi
Jan 24, at 10:15am

Ron Have you tried the attach-it.com   They will blow your mind how easy and strong the are.  We will be glad to send you afree sample . Renny Barnacle Company

avatar
Renny Barnes
Dec 2, at 4:22pm

Thank you! Exactly what I needed to know, and a little more to help figure out what I need for my next project. You empowered me!

avatar
MJ Taylor
Nov 25, at 12:01pm

Ron, my problem is how to hang my mirror 3’x4’ against my fireplace, which has rocks plastered to the wall. I couldn’t find the ceiling studs.The fireplace is diagonally positioned to the corner of my living room. The crawl space is too tight and is stuffed with a 12” insulation material. what could I possibly do to hang my frame? I’ve punched holes in the ceiling and they are begining to show.
Tanx…..Daddy Bee

avatar
Daddy Bee
Nov 17, at 12:53am

Hi Ron!  I also would like to thank you for the many ideas and tips you pass along.  I am versed enough not to need this particular tip,but I have used many of them in the past,and have never thanked you for them. 

The one I liked the most was the idea about making a box and then attaching the draw slides to it in the work shop. Then sliding the entire box with the hardware already attached inside the cabinet.  I think you called it the pots and pan slide out.  My wife loved it so much I had to make another for bowls and dishes .  The top try she uses for many kitchen gadgets cookie cutters, meat thermometer, funnel,cheese grater etc.

Prior to your idea I installed the same type draw slides inside an existing cabinet,but it was a very frustrating and much more difficult job doing it in place.

Thanks again for making my life easier.  Dave Lick    

avatar
Dave Lick
Nov 16, at 10:20pm

how do you keep the toggle bolts from falling down the wall , when youhave to pull out the screw and put it into a hole to tighten it up   ??????? THANKS   JOHNMA

avatar
john von dohlen
Nov 15, at 7:11pm

THE “KIDS WALL SHELVING” IDEA WOULD WORK GOOD FOR CLOTHES RODS. LITTLE PEOPLE COULD LEARN ABOUT SELECTING AND ‘PUT IT AWAY’ IF THEY COULD REACH THE ROD. BY THE TIME THEY CAN REACH A 5’ HI ROD THEY’RE ALREADY TOO OLD TO LEARN !!!

avatar
DENIS SNYDER
Nov 15, at 11:29am

The nice thing about molly bolts is that they can be removed from the wall without leaving humongous holes is by placing the screw into the molly and   pushing in to unfold the ears .  This does have to be done carefully, but will allow the molly to be removed without a major plaster repair.

avatar
John Hanecker II
Nov 15, at 9:22am

Ron:
Just wanted to tell you how much I enjoy your tips and tricks.
Too bad the internet wasn’t around when I bought my first home, I could have used a lot of your tips.
Keep them coming and THANKS!

avatar
Eddie
Nov 14, at 10:13am

All your vidio’s are very interesting and informative but half of your vidio’s don’t have any sound and on all of them the video stops and starts every 5 seconds apart. It’s enough to drive you crazy trying to watch it.

avatar
Dennis
Nov 13, at 8:55pm

This is a great video for ALL homeowners!  However, I have two comments.
1.)  When installing the toggle bolts, after the hole is drilled, the toggle screw NEEDS TO BE PUT THROUGH THE ITEM!!  Many years ago I used them to anchor a 2x4 to a cinder block wall.  I put the toggle end in the hole and tightened up the screw, then backed it out to apply the 2x4.  Well, when you remove the screw, the toggle end falls to the floor since nothing holds it to the inside of the wall.  I had to make an extra trip to the hardware store for more toggle bolts!  As a good rule, always buy a few extra when you start a project!
2.)  Also, the MOLLY BOLTS work really good, but they come in different lengths for different wall thicknesses.  Pay attention to the package instructions!

avatar
Noah
Nov 13, at 7:38pm

If you have the correct sized masonry drill ,use it when drilling SHEET ROCK walls. The over the counter normal drill bit is good for wood or metal.

avatar
Mike Williams
Nov 13, at 4:10pm

I have seen several demonstrations of the type of wall attachments shown in these videos and I am glad to see them.  They illustrate what is good and not so good about a variety of tools available for this type of project.  What I don’t think I have ever seen is how to go about attaching anything to a cement block or other masonry or brick wall.  For example how do you attach brackets to a wall to create a wood storage shelving system?  Or how do you attach 2x4 to other furring strips to allow attachment of wall board or other finish goods say in a basement or garage?  I have seen a variety of shelf systems installed but never the method of attachment to the cement block?  This is not trivial to me.  I would love to see how Ron does it.

avatar
John Walters
Nov 13, at 12:16pm

Hey, Ron.  Great video!  Now I know how I’m going to really, absolutely, no falling down, secure my jam-packed bookshelves.  Molly-bolts!  Thanks!

avatar
Lisa
Nov 13, at 10:52am

Fantastic video Ron!  I can understand things so much better when I can watch it.  We are getting ready to move from a house into an apartment and now I know which type of hardware to use to make the least intrusive holes.  Thanks so much for publishing these videos!

avatar
Mary H.
Nov 13, at 10:46am

Enjoyed your video but wondered about how to attach the shelf to the brackets.  It seems that would be needed to really keep items and people safe.  Also, should items placed on the shelves have something to keep them in place?  Many areas have earthquakes, etc.

avatar
Mary Norton
Nov 13, at 9:25am

Hey Ron,
  Your video about installing toggle bolts into wall board is a bit misleading.  Some viewer may think that once the hole is drilled in the wall board and the toggle bolt is inserted, you then can remove the Screw from the fastner (as your video eludes to) and the Butterflied toggle piece will stay in position.  This is not the case.  As I am sure you know, once the screw is removed the toggle part or butterfly part will fall down inside the wall leaving nothing for the screw to be replace back into .  I enjoy your tips, keep up the good work, but this one needs to be cleared up.

avatar
Doug Hamblin
Nov 13, at 8:20am

Ron, my wife and I use a product almost exclusively called, “Monkey Hooks”.  My wife has “seasonal art”, so she is always changing wall art that has different sizes.  She is able to hang nearly any art on one of two sizes of hook that come in 25 and 50 pound capacity.  She merely pushes them into the wall, gives them a twist, and the hook is ready to go (you note I say SHE) - no tools requred, they just leave a small nail sized hole (she is also very good at filling holes with spackling).  The Monkey Hooks work very well only if there is no wall stud where you’re hanging the object d’art.

avatar
frank domurath
Nov 13, at 7:56am

Ron I have been hanging things on my walls for years now, with only a straight pens.
I push them at a 45deg. Into the sheetrock and leave out enough to hold the photo frame or other things that I have on my walls.  They hold a lot of weight for no bigger then they are.
The good thing about using straight pins, they leave a hole that paint will cover..

avatar
Lee
Nov 13, at 3:29am

Ideas for how to hang a collection of old cameras with out shelving showing?

avatar
Linda Biram
Oct 6, at 3:44am

Ron can we send you some attach-it.com—-would make hanging heavy stuff a snap

avatar
Renny Barnes
Aug 15, at 1:47pm

Submit A Comment

If you have a comment, question, or suggestion about this project, submit it here.

All Fields Are Required

Please enter the word you see in the image below: