RON HAZELTON:
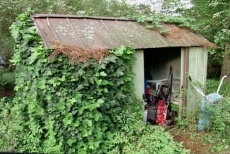
Well, I'd say it's a good day for a road trip. I'm headed to Atlanta, Georgia. Gonna pay a visit to Jonathan and Rachel Logan. Now they say they've got a garden shed that's just gotta go.
Today, with a little help from me and my traveling carpenters, David Schulte and Scott Haines, we're going to replace the old storage shed with a new solar garden shed.
[BOTH SPEAK AT ONCE]
Wow, that's been here a while huh?
JONATHAN LOGAN:
It's a little rickety so --
RACHEL LOGAN:
Yeah, and the doors kind of were just leaning up. [LAUGHS]
RON HAZELTON:
It's a certain character.
RACHEL LOGAN:
Yeah, yeah.
RON HAZELTON:
There's a part of me that doesn't want to tear this down.
RACHEL LOGAN:
Yeah.
RON HAZELTON:
But then there's the other part of me that looks up here and sees all the rust and yes, I think it's time to go.
Step one in building our new shed is clearing out the old one.
How many weed trimmers have you got? I think this is the third one I've picked up.
JONATHAN LOGAN:
That one died.
RON HAZELTON:
This shed is so full that a few members of our TV crew pitch in to help. In the process, I discover something I never want to see. Gasoline in a glass container.
This is extremely dangerous.
JONATHAN LOGAN:
Is it really?
RON HAZELTON:
Yeah.
[BOTH SPEAK AT ONCE]
You don't have kids here but it, if this were to drop and it was near, let's say a hot water heater --
JONATHAN LOGAN:
Yeah.
RON HAZELTON:
[MAKES NOISE] Big time fire explosion. So never store it in a glass container.
[BOTH SPEAK AT ONCE]
RACHEL LOGAN:
-- container.
JONATHAN LOGAN:
We're, we're gonna put it --
[BOTH SPEAK AT ONCE]
RON HAZELTON:
-- only.
RACHEL LOGAN:
A temporary solution.
RON HAZELTON:
Like this one, like this one right sitting here. This would be a good thing to put it in.
While our disposal phase continues, the delivery truck from the local home improvement center has arrived upfront. The new shed, manufactured by a company called Handy Home Products, comes as a kit, complete with instructions and everything you need but the tools. But before the new shed can go up, the old one has to come down. We start with the roof.
We got a ton of pine needles and dirt and vines up here, and we're never gonna get this lifted off unless we take them off. So who wants to go up?
RACHEL LOGAN:
I think Jonathan.
[BOTH SPEAK AT ONCE]
RON HAZELTON:
Ah, good. Okay.
RACHEL LOGAN:
Yeah, I like him, for sure.
RON HAZELTON:
All right, if you insist, Jonathan.
RACHEL LOGAN:
Yeah.
RON HAZELTON:
Now be careful because I don't know what's gonna come down with that. We've already uncovered a lot of ants so you might get some more stuff up here.
Look at that. I'm surprised -- well, I guess this can take a lot of weight. There's something called a living roof, you know.
RACHEL LOGAN:
Yeah [LAUGHS].
RON HAZELTON:
Where you grow food.
JONATHAN LOGAN:
Yeah, I've seen that.
[BOTH SPEAK AT ONCE]
RON HAZELTON:
A missed opportunity here. You could have done --
RACHEL LOGAN:
Yeah.
RON HAZELTON:
-- done carrots up there.
RACHEL LOGAN:
Yeah, right, you're right actually [LAUGHS].
RON HAZELTON:
Now we could remove the roof and disassemble the rest of the shed by backing out hundreds of screws. However, many are badly rusted. So instead, we'll cut the shed apart using a reciprocating saw. It's easier and a lot faster.
[MUSIC]
Okay, we have to make a couple decisions here.
RACHEL LOGAN:
Okay.
RON HAZELTON:
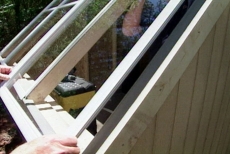
This is called a solar shed which means that one side of the roof are these glass panels, so you have to decide where you want those oriented. Generally you want to put them south because that gives you the most amount of light in here. But you have some aesthetic considerations, so you may want to see the glass panels from your house. So you have to decide that.
While Jonathan and Rachel decide on the orientation of the shed, my crew unpacks and organizes all the parts. The first step is to build the four walls. We lay the studs out on the concrete slabs, spacing them at 16-inch intervals.
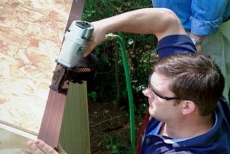
Now we need to attach them to the top and bottom plates. Well, we're going to be doing a lot of nailing today as we put together the walls of our shed and we could do all that nailing with a hammer. But instead, we're gonna use nail guns.
Now I know what you're thinking, nail guns are professional tools. Well not so today. You can buy a starter set, for example, that includes a compressor, hose and a small nail gun for around $200 or you can rent these from tool rental shops. The whole works. Now they come in a number of different styles, shapes and sizes. This is a framing nail that I was using right over here.
These two are finishing nailers. Usually nails with very small heads. This is a roofing nailer here. Drives in very short, large headed roofing nails. And this last one doesn't even require a compressor or hose. It uses butane and a small explosion inside the cylinder drives the nail into the wood.
Now modern nail guns are safe to use. They've got a lot of safety features built in and they'll save you a lot of wear and tear on your shoulder, elbow and your thumb.
Okay, everything's laid out here ready for you guys to start nailing. Now what I've done is I've given you some marks here, just to line everything up. This is in the center of the stud, then I carried this line up across and down the other side, so you know exactly how to line this up.
Once all the wall sections are assembled or framed, we cover each one with exterior wall sheathing, attaching it in place with rust-resistant nails. We repeat the process for each wall section.
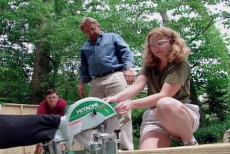
All right, we're about to cut some strips of two by four, they're called sill plates. This is pressure-treated lumber. It's gonna go around the edge here and the building's actually gonna sit on this. And this will be bolted into the concrete.
RACHEL LOGAN:
Oh.
RON HAZELTON:
After measuring each one to the proper length, Rachel cuts the sill plates using a power miter saw.
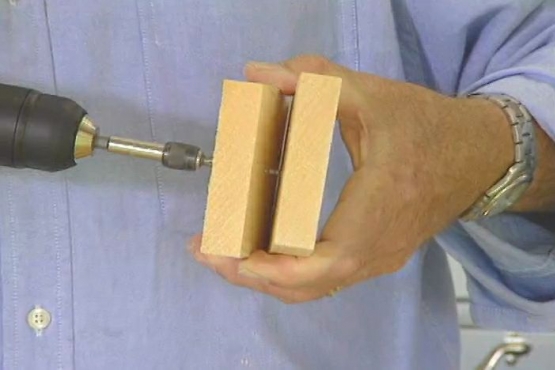
This is a special drill bit. It will drill through both wood and masonry. I'm just gonna go through the wood and just gonna mark the position on the concrete, okay. It's also a hammer drill. Hear that?
JONATHAN LOGAN:
Yeah, what's a hammer drill?
RON HAZELTON:
Well, it's hammering at the same time it's drilling. You see the dust?
JONATHAN LOGAN:
Yeah.
RON HAZELTON:
Now in that way, we know we've hit the concrete.
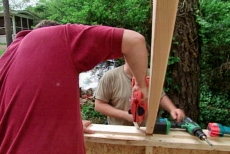
Once we've drilled through the sill plates and made our starter marks on the concrete, we remove the boards and drill each hole with a carbide-tipped masonry drill bit. This tape on the bit serves as a gauge to insure that we end up at the proper depth. Next, we drive expanding anchor bolts into each hole, align the holes in the sill plates with the bolts and tap the sills in place. Nuts and washers secure them.
JONATHAN LOGAN:
No?
RACHEL LOGAN:
No.
RON HAZELTON:
Okay. One down. That's not gonna go anywhere, huh?
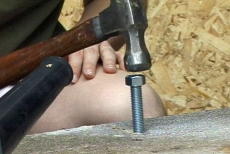
Once our sill plates are installed, we cut off the tops of the anchor bolts so that they won't protrude through the bottom plate of the wall. Next, we bore shallow holes on the underside of the bottom plates, to allow them to slip over the nuts.
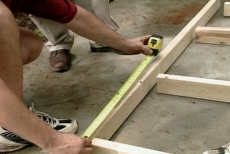
In order to do that, I first mark the location of each bolt on the side of the bottom plate. Then make a measurement.
And what I'm doing right now is measuring the back set, that's the distance from the edge of this board to the center of that bolt. Then I'm gonna transfer this up here, and make a mark.
Jonathan and Rachel take turns drilling shallow holes at each of my marks. Finally, we set our first wall into place.
Just give it a tap with your toe, Rachel. Okay, back a little bit, Jonathan.
With Jonathan and Rachel both using levels to make sure the wall remains plumb or perfectly vertical, I install a temporary brace to hold it in position.
RACHEL LOGAN:
Oh, God.
RON HAZELTON:
All right -- she can let go.
[BOTH SPEAK AT ONCE]
RACHEL LOGAN:
Scared me to death [LAUGHS]. I wasn't expecting that.
RON HAZELTON:
Well, the nail gun might have startled Rachel a bit at first, but in no time she's gotten comfortable using it to attach the wall to the sill. On the exterior side of the wall, Jonathan nails through the sheathing and into the side of the sill plate.
One wall up, three to go.
With one wall up, we move on to wall number two, using the same method.
Wall number three.
RACHEL LOGAN:
Right.
RON HAZELTON:
Otherwise known as the short wall.
RACHEL LOGAN:
Yes.
RON HAZELTON:
Good shoot. Okay, coming up.
Coming up, we race to raise the roof as a thunderstorm is bearing down.
JONATHAN LOGAN:
So during this rain delay, we're going to bring you the 1972 game, the Cubs versus the Pirates.
[LAUGHTER]
ANNOUNCER:
Ron Hazelton's HouseCalls is being brought to you by the Home Depot.
[SOUND CUT]
RON HAZELTON:
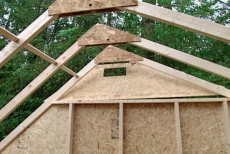
Today's HouseCall brings me to the Atlanta home of Jonathan and Rachel Logan. We've just finished putting up the walls of our new backyard solar garden shed. And now we're installing the first of four roof trusses. We attach them with rust proof galvanized screws.
JONATHAN LOGAN:
Oh yeah, that's great.
RON HAZELTON:
Got it?
JONATHAN LOGAN:
Mm-hmm [AFFIRMATIVE].
RON HAZELTON:
Okay, could we go for number two?
Our kit comes with spacers which we drop in between each of the trusses. The spacers eliminate any guesswork and insure that the trusses end up in precisely the right locations.
I can see if the whole village would show up to help you do this.
RACHEL LOGAN:
Yeah.
RON HAZELTON:
No, you could get it a lot better than one day. Okay, I'm on.
JONATHAN LOGAN:
Here you go, Ron.
RON HAZELTON:
A few drops of rain, I'm hoping we'd make this. It's so nice to get this roof up.
All right, this is called a stringer. It's gonna sit right on these notches on the rafters here. It's gonna do a couple of things. It's gonna form the top of the framed opening for the window panes or the glass panes that are going on this side.
It's also going to allow us to tie these rafters or trusses together, here on the top. Are you ready?
JONATHAN LOGAN:
Ready.
RON HAZELTON:
Next, we hold the rear gable in position and no sooner does Jonathan nail it into place, when a rainstorm breaks out. Now plastic sheeting isn't exactly what we had in mind for a roof, but for now, it will have to do.
JONATHAN LOGAN:
So during this rain delay, we're going to bring you the 1972 game of the Cubs versus the Pirates.
[LAUGHTER]
Either that or we're gonna show you an old episode of Andy Griffith. We'll come back to you in a half hour.
RON HAZELTON:
Reruns of This Old House or what else?
JONATHAN LOGAN:
No --
[BOTH SPEAK AT ONCE]
During this rain delay, we're going to be bringing you some classic episodes of the House Doctor.
RON HAZELTON:
In a few minutes, this storm has moved on and after changing into dry clothes, Jonathan and I get back to work. We nail the front gable into place, then attach our first section of roof sheathing.
One side of the roof -- is a roof.
Our shed kit comes with several pieces of decorative trim, fascia boards which cover the ends of the roof trusses and -- one door, sir.
Now we move our attention back to the roof. We're installing a drip cap designed to prevent water from seeping into the edge of the roof sheathing.
Let's get some roofing paper. We're gonna start here at the bottom and we're gonna overlap. Now let's put this row down first, then overlap the next one and the next one. Again, so that we have the paper overlap like this. As the water rolls down, it will go from one to the next and not go underneath the one below it.
As we lay down our roofing felt, we attach it in place with staples. Next, we begin putting down shingles, starting at the bottom edge, where we install a double layer. Each shingle overlaps the course below and is held in place with four roofing nails.
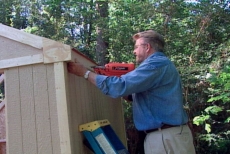
The nails are placed so that the heads are concealed under the next row. With the shingles up, we move onto the roof windows which are what make this a solar shed. First, we run strips of double stick tape along the top to the roof trusses.
Now we just want to set that right on top of the tape, Jonathan. Okay, fitting?
JONATHAN LOGAN:
Beautiful.
RON HAZELTON:
Now this is a metal trim strip right here with some holes drilled in it. It's gonna do two things. It's gonna cover up this gap between the windows and it's also going to apply downward pressure to hold the windows in place. Matter of fact, this is all that's holding the windows in place. It will be plenty.
Finally, it's time for the finishing touches.
[MUSIC]
Wow, now this is a shed, huh?
RACHEL LOGAN:
Yeah, it's fabulous.
RON HAZELTON:
Boy, do I like the way this turned out.
RACHEL LOGAN:
Yeah, I love the thermometer.
RON HAZELTON:
Thermometer, yeah. Hey, and here he is.
JONATHAN LOGAN:
Hey, how are you?
RON HAZELTON:
Bonsai man, huh? You know, the way you were tearing into that shed ripping it down and wielding that nail gun, I never would have taken you for a bonsai guy.
JONATHAN LOGAN:
Me neither.
[LAUGHTER]
RACHEL LOGAN:
He had to learn patience. It's been a good hobby for him.
RON HAZELTON:
So how was it for you, building this?
JONATHAN LOGAN:
Oh, it was great. I thought this was a lot of fun. I'd like to do it again. So if we -- you know, if we have another project, we'll be sending you a letter.
RON HAZELTON:
So now my question which I, I like to ask a lot is, having done this job, do you feel a little more confident in taking on the next ones?
JONATHAN LOGAN:
Absolutely.
RACHEL LOGAN:
Yes.
RON HAZELTON:
So long?
JONATHAN LOGAN:
Bye bye.
RACHEL LOGAN:
Bye.
JONATHAN LOGAN:
Thanks, Ron.
RON HAZELTON:
You're welcome.
Looking back, it's really amazing that such a good-looking structure came to us in a box. Unlike the dilapidated and rusting shed that used to stand here, this one adds beauty and value to the property and is every bit as functional on the inside as it is attractive on the outside.