How to Remove and Put in a Porcelain Kitchen Sink
Replace Your Stainless Kitchen Sink with a New Porcelain Model and Switch the Garbage Disposal to Your Preferred Side
Replace your dull kitchen sink with a newer more attractive porcelain model with an updated spray wand and the garbage disposal moved to the side that suits your style of kitchen use. This DIY kitchen sink installation--both removing the old sink and plumbing the new one--is a straightforward project made even simpler with the addition of helper's hands.
Read More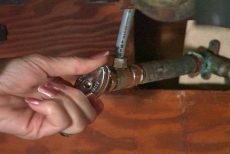
Turn off the Water Supply at the Sink's Shut-off Valve
Stop the water supply to the existing sink by rotating the sink's hot and cold shut-off valves clockwise to a closed position.
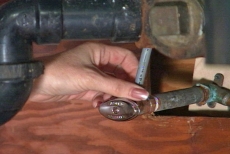
Loosen the Nuts and Disconnect the Water Lines
Loosen the nuts to the water lines with an adjustable wrench and/or your fingers and disconnect each line after placing a container beneath to catch the residual water. Leave the container in place for the next step.
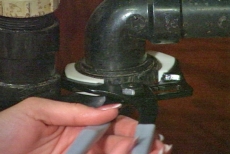
Disconnect the Drain Line and Remove the P-Trap
Loosen the plastic nuts on the drain line with adjustable multi-groove pliers that open wide enough to grip the large nut. Remove and drain the P-trap. Use a screw driver to loosen the hose clamp on the garbage disposal.
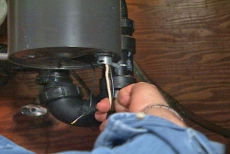
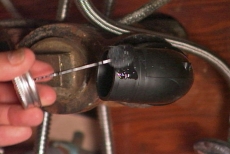
Disconnect the Wiring and Remove the Garbage Disposal
Switch off the electrical circuit to the garbage disposal, loosen the wire nuts and disconnect the electrical wiring. Slip a screwdriver through the ear on the retaining ring, give the ring a quarter turn and remove the garbage disposal.
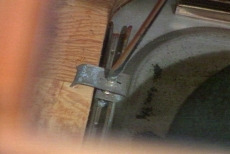
Unscrew the Metal Attachment Clips and Remove the Existing Sink
Unscrew the metal clips under the sink that attach it to the underside of the countertop. Lift out the old sink from the top of the kitchen counter and set it aside.
Install the Sink Components before Positioning It in the Countertop
Uncrate the new sink and install the gaskets, base plate, faucet, spray wand and air-gap device. Secure them from the underside of the sink. You will position the sink in the countertop in a later step.

Add Plumbers' Putty before Installing the Sink Hardware
Add plumbers' putty around each drain opening and press the strainer basket into one opening and the garbage disposal ring into the other. Tip the sink on edge and install the gaskets and hardware on the underside of the sink.
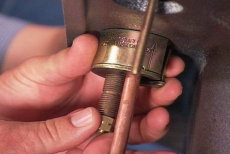
Secure the Garbage Disposal to Its Hardware beneath the Sink
Attach the garbage disposal to its mounting bracket beneath the sink. Secure it by slipping a screw driver into the ear on the retaining ring and rotating the ring.
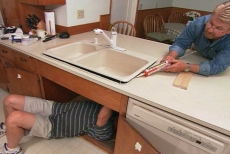
Position the Sink in the Countertop Resting on Temporary Blocks
Position the sink in the opening on wooden blocks while you add a bead of caulk. Support the sink from the bottom, remove the blocks, fill the gap with caulk and lower it into position. Caulk the upper edge.
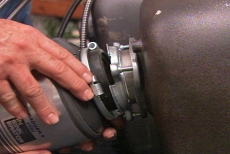
Reinstall the Plumbing and Restore the Water Supply and Electricity
Reinstall the drain line to accommodate the disposal in its new position and reinstall the water lines. Reattach the garbage disposal wiring and the power to the electrical circuit and restore water flow at the shut-off valves.
Related Tips

Blog Articles

Expert Tips: How to Mount a TV on the Wall
Get step-by-step instructions on how to mount a TV on the wall, especially for big screen TVs. Master the art of wall mounting with our tips.

Frustrated by Stripped Screws? Here’s How to Get Them Out Fast
We've all been there. You're in the middle of a project, and suddenly your screwdriver spins uselessly in the screw head. The screw is stripped, and frustration sets in. With a little know-how and this simple trick, you can tackle a stripped screw and get your project back on track.

The Secret to Finishing Plywood Edges
Plywood projects are fantastic, but exposed edges can be an eyesore. This blog post unveils the magic of edge banding - a simple technique to create flawless, finished edges on your plywood projects, making them look professional and ready for paint or stain. Watch the video to learn how to apply edge banding like a pro!


