How to Stain and Protect a Porch
Increase Your Home's Curb-appeal: Stain and Protect a Porch with Colors to Eliminate the Raw Look of New Pressure-treated Lumber
Stain and protect a new porch with house-coordinated colors. You'll create eye-pleasing contrast that complements the house and eliminates the raw look of new pressure-treated lumber that makes a porch look like an add-on. Be sure to buy stain that is recommended for new pressure-treated lumber and use semi-transparent stain on the porch flooring (decking) to avoid foot-wear patterns.
Read More
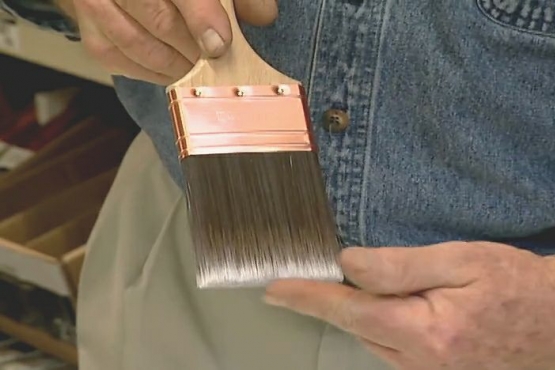
Select Tools and Materials to Stain and Protect Your Porch
Select stains intended for new pressure-treated wood that provide UV-filtering to prevent color fading. Semi-transparent stain will prevent paths from foot traffic on the porch flooring. Purchase a variety of pads, rollers, and brushes to stain and protect your porch.
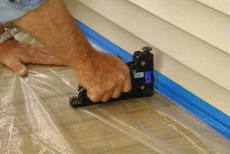
Mask Areas before Staining and Protecting Your Porch
Apply masking tape at post bottoms and siding before beginning to stain and protect your porch. Spread plastic sheeting to cover the entire deck and stairs, stapling the edges along the wall, rim joists and stair risers.

Start at the Top to Stain and Protect Your Porch
Begin to stain and protect your porch at tops of posts and railing, working downward. Use different roller sizes, as appropriate, but follow with a paint pad or brush to push the stain into the wood.

Prepare to Stain and Protect the Porch Flooring
Remove staples and plastic sheeting, but leave the masking tape, tucking it under the bottom edge of the siding with a wide putty knife. Flip the plastic sheeting up to protect the white-stained railing.
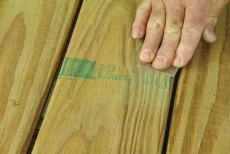
Sand Manufacturer's Marks before Staining and Protecting the Porch Flooring
Sand out stains and manufacturer's stamps before continuing the project to stain and protect the porch flooring. Any noticeable mark will show through the semi-transparent stain selected to prevent paths from foot traffic on the planking.
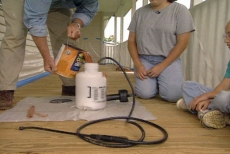
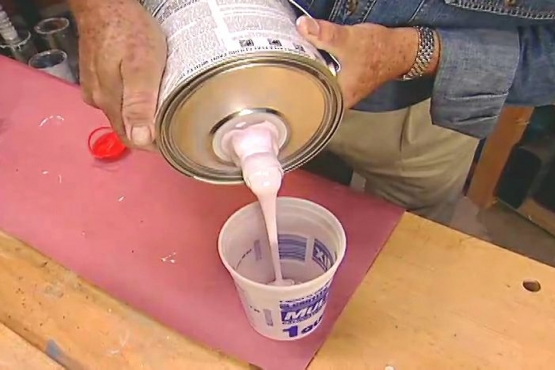
Fill Sprayer to Stain and Protect the Porch Flooring
Pour semi-transparent liquid stain into a garden sprayer, temporarily setting it on plastic to avoid mess from spills. Pump and pressurize the sprayer before beginning to stain and protect the porch flooring.

Spray Consistently to Stain and Protect the Porch Flooring
Hold the garden sprayer about 6 inches from the surface to stain and protect the porch flooring. Spray in consistent strokes over a 6-foot square section. Work the stain in with a deck brush before moving to the next section.
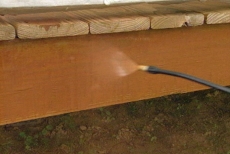
Back-brush to Stain and Protect the Porch Stairs and Sides
Spray the rim joists and l ends of the porch flooring to stain and protect the porch sides and stairs. Back brush with a paint brush to work the stain into the wood and ensure good coverage and penetration.

Remove Plastic after Staining and Protecting the Porch
Remove and properly dispose of the plastic sheeting on completion of the project to stain and protect the porch. Gently peel off the masking tape anywhere it was used to secure the plastic or protect the siding.
Related Tips


Blog Articles

Expert Tips: How to Mount a TV on the Wall
Get step-by-step instructions on how to mount a TV on the wall, especially for big screen TVs. Master the art of wall mounting with our tips.

Frustrated by Stripped Screws? Here’s How to Get Them Out Fast
We've all been there. You're in the middle of a project, and suddenly your screwdriver spins uselessly in the screw head. The screw is stripped, and frustration sets in. With a little know-how and this simple trick, you can tackle a stripped screw and get your project back on track.

The Secret to Finishing Plywood Edges
Plywood projects are fantastic, but exposed edges can be an eyesore. This blog post unveils the magic of edge banding - a simple technique to create flawless, finished edges on your plywood projects, making them look professional and ready for paint or stain. Watch the video to learn how to apply edge banding like a pro!


