How to Insulate and Level a Garage Floor

Video Transcript

Video Transcript

RON HAZELTON:

Well it's moving day for me. Actually I'm not going to go anywhere, I just have to get everything cleared out of the shop because I'm going to put down a new floor.  Now it's going to make the place look a lot better but the main reason I'm doing it is to keep it warmer in here.

I've already insulated between the rafters and installed my workshop garage heater up here. But this concrete slab gets really cold. So I'm going to do something about it.  But first things first.

When I designed my shop, I put nearly everything on wheels.  The main reason I did it was because I had limited space and I wanted to be able to easily reconfigure the place. Depending on the project I was doing and the machines I needed. Today though, all those wheels are going to make it a whole lot easier just to clear everything out. 

[MUSIC]

Well I've gotten all my tools and machinery and benches out of here and swept the floor clean. The next step is to put down some sub flooring.

This is a product called Drycor. It's actually an engineered wood product made up of wood chips or flakes that are compressed under a whole lot of pressure using a waterproof glue. And then on the back side is a polyethylene moisture barrier.


Now it's really important when using this product to bring it inside at least 24 hours before installation so that it can acclimate to both temperature and humidity.  The sub floor comes in 2-foot squares that interlock with each other using tongue in groove joinery.

No glue is required.  Now this is called a floating floor system.  It doesn't get attached to the concrete underneath.  It just sits or floats on top. As a matter of fact, the entire floor will expand and contract with changes in humidity and temperature.

And that's why I'm putting these spaces around the edge. That will leave us a quarter inch gap here.  I'll take these out when all the flooring is down.  And that gap will allow the floor to move as it needs to.  There are a few low spots in my garage floor.

You can see one right here.  Notice the gap underneath the straight edge.  I can adapt the flooring panels to irregularities like this by using these shims designed to fit right on the molded panel bottoms.  If necessary, I can stack up to 4 of them on top of each other.  A bit of masking tape helps hold them in place as I turn the panel over. 

I'm at the end of the first row and here I'll need something less than a full panel.  I just measure the space, set my fence to the same dimension and make the cut on my table saw.  A hand held circular saw or jigsaw would also do the trick.

The cut piece drops right into place. However, I can't use a hammer and tapping block to pull up the joint. So I'll do it with this tool called a pinch bar.  It slips into the gap next to the wall and hooks over the edge of the panel.

The opposite end is bent upward to form a striking surface.  A few hammer blows and the job is done.  I'm about to begin the second row and I've laid out a few panels here to make a point.  And that is that I'm going to be staggering my joints.

Now these joints on the first row, I've outlined in blue tape so you can see them more easily.  You notice the joints in the second row are going to fall in the center of the boards on the first row.  Think of it this way:

This panel right here is going to lock this panel and this panel together and when I'm all finished, I'm going to have a much more stable floor.  When I get to the doorway, it's time to do a different kind of trimming. I need to notch out a panel to fit around this corner.

The easiest way is to set the panel in place. Then use a straight edge or square to extend the wall lines onto the board.  A jigsaw makes cutting out the notch quick and simple.  This kind of sub floor would be ideal for finishing a basement where you might already be concerned about a low ceiling.

This raises the floor a very, very small amount. So what you're getting is a vapor barrier, a finished surface and insulating value, all from a product that's less than an inch thick.

Well I'm down to the last couple of pieces. You know the real beauty of a sub floor like this is how quickly it goes in.  Well it looks pretty good, doesn't it?  Now this would be an ideal sub floor for wood, carpet, vinyl or laminate.

But since this is my garage and workshop, I've got something else in mind.  This is called G floor from Better Life Technologies. It's a garage floor covering that comes in 9 foot widths and simply rolls out.  It lies perfectly flat and stays put without the need for adhesive.

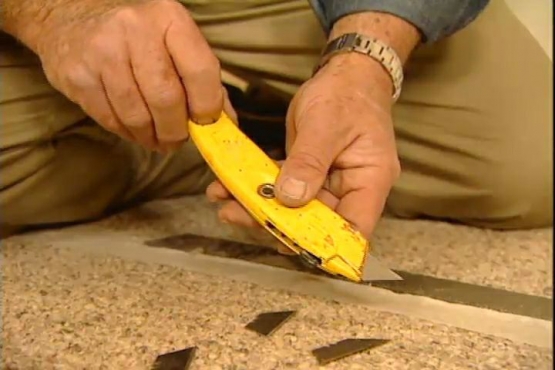
In a couple of minutes, I transform the look and feel of the entire floor. For trimming, I use either a hook shaped utility knife blade, or a pair of scissors. Cutting the floor to fit, as I work my way around the edge of the room.  To hold the seams tightly together, I apply double stick carpet tape to the back of the flooring.

However, I remove the protective liner from only one side.  Because I want the tape to stick only to the covering and not to the underlayment. This leaves the floor covering free to expand and contract with changes in temperature and humidity.

Finally I get rid of any bubbles or ripples with a push broom.  Working from the center to the edges.  I love my new floor.  It's tough, durable and good looking. And if I ever want to put the car back in here, fat chance of that, it's resistant to oil and gasoline.

Now it's not attached to anything, so I could take it out. Although I can't imagine why I'd ever want to do that.  The whole floor is only about an inch thick but even that is going to give me some pretty good insulation value. And that is going to make the shop a whole lot more comfortable.

A step-by-step demonstration showing how to install a floating subfloor of interlocking ready-made panels with a roll-out vinyl covering

In an effort to may my garage workshop comfortable year-round, I insulated between the rafters and installed a gas heater made just for this kind of space.  Nevertheless,  the concrete slab floor still remained really cold.  The solution to this problem provided a floor that was level, comfortable to walk and stand on and considerably warmer.  This approach is also suitable for finishing basement floors and can be used in combination with carpet, laminate, engineered hardwood, tile as well as vinyl.

Product Information

Click here for information on the Dricore subfloor system used in this project

Click here for information on the vinyl G-Floor from Better Life Technologies used in this project

17Project Comments

We welcome your ideas and suggestions. Read through comments from other readers or leave your own.

Hi, Ron,
Watched video on installing floor in garage/workshop. You didn’t finish the project. What can be done to finish panels at the garage door opening? If you want to move your power tools outside for any reason, there will be a lip at the edge of almost an inch. This will be a problem with a heavy saw with small wheels to overcome. Is there a tapered end system that can be used with the last few pieces of installed subfloor? Also interested in your lifting system with wheels that you have installed on your table saw shown in the beginning of the film. Thanks for the many great ideas/tips! . . . Charlie Strickler.

avatar
Charles W. Strickler Jr.
Mar 16, at 9:38am

Hey Ron what was that blue top on your trash can that you were cutting on? Is it just another flat surface for your shop or is it for cutting over a trash can.

avatar
Tom Bowling
Mar 12, at 10:48pm

What’s the R value of the subflooring panels?

Is there any additional R value to the roll-out stuff as well?

Also, how well do your tools roll now that it’s on that roll-out stuff, compared to bare concrete?

I’d also be very interested in a video showing and describing any nifty wheel setups (like that one you used your foot to raise the tool near the beginning of the video) you used when making your tools mobile.

Thanks!

avatar
Rich
Mar 12, at 8:55pm

Thanks Ron for all of your efforts and generosity on behalf of one avid do-it-yourselfer !!!

I have a growing catalog of your excellent videos ....

Take Care,

avatar
Joe Perticaro
Mar 12, at 8:26am

Great video! Wonder how much that cost!

avatar
Lee
Mar 11, at 5:42pm

I installed this flooring in the work shop part of my pole barn about 3 years ago. It was the best thing I have done in a long time. Not only does it make standing for long periods more confortable, my feet do not get cold anymore ( I live in Michigan).

I purchased the panels from Menards, Lowes and Home Depot when they were on sale, usually about 20 panels at a time. The panels cost around 5-6 dollars.

avatar
Robert M. Messer
Mar 11, at 3:59pm

Looks great.  I had a center drain hole in my garage as during the winter here in Michigan we get alot of snow and with two cars you need a drain.  How do you accommidate for the water disposal in the drain.  Will the product hold up to alot of water as there is no way to get the snow and water off the bottom of the car before putting it in the garage?

avatar
DV Adam
Mar 11, at 3:49pm

What did you do to finish the edge near the over-head door and how much weight can it support? I have an old 1960 Chevy that I keep in my garage, will it support it? Thanks great project!

avatar
Larry C
Mar 11, at 3:35pm

Hey Ron,

I would still need to park my car in my garage, can this product withstand a car sitting in the same place for years.  Also, I live in Wisconsin - How would the rolled out product hold up to salt dripping off the car?  Love your tips - Please keep sending them!  Ray

avatar
Ray Bigelow
Mar 11, at 2:58pm

The project materials are available at Home Depot.

avatar
Papa
Mar 11, at 12:00pm

Great look and doable.  My question is, how did you finish the edge where the garage door comes down to prevent damage to the new floor?  Noticed it looked a little “raw” in the video. Love all your handy advice and videos.

avatar
Kate4301
Mar 11, at 11:57am

Really a nice floor system. I noticed you had to deal with leveling issues while installing the subfloor panels. Just curious, how much leveling did you have to do over the whole garage floor, and how many of those adjuster add-ons did you use to flatten the flooring?
I have seen these panel systems at both Home Depot & Menards.
Thanks, Ron.

avatar
Donald S. Cooling
Mar 11, at 11:37am

Great job. How long does a job like that take?

avatar
Carol
Mar 11, at 9:25am

Hi. Very nice job ,, and plenty of help for me , for the future ... Thank you .  Great job .... Claude .

avatar
Claude Godmaire
Jan 24, at 4:09pm

My husband is a mechanic and his shop has a totally cement floor.  His brother, however, has a shop that was insulated PRIOR to pouring cement and is about 99% warmer!!  Is there any way to insulate my hubby’s floor without tearing up the current floor???  The product, if any, would need to be able to handle: oil, tools, etc. for wearing, etc.

Thanks,
Teresa

avatar
Teresa Hauf
Dec 6, at 8:06pm

I liked the insulated floor you put in your shop!!!  I would like to know where to purchase, as my floor is not level, any info will be appreciated.  Thanks

Darrell Boswell

avatar
Darrell Boswell
Sep 16, at 8:04pm

I am reraaly interested in the leveling, insuktatin, subfloor Ron installed on hos cement garage floor.  I want to use this on my den and dpwnstairs bedroom floor which are on a cement slab.  2 questions:
1.  What is the name of this product so I can but it.
2. How thick is this product?

Thank you. 

avatar
Kathy O'Donnell
Sep 4, at 9:40pm

Submit A Comment

If you have a comment, question, or suggestion about this project, submit it here.

All Fields Are Required

Please enter the word you see in the image below: