RON HAZELTON:
San Francisco is the city of contrasts. In addition to its modern skyline, it's home to thousands of ornate Victorian homes that have survived earthquakes, fires and America's constant push to bulldoze its past. Today's HouseCall takes me to the nearby oceanfront suburb of Pacifica.
I'm headed to this 45 year old ranch house. Home to three year old Jeremy Chang Yu and his parents, Jason and Grace. Grace, a university sociologist and Jason, a statistician, are first time homeowners. While they may be short on experience, they're long on enthusiasm and eager to bring some style to their home, starting with this fireplace. I'm here to help.
Ah, this is the fireplace huh?
GRACE:
Yes, it is the fireplace, yeah.
RON HAZELTON:
That's the first thing you see when you walk in.
GRACE:
It is.
RON HAZELTON:
Talk about a focal point.
GRACE:
Exactly.
RON HAZELTON:
Well this is like brick that's been painted, huh?
GRACE:
Right, right.
RON HAZELTON:
So this will be really, your first do it yourself project.
GRACE:
Yeah, it will be.
RON HAZELTON:
And what did you, what were you thinking?
GRACE:
We were thinking a mantel so we could put pictures up.
RON HAZELTON:
Okay.
GRACE:
Maybe some nice colorful tile to cover the brick. It's just really trashy at the moment.
RON HAZELTON:
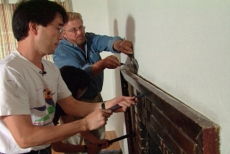
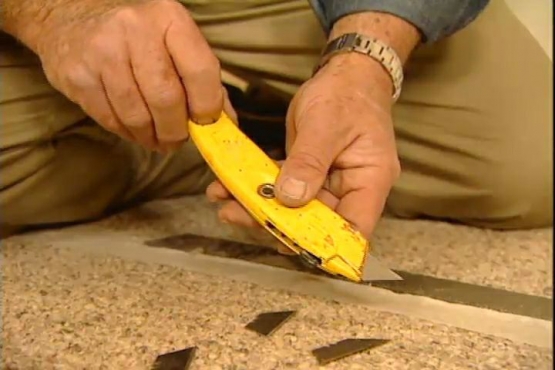
We're going to be kicking up some dust today, so we clear the room and then lay down some floor protection. Our next step is to remove the wood trim around the fireplace. Grace and Jason use utility knives to cut through any paint and caulk at the edges.
So here's what we're going to do guys. This is our pry bar. I want you to come in here like this, okay.
GRACE:
Okay.
RON HAZELTON:
We're going to tap this in. Grace, now push down on that.
We remove the trim with pry bars. I insert a wide putty knife between the pry bar and the wall to keep from damaging the plaster.
Well it's time to prepare this brick right now. We've got this paint on here, we've got a lot of soot up here. I want to remove the loose paint and kind of roughen the surface up a little bit so that the mortar we're going to put on later, will have a way of sticking, all right.
And to do that, we're going to use this tool. This is a grinder that's outfitted with a brush.
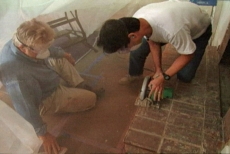
Grace and Jason rough up the brick and use a vacuum to catch some of the dust. Next problem I want to deal with is this overhang right here. We want to remove this, because for tile, this would just make it way too complicated and actually not that attractive.
We cut the brick with a circular saw, equipped with a diamond blade, used for cutting stone or concrete. This time, however, the vacuum can't quite catch all the dust, so it's time to get creative.
Now that dust was just way too much for the house. So what we've done is, we've kind of made a tent over here, but then this is like a tunnel see, and right at the end over here, we've got the fan. The fan is turned out, turned outward so it's blowing air out that way.
My theory is that it will - as we cut, it will suck air down the chimney and take the dust and carry it right down the tunnel here and out the door.
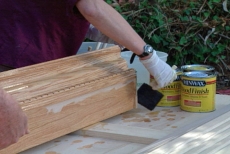
Jason and I have resumed cutting and I've got to say, my solution is a bona fide success. Inside the tent though, it's still dusty. So as soon as Jason and I finish, we're going to move outside not only for a breath of fresh air, but to begin staining our mantel.
This is called a natural stain. It's not going to put very much color in here, it's just going to bring a little bit more of the natural colors of the wood out.
Jason and Grace apply the stain with foam brushes, working from the top to the bottom of each piece. Once we've coated each piece with stain, we wipe off all the excess on the surface. Leaving our stain to dry, we move back inside to determine the layout of our tiles.
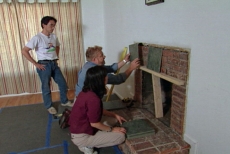
First, we locate and mark the center of the firebox. Next, we use a couple of two by fours to create a temporary ledge that will support the vertical tiles while the mortar which I'll apply shortly, dries.
Let's say we decided to put the first tile right on that line, when we got over here, we're going o be putting in a very narrow piece of tile. I'm not too crazy about that. But when we center the joint formed by the first two tiles directly on the center line, we end up with nearly full tiles on each end.
Now we are going to have to cut these down but my vote would be for a layout more like this.
GRACE:
Yeah.
RON HAZELTON:
Jason, what do you think?
JASON:
I vote for this one.
RON HAZELTON:
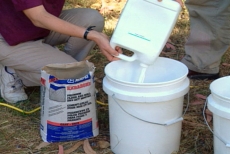
Next, it's back outside for one of my favorite parts of tiling. The mixing of the thin set.
GRACE:
Okay, great.
RON HAZELTON:
This is the mortar that we're going to use to attach the tiles to the surface of the brick.
GRACE:
Okay.
RON HAZELTON:
Instead of water, we use an acrylic additive with the thin set which will make the mortar bond a lot stronger.
[ ? ] a mixture on the end of the drill right here.
GRACE:
Okay.
RON HAZELTON:
All right Jason, if you could pick up the mortar and start to pour some of that in there.
JASON:
Slowly?
RON HAZELTON:
Kind of slowly. Is that [ ? ] slowly?
[LAUGHTER]
You want to move it up and down a little bit.
JASON:
Oh okay.
GRACE:
It's mixing like dough or something.
RON HAZELTON:
Yes, like pancake batter.
GRACE:
Exactly like pancake batter.
RON HAZELTON:
We make milkshakes in this. Any time we're mixing up mortar, we have to do what's called letting it, letting it slake which means just rest in the chemicals and kind of combine, or water combines with the materials in here. While it slakes, we slack.
Well, slaking only takes ten minutes. So our break is short.
Some of our thin set - what a nice job you guys - look at that, isn't that beautiful?
GRACE:
Yeah.
RON HAZELTON:
And we're just going to fill up using a margin trowel, we're just going to fill up the, the joints here -
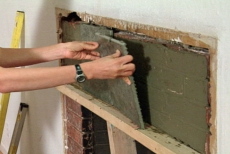
We fill the joints in one section of the fireplace at a time. Next, we apply mortar to the back of each tile. Then use a notched trowel to create these ridges which insure that the mortar is uniformly thick over the entire back of the tile.
Now with the first full tiles in place, we're ready for some tile cutting. Now there's more than one way to cut a tile.
[MUSIC]
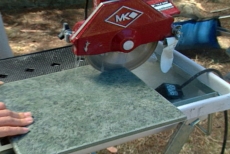
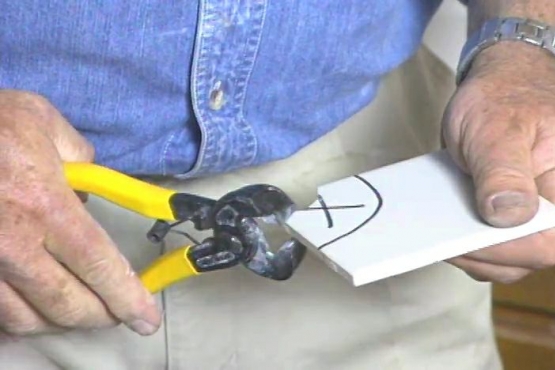
You know, just about any tiling job that you take on is going to require that you cut some tiles. For small tiles, you might try a hand held scoring cutter. Place the cutting wheel on the edge of the tile where you want to start the cut, push down with your opposite hand and move it across the tile.
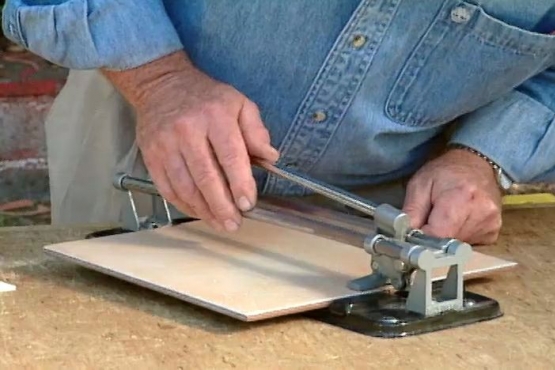
Once you've done that, grip the tile like this, these two ears are going to apply pressure on either side of the cut, squeeze and there you have it. For larger ceramic tile like these, a bench top scoring cutter would be a good choice.
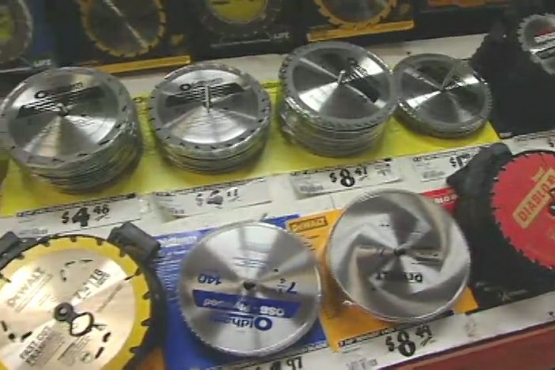
The principle is the same. There you go, nice clean cut. Now, for thicker, larger tiles like this one or for porcelain tiles, the only way to really cut these well is with a tile saw. This is a circular saw with a pump that flows water over the wheel, keeping it cool as it cuts, has a sliding platform right here and if you've got much tile to cut, this is the way to do it. You don't want to buy one of these, you can rent them from 30 to 45 dollars a day. But any way you slice it, there's a way to cut tile that will fit your budget.
Grace cuts the tiles that will go on the ends of our top row. Then back inside, Jason applies the mortar and sets the tiles in place. We insert these plastic joint spacers between each tile. They'll help us keep our grout line a consistent width.
We're on a roll now, so we move on to the rest of the fireplace. The mortar needs to dry overnight. So once we've set the rest of the tiles, we'll call it a day and pick it up tomorrow. Coming up, our fireplace gets grout and a top coat as our makeover continues.
Now we're about to add a protective finish coat to the mantelpiece.
Now this is a polyurethane. If you look in here, you see, look down in the can right here, you see how it's kind of a golden color. It's going to impart a little bit of color to this just because of the color of the finish.
We apply the finish coat in the same manner we applied the stain. While it dries, we move on to our next step, filling the tile joints with grout. Grout is another form of cement or - or mortar.
GRACE:
Okay.
RON HAZELTON:
This comes in colors. I've got gray right here, you see which I think is going to look pretty nice with that dark green. Is that all right with you?
GRACE:
Oh yes. Really [ ? ].
RON HAZELTON:
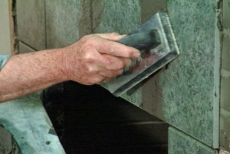
We're careful to mix the grout consistently. We want to avoid starting and stopping and over mixing it. Just enough mixing to get things thoroughly blended and smooth.
Grout is ready. This is a grout float. It's sponge rubber. Okay, can have a white rubber bottom on it. And we're going to use this two ways. We're going to get some of this material on here like this. And we're going to actually push, use the grout to push this into the joints like this.
GRACE:
Oh, neat.
RON HAZELTON:
Once we get the joint filled up, we're going to come back and tip this up on edge and kind of break off the excess. And we're going to do it on a, sort of a diagonal [ ? ].
After filling the joints, we wipe the excess grout from the face of the tile with grout sponges. We wring most of the water out and use light pressure. Being careful not to pull grout out of the joint. Okay, now for the fun part.
GRACE:
Yeah.
RON HAZELTON:
Go ahead, put the legs up there.
GRACE:
Okay.
RON HAZELTON:
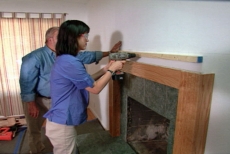
Put the bottom of the leg right up next to the tile and then push it up next to the wall, right. Now Grace, I'm going to come in here -and we want to see if this is plumb or vertical. Once we're plumb, Grace draws a line along the outside of the mantel leg. Jason does the same on his side.
All right guys, now you notice that, right here, this is three quarters of an inch thick. So we're going to draw a line parallel to this one three quarters of an inch inside of this, all right. Now this is called a cleat. It's a piece of two by two but it's going to serve as a cleat.
It's that mark that I put, three quarters of an inch inside. That's where I want you to put the edge of your board on that.
GRACE:
Okay.
RON HAZELTON:
We drill a couple of clearance holes through each cleat, then drive in screws to secure them in place. So we're going to put the, the leg right here over the cleat and you see how it's open on the inside. And I'll get this in position.
And then what I'd like you to do is put about four nails, about an inch or so out from the = from the wall there.
With the two legs in place, I carefully squeeze some construction adhesive along the inner ledge of each one. The adhesive will secure the mantel skirt which we'll drop in place next. All right, now here is the mantel cap. So we're going to just set this right up on top. It should drop right on there.
GRACE:
It's great.
RON HAZELTON:
Yeah, is it in position?
GRACE:
Yeah. Pretty.
RON HAZELTON:
Okay. Now hold it there for just one second.
GRACE:
Okay.
RON HAZELTON:
I'm going to take this pencil and draw a line around down here.
We'll attach the mantel cap in much the same way we did the legs. First we screw a cleat into the wall studs, add some adhesive, and then nail the mantel cap to the cleat with finish nails. Next, we nail the mantel feet into place.
And after adding a few accessories, our makeover is complete. I could definitely sit down in front of this fireplace and enjoy myself.
GRACE:
Oh yeah. We could too. It's, it's transformed and we were part of the transformation. And that's the amazing thing because I never thought we could be part of something like this. I always thought, you know, you have to hire out, but we did it. We did it on our own. And that's kind of the amazing thing.
RON HAZELTON:
Well a fireplace can't help but be the focal point of almost any room. And if it's an eyesore like this one used to be, it can bring the whole room down. But with the right tools and a little bit of knowhow, a fireplace makeover can make home and hearth feel warm and cozy.