Ron:
Now when Annie, a neighbor of mine over in Wilton, CT, called me the other day about improving the energy in her kitchen, I figured she was planning on upgrading her electrical service. It turns out that she was planning to install a new granite countertop, now granite’s never seemed very energetic to me, it sort of just lies there. Annie, a Feng Shui practitioner, sees granite with a whole different vibration.
[Door bell]
Annie:
Come in.
Ron:
Hey.
Annie:
Hey Ron.
Ron:
How are you?
Annie:
Fine thank you. Welcome to my house. My name is Elsebeth Ann Byer.
Ron:
Elsebeth Ann, do people call you that?
Annie:
Yes they do, Elsebeth or Annie.
Ron:
Can I use Annie?
Annie:
Absolutely.
Ron:
I noticed you were down here, what is this?
Annie:
This is the alter in the Thai Chi of my house, in the art of Feng Shui which is the art of managing energy and space. This should be the most peaceful of all the areas of the house. And I happen to have a lot of chaos in my kitchen which is why I have you here today.
Ron:
Alright. Well let’s sort out your circus, let’s take a look.
Annie:
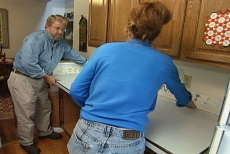
Alright. So Ron this is my kitchen.
Ron:
Do you spend a lot of time in here?
Annie:
Well not as much as you’d think?
Ron:
Are you a gourmet cook?
Annie:
No I’m not.
Ron:
But you hate this countertop?
Annie:
I really, ever since I bought this place, I’ve disliked this counter.
Ron:
Now as a Feng Shui specialist, tell me about this.
Annie:
Well there’s 3 main rules in Feng Shui, there’s many rules, but this rule that you don’t like something, or that it’s broken or that you haven’t used it, is part of the choice of changing to granite.
Ron:
Well obviously you’ve used it, you’ve got to have it, so you dislike it? Is it broken?
Annie:
Yes I have, but I, I dislike it. It’s broken over here.
Ron:
Where?
Annie:
Over here, and I tried to fix it, and you can see I can pull it apart completely.
Ron:
I like the little nail down here though, that was good.
Annie:
Yeah that was my doing.
Ron:
You know what, if you can live with this, I think I can probably repair this.
Annie:
No way.
Ron:
So the overriding thing here is that you hate it.
Annie:
That’s right. That’s right.
Ron:
So is there anything else about the granite, about stone, the reason that you prefer it?
Annie:
Yes, the reason I, yes, the durability and the beauty factor of granite, and in Feng Shui, this section of my home has to do with fame and reputation, which is governed by the element of fire, which produces earth, and granite is obviously a symbol of earth. So that was a part of the decision that I made.
Ron:
Is it that you want fame and reputation, or that you’re protecting fame and reputation?
Annie:
We all need to have a good reputation in the way that the community views us. It’s not just fame in being famous.
Ron:
Well no wonder I gravitated to my new kitchen, it happened to come with granite in it. Well listen, I’ll tell you what. You up for a little sort of like a shopping trip?
Annie:
Yes I am.
Ron:
Kind of just go, let’s go some place that’s got a bunch of granite, and we can both look at it. Let’s see what, what tugs at us. Okay.
[Music]
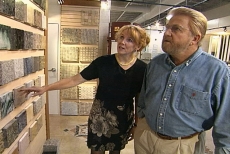
Ron:
Wow it’s like a rainbow of color.
Annie:
Isn’t it beautiful?
Ron:
What uh, what tweaks your fancy here?
Annie:
This is a very difficult decision when you look at all this variety.
Ron:
It takes a while, but Annie finally settles on a sample that’s her cup of tea.
Annie:
I also wanted to have a little bit of red into the, uh, stone…
Ron:
Like this, this is really red.
Annie:
Blue with a little bit of red in it, which would be this one.
Ron:
Oh that’s interesting.
Annie:
And it also has white…
Ron:
Jubenero Indigo. Wonder what these uh, what these, the price range is on these.
Annie:
I have no idea, I’m sure I picked the most expensive ones.
Ron:
Hi.
Salesperson:
Hi.
Ron:
How are you? Ron this is Annie.
Robert:
Robert nice to meet you.
Annie:
Robert nice to meet you.
Robert:
How are you today?
Annie:
Great thank you.
Ron:
We were just wondering about some things, prices to begin with.
Ron:
Robert answers our questions, then addresses Annie’s concern. Making such a big decision from such a small sample.
Robert:
Yes that’s a very good point. Actually we tell customers that small sample doesn’t tell the truth, that’s why we go to the slide yard, and take a look at a large piece uh, slab itself, and uh, then make a decision. This is the indigo, we can take this with us.
Ron:
I say let’s go to the slab yard. Wow look at this.
Annie:
Incredible.
Ron:
How much do these weigh?
Robert:
About 600, 700 pounds, it depends on the size of the slab.
Ron:
And where’s our slab there?
Robert:
This is indigo, it’s, I assume it’s right here. This is the, uh, the sample, do you see?
Ron:
What do you think Annie?
Annie:
Oh it’s much more beautiful in person.
Ron:
So you want to go with that?
Annie:
I think that’s perfect, what happens next?
Robert:
Um, we need to take a template, and once we take a template, we bring that here, and we can cut your stone, we can make your countertop.
Annie:
Fantastic.
Ron:
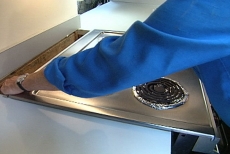
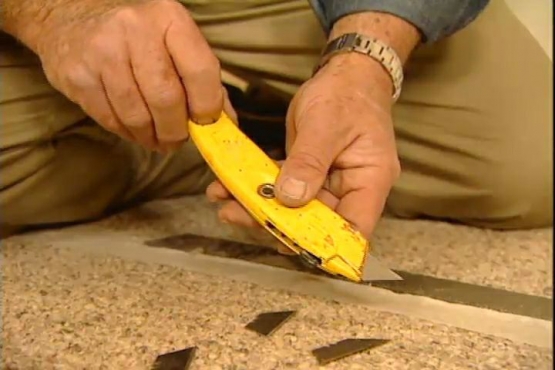
Annie’s stone is pulled, prepped, and poised for cutting. A few days later, a technician arrives at her home, to make a template. The template is made by laying thin strips of glue on plywood along the edges of the existing countertop. This process reduces measuring areas, accurately reproduces angles, and shows the sink location. The individual strips are then glued together with a hot metal adhesive, forming a rigid pattern, that can be lifted off in one piece. Finally notations about edge profiles and sink style are written on the face of the template.
Technician:
Now you, on the backside here as well you want to do the same measurements you’re getting?
Annie:
Yes I do.
Ron:
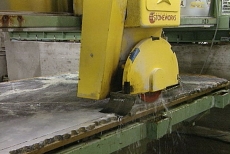
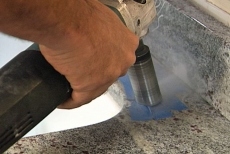
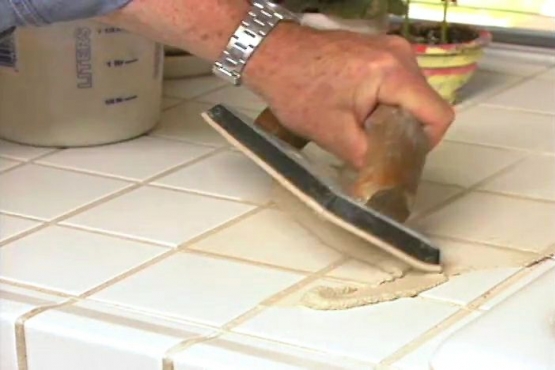
The template is brought back to the fabrication plant, laid on the slab, and traced. A laser sided saw then cuts along the outline. The saw is equipped with a diamond blade that’s water cooled to prevent the granite from chipping or cracking. Finally the stone workers use hand held grinding and polishing tools to form the decorative edge that Annie wants on her countertop. Well the stone cutters have done their job, but the new countertop can’t go in, until the old one comes out. And that’s our job.
Ron:
We start down under by disconnecting the old sink plumbing, then move up to the sink itself.
Ron:
So we’ve got to take this out, this is kind of glued in, so this is what I want you to do. Just take the putty knife, and just work it around here. Oh hey, hey, we’re making progress.
Annie:
Hey, I’m having a sinking spell.
Ron:
A thinking spell?
Annie:
A sinking spell.
Ron:
This is getting just a corner, just get it under, okay that’s it, is it coming up?
Annie:
Yep.
Ron:
Alright can you get your fingers under there?
Annie:
Yep.
Ron:
Okay I’m gonna come straight up, and bye, bye sink.
Annie:
Strong like bull.
Ron:
Next it’s on to the back splash.
Annie:
Splish, splash I fell in the bath.
Ron:
Not a splish splash, a back splash.
Annie:
Got it.
Ron:
Now we’ve got to take it off. Do you know how it’s put on there?
Annie:
No, glue probably?
Ron:
Glue. Right, glue. So here’s the, the 2 things I’m concerned about in getting this off, I don’t want to damage the wall, the paint up here by pulling something away, and I don’t want to put a hole in the wall as I pry this off, so I thought you might appreciate that.
Annie:
Thank you.
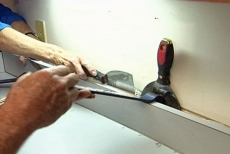
Ron:
Annie uses a utility knife to cut through a bead of caulk, then I have her tap a wide putty knife in behind the back splash.
Ron:
What I’m going to try to do is put a pry bar behind here, and the reason I put the putty knife there, is so that when we lift with the pry bar I don’t punch a hole hopefully through your wall.
Ron:
The putty knife gives us a solid surface to pry against, and it does in fact protect the wall from any damage.
Annie:
Hey, well.
Ron:
Okay Annie. Like most laminate countertops, this is held down with a few screws. Screwed up from the bottom. But only about 3 for the whole countertop, so it seems like this is also glued on here. So we’re gonna kind of do the same thing that we just did, so if you want to grab your putty knife again. Go ahead.
Ron:
It turns out it isn’t glue at all, but instead, more screws that we just couldn’t see. One of them is being particularly stubborn.
Ron:
You notice they never put these where they’re easy to reach. Oh man.
Annie:
Well somebody had to put it in.
Ron:
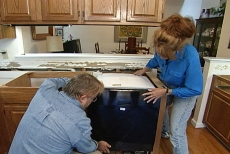
There we go. Success at last. Next we pull out the range. The dishwasher is coming out too, so we can reach the screws that are holding down this section of the countertop.
Ron:
Okay hold on one second let me just give you a hand here. Now obviously I’ve gone ahead and disconnected the electrical and the plumbing on this. What I’d kind of like to do is, we can tip this back down a little bit.
Annie:
My hand is back there.
Ron:
Oh, oh sorry. Oh ow. Darn. No I’m just kidding. Tit for tat there right. You’re a vengeful person.
Annie:
That’s right.
Ron:
Here we go, let’s take it outside. Finally the last of the old countertop makes it’s departure. Now if you can just swing your end out this way. And a new dishwasher nestles into place. At last we’re ready for the new arrival.
Annie:
He’s standing there holding it. I know it’s heavy.
Ron:
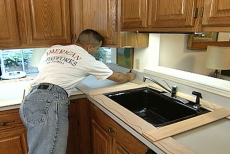
Now bringing a piece of granite countertop is no easy feat. These babies weigh in at about 600 pounds. Once the slab is in place, it takes a team of skilled craftsmen to do the final trimming and fitting. The new sink will mount underneath the new countertop, and is clamped in place until it can be permanently attached. Holes are drilled for the faucet and soap dispenser. The back splash is slipped into place. And what began as a massive slab in the yard, has been transformed into a stunning countertop in Annie’s kitchen
Annie:
This is magnificent.
Ron:
It’s gorgeous. It’s gorgeous. You know I like granite, I haven’t been in love with it, but now I’m beginning to see how beautiful this can be with the colors. This is just stunning.
Annie:
It’s amazing how it picked up the colors of the blue, that I wanted it to, and how it brings out the cabinets because of the little bit of red that’s in the counter.
Ron:
Well you got a new visitor here, who is this?
Annie:
I do, this is Quan Yen.
Ron:
And she represents?
Annie:
Well to me she represents peace and tranquility and, which is really what I wanted to accomplish in the center of my home, which is my kitchen.
Ron:
And we did that?
Annie:
We did that.
Ron:
Alright.
Annie:
We did it with great style, and great peace, thank you so much for coming.
Ron:
You’re welcome let’s take a nap.